
(File – Data Import Menu)
All the data import screens are located on the Data Import menu. All screens use the same data import utility, which works as follows:
Import Process
The import process goes like this.
| • | For each table to be imported, you export the data from your old system. You either export the data directly into an Excel spreadsheet or you take your export file and convert it into an Excel spreadsheet. |
| • | You then edit your Excel spreadsheet so that the data conform to the requirements of the DBA system. |
| • | Once your spreadsheet is finalized, you map each of its columns to its corresponding field in DBA and then you import the data in a single batch transaction. |
The specific steps in the data import process are detailed in the next three sections.
Phase 1 – Export Data into Excel
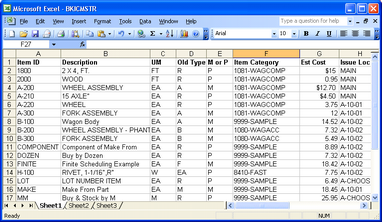
Most accounting systems include a data export utility that will enable you to export some or all of the master tables listed at the beginning of this chapter.
Excel - Special Warning Regarding Leading Zeroes in your Reference IDs
Excel will automatically drop leading zeros from a Reference ID in a spreadsheet data column. This can lead to an "unable to find value" error during data import. If you encounter this issue, you may consider using the Open Office spreadsheet tool. The Open Office spreadsheet .csv format will not auto-format your data.
Export directly into Excel, if you can
If your data export utility can create an export file directly in Excel format, do so.
If you cannot export directly into an Excel spreadsheet, we recommend that you export into a comma delimited text file format that you can then import into an Excel spreadsheet.
Importing a text file into Excel
If you need to import a comma delimited text file into Excel, do so as follows:
| • | Open a new Excel spreadsheet. |
| • | Click Data – Import External Data – Import Data. |
| • | Select your comma delimited text file. |
| • | Specify Delimited as the file type and click Next. |
| • | On the next screen, select Comma as the Delimiter and click Next. |
| • | Verify the settings on the next screen and click Finish. |
| • | Click OK on the final screen. Your data should now be visible and organized into columns on your spreadsheet. |
| • | Click File – Save As and save your spreadsheets as a *.csv file type. |
Phase 2 – Edit Spreadsheet
In this second phase you will edit your spreadsheet so that it conforms to the requirements of the DBA system.
Step 1 – Assign Column Headings
Identify each of your spreadsheet columns as to its contents and give it a column heading in row one that matches or approximates the column names specified for each DBA import table.
Step 2 – Delete Non-Matching Columns
Delete any columns in your spreadsheet that do not have a matching field in DBA.
Step 3 – Edit Columns as Required
Review each column for any editing that may be required and alter your data accordingly. For example, you may have Y/N (yes/No) values in a column that need to be converted into T/F (True/False) values in DBA. You can use search and replace to convert such values to the DBA format.
As another example, if your old system uses codes to represent customers and suppliers, you will want to convert these codes to full names in your spreadsheet to take advantage of DBA’s 50-character identification format.
Some columns must contain matching values with supporting tables in DBA that might not have existed in your old system or might have gone by different code names. In such cases, you must enter or change such values to match the supporting table values in DBA.
All such editing considerations are documented later in this chapter for each import table.
Editing Tools
The following tools are available within Excel that can help you edit your export data to conform to DBA’s requirements. Click Help within Excel for detailed instructions.
Find & Replace
You can highlight a column and then use the Find & Replace function to mass change a value. For example, if you need to convert all the ‘Y’ (yes) values in a column to ‘T’ (true), this function can find all ‘Y’ values and replace them with ‘T’ values.
Move Columns
You can use Cut and Paste to move columns to any desired left-to-right order. This can be useful if you choose to structure your spreadsheet in the same column order as the import specifications.
Split Columns
You can use the Text to Columns function to split the data within a single column into multiple columns. For example, your old system may store the city, state, and postal code for an address within a single field. The Text to Columns function can split these values out by comma and/or space separators into separate columns, as required by DBA. After the split is done, some manual editing is usually required to make sure all the text was split correctly.
NOTE: When you split a column, always temporarily move it to the far right position in your spreadsheet so that the new columns that get created do not overwrite any other columns.
Merge Columns
You can merge data from two columns into one column by creating a third column and populating that column with a merge formula, such as:
=(A7&” “&B7)
For example, your old system may store a contact name in two fields, one for the first name and one for the last name. In DBA, the contact name is a single field. Using a merge formula, you can combine the contents of two columns into a single column.
Phase 3 – Import Data
The final step is to import the data. The import process involves four screens that are presented in succession by clicking the Next button.
Screen 1 – Introduction
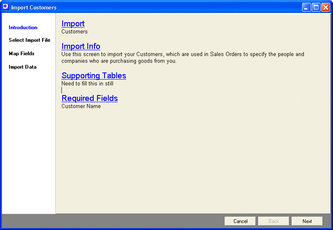
This first screen provides information notes on each particular import, a list of supporting tables that should be populated prior to running the import, and a listing of required fields.
Screen 2 – Select Import File
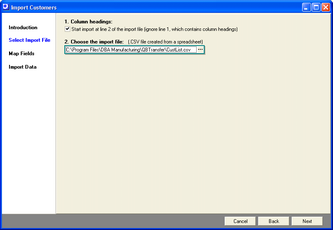
1. Column headings
This checkbox is selected by default and tells the program to skip row one of the spreadsheet because it contains column headings.
2. Choose the import file
Click the button in this field to navigate to your *.csv spreadsheet file.
Screen 3 – Map Fields
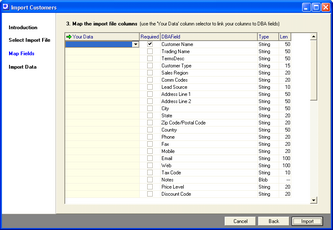
On this screen you will map each DBA field, where applicable, to the corresponding column on your spreadsheet. Field explanations are as follows:
Your Data
Click the down arrow and select the column heading from your spreadsheet that matches the DBA field.
Required
This checkbox is selected when the field is required, which means all rows in your spreadsheet must have a value. Mapping is optional with non-required fields.
DBA Field
This is the descriptive name of the field in DBA.
Type
This indicates the field type, such as ‘Blob’ (freeform text), ‘Boolean’ (true/false), ‘Float’ (floating decimal), and ‘String’ (alphanumeric).
Length
This indicates the field length, when applicable.
Screen 4 – Import Data
When you are done with your mapping, click the Import button. The program will attempt to import your data. If any errors are found, the data will not be imported and a list of errors is presented on the screen.
