(Inventory – Stock Items - List Tab)

Screen Details
Upper Panel
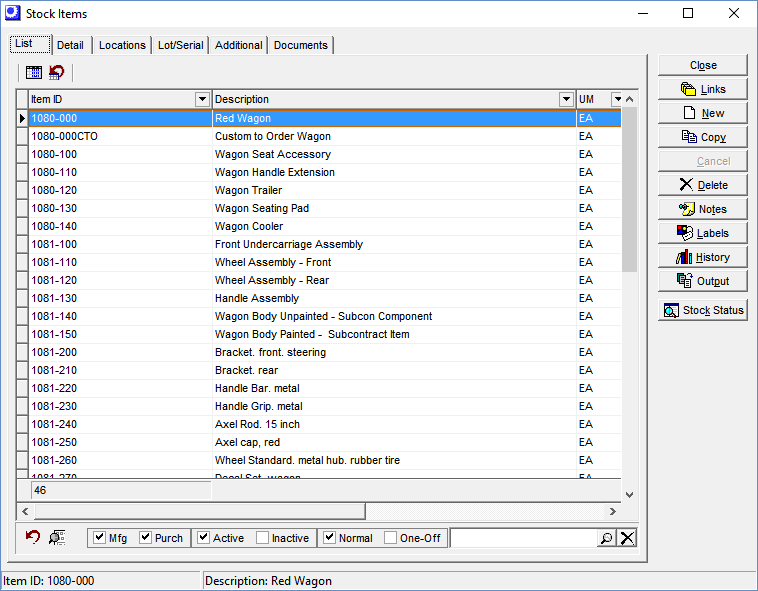
Customize Grid
Click this button to customize the grid. In the Customize Grid screen you can select the fields to be visible and their sort order.
NOTE: Customized settings are saved at the user level and are not applied system-wide.
Reset Grid Customizations
Click this button to clear your grid customizations.
Lower Panel
This panel is located along the bottom of the screen and is used to filter the contents of the list.
Magnifying Glass Icon (Lookup)
Click this icon to launch a lookup screen that enables you to filter the opening list a variety of ways.

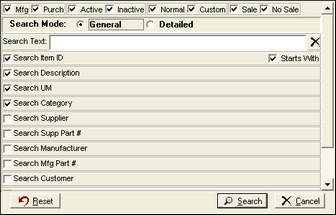
Top Row
The filter checkboxes located in the lower panel of the List tab are repeated here in the top row (Mfg, Purch, Active, Inactive, Normal, One-Off). See further below for field explanations. Two additional filter checkboxes are provided:
Sale
Select or clear this checkbox to include or exclude all items that have a base price.
No Sale
Select or clear this checkbox to include or exclude all items that do not have a base price.
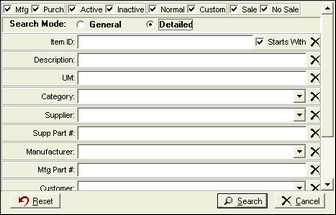
Search Mode
Two radio button options are offered:
General
In this mode you can enter Search Text in the next field and then you can select checkboxes against whichever fields or sub-tables listed below that you want included in the search. This mode is called “General” because it is a general search where each checkbox selected expands the list of potential matches. Think of this mode as an “or” type condition, such as “I want to search the Item ID or the Supp Part # or the Mfg Part #.” You would use this mode when you are not sure which field or table the text string is stored in.
Search Text
Enter the text string to be searched in this field. A text string can be any combination of alpha characters, numbers, punctuation marks, or spaces.
Search Item ID – Starts With
If your Search Text value is the beginning portion of an Item ID, select this field to make the search significantly faster.
Detailed
In this mode you can enter a text string or select a value from a lookup in one or more of the fields listed below to narrow your search. Think of this mode as an “and” type condition, such as “I want to search for an item with “red” in the description and it is supplied by ACME Paint supplies.” You would use this mode when you are sure which field or table your text string or value is stored in.

Item ID – Starts With
If the text string entered in this field is the beginning portion of an Item ID, select this field to make the search significantly faster.
Reset Button
Each time you access this screen, the settings are retained from the previous time you were in this screen. Click this button to clear your previous settings and restore the default selections.
Search Button
Once your entries and selections are completed, click this button to initiate the search. When the search is completed, the opening List will be limited to stock items that match your search criteria.
Mfg
Select this checkbox if you wish to include ‘M’ (manufactured) items in the list.
Purch
Select this checkbox if you wish to include ‘P’ (purchased) items in the list.
Active
Select this checkbox if you wish to include items with a Status of ‘Active’ in the list.
Inactive
Select this checkbox if you wish to include items with a Status of ‘Inactive’ in the list.
Normal
Select this checkbox if you wish to include items that are not Custom (see next) in the list.
One-Off
Select this checkbox if you wish to include “one-off” items in the list. One-off items are generated during sales order entry by the One-Off Item Generator and are used for one-time manufactured items, repair jobs, and project jobs.
Search Field
You can enter a text string in this field and click the magnifying glass button to limit the list to columns containing that text string.
Buttons
Links
Click this button to link to the following screens, within which this item is selected:
Bills of Material
Where Used
Base Prices
New
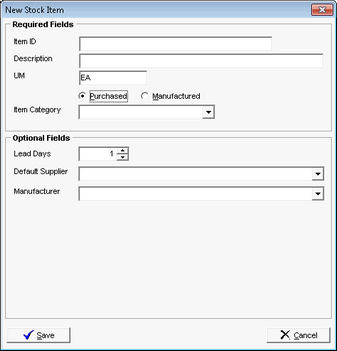
Click this button to launch the New Stock Item screen, which is used to create new stock item records.
New Stock Item Screen

Required Fields
Item ID
Enter an up to 30-character alphanumeric code to identify the item.
Description
Enter an up to 60-character description of the item.
UM
This defaults to the UM specified in the Inventory Defaults screen. Enter an up to 8-character stocking unit of measure (such as EA, LB, KILO, FT, MTR, GAL, etc.).
Purchased or Manufactured
This defaults to the setting specified in the Inventory Defaults screen. Indicate whether the item is purchased or manufactured by selecting the appropriate radio button.
Item Category
Select an item category from the lookup.
Optional Fields – Purchased
Lead Days
Enter the number of days allocated by MRP for procuring the item from the default supplier.
Default Supplier
Select a default supplier from the lookup.
Manufacturer
If this item must be sourced from a particular manufacturer, select the manufacturer from the lookup.
Mfgr Part No
This field is only visible when a Manufacturer is selected. Enter the manufacturer’s part number for cross-reference on purchase orders.
Optional Fields – Manufactured
Lead Days
When the Use Lead Days Generator option is selected in MRP Defaults, which is recommended, this field is grayed out because it is automatically updated without user intervention. If not selected, enter the number of days allocated by MRP for making or procuring to-order components prior to starting jobs for this item.
Job Days
Enter the number of shop days allocated by MRP for making the item’s typical larger size job quantity.
CTO
Select this checkbox against items that are customized for each job such that the finished item cannot be sold to other customers. Jobs for CTO (custom to order) items are generated by MRP directly from sales order lines in the exact quantity ordered.
Copy
Click this button to copy the selected item’s settings to a new item ID. First you are prompted to enter a new item ID and then, in the case of P items, you are asked if you wish to copy the item’s estimated cost.
Notes
Click this button to get a listing of past Activity Notes for this item. From this screen you can also create new Activity Notes.
Labels
Click this button to launch the Stock Item Labels screen, from which you can print item labels for this item for product identification or packaging purposes.
History
Clicking this button provides a listing of the highlighted item’s inventory transactions, including the transaction type, the location, and the cost.
Output
Click this button to output the grid contents to an Excel file, HTML file, CSV file, or to the printer.
Stock Status
Click this button to view this item’s complete stock status, including stock availability, projected stock, current supply and demand details, and MRP settings.
Link:

