
(Sales - Order Picking)
Use this screen to pick sales order line items for shipment.
Link:
 Training Guide - Order Picking
Use in combination with the Picking Manager
Use Order Picking in combination with the Picking Manager screen, which manage sales order picking by means of stock allocation. Each time the screen is launched a batch process is run against all items with sales demand that allocates stock on hand to sales order lines in ascending required date order. Color coded icons indicate which sales orders can be fully or partially picked for shipment. Sales orders can be selected one-by-one for picking via a link to the Order Picking screen.
Link:

Screen Details
Upper Panel
SO No
This field displays the sales order selected in the Picking Manager screen or it can be used to select an open sales order from the lookup.
SO Description, Status, Customer, Trading Name
These fields identify the sales order.
Allocation Status
The same stock allocation batch process used in the Picking Manager screen is applied to sales order lines in the Order Picking screen. For each item with sales demand, stock on hand is allocated to demand events in this hierarchy:
1.Stock is allocated first to Released status job components in planned Job Start date order.
2.Remaining stock is then allocated to sales orders in ascending line item Required Date order.
3.When sales order lines share the same Required Date, remaining stock is allocated in ascending SO No order.
This field displays the allocation results for this particular sales order with the following color coding:.
•Green color and "All" indicates that all lines with remaining quantities are fully allocated and the sales order is ready to be picked in full.
•Yellow color and "Partial" indicates some lines have an allocated quantity and the order can be partially picked.
•Red color and "None" indicates that none of the lines has allocated stock and the order should not be picked.
SO Stock Allocation Inquiry
You can click the search icon to view the SO Stock Allocation inquiry, which provides stock allocation details by line item and shows which items can be fully or partially picked for shipment.
Stock Allocation Inquiry
Against any item listed in the SO Stock Allocation inquiry, this drill-down inquiry shows the item’s stock on hand and the quantities allocated to each demand event. Stock on hand is allocated first to Released status job components in Job Start date order and then to sales order line items in earliest line item Required Date order.
Picking Tab
Buttons
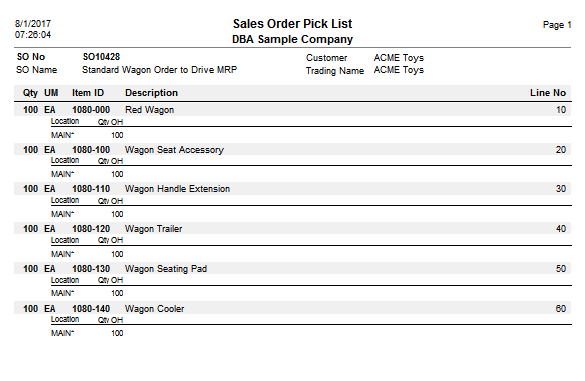
Pick List
Click this button to print a pick list. The pick list provides a listing of the stock items to be picked (descriptor line items are not included). After printing the pick list, you physically pick the order and indicate on the pick list the locations and characteristics associated with your transactions. You then return to this screen to record your transactions and update inventory. Before printing, you are presented with this selection screen:
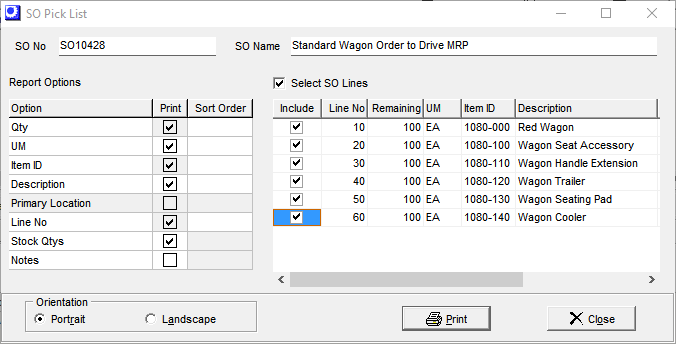
Report Options
Use the Print checkbox to select or de-select the fields you want included on the pick list. You can change the order by clicking into the Sort Order field on those cells in the grid that are not grayed out.
Stock Qtys (Recommended)
We recommend that you select this option, which lists available stock on hand by location and characteristic sets. This makes it much easier to find stock and to indicate from which location stock was picked and what characteristics were used.
Orientation
You can select the Portrait or Landscape option to achieve a vertical or horizontal style printing layout.
Select SO Lines
Select this option if you wish to limit the pick list to selected line items. When you select this checkbox, a panel displays below within which you can select or de-select the Include checkbox to determine which lines get printed.
Print Button
After your selections are completed, click this button to print the pick list. Here is a sample:
Pre-Fill
Click this button to “pre-fill” the Picked Qty column in the grid against line items where a selection process is not required, which occurs under the following conditions:
| • | Stock is only on hand in one location. |
| • | Allocated stock is equal to or greater than the line item’s remaining quantity. |
| • | Stock on hand consists of only one set of characteristics (such as a single lot number). |
| • | The line item is a descriptor. |
Pre-filling from the primary location
You have the option of limiting pre-filling to each item’s Primary Location and ignoring stock on hand in secondary locations. To achieve this, go to the Inventory Defaults screen and in the When Stock Is in Multiple Locations panel, select the Pre-Fill from Primary Location option.
Update
After your entries are completed, click this button to perform the following processes:
| • | Each item’s stock on hand is reduced at the designated locations and for the selected characteristics. |
| • | Transactions are posted to the item history and sales order batch history tables. |
| • | The Act Qty is increased against each sales order line item. |
| • | The total inventory cost associated with each line item transaction is debited to your Picked Not Invoiced account and an offsetting credit is posted to your Inventory account. |
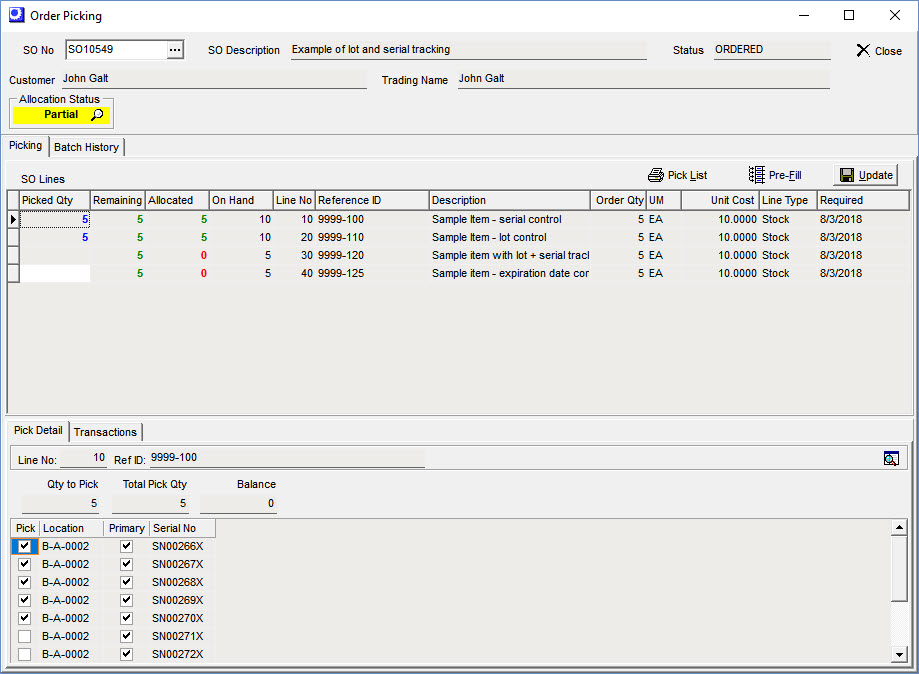
SO Lines
All of this sales order’s line items are displayed in the grid and are sorted Line No order.
Picked Qty
When this field is not grayed out, you can enter the picked quantity. When the field is grayed out, direct entry is prohibited and you must make entries in the Pick Detail tab below.
NOTE1: When the Picked Qty is equal to the Remaining quantity, this amount is displayed in bold blue text, which gives you a visual cue that this line item has been picked in full.
NOTE2: Negative stock on hand is not permitted. Therefore, you cannot enter a Picked Qty greater than the On Hand quantity.
NOTE3: Over-picking is not permitted. The Picked Qty cannot exceed the line item’s Remaining quantity. If you wish to pick and ship a greater quantity than the order Qty, you must go into the sales order and either increase the line item’s order Qty or add a new line for the excess quantity. You can then return to this screen and pick the additional quantity.
Direct Entry
The Picked Qty field is available for direct entry under these conditions:
| • | When stock on hand in the primary location is equal or greater than the line item’s Allocated quantity and the When Stock Is in Multiple Locations setting in the Inventory Defaults screen is set to the Pre-Fill from Primary Location option. |
| • | All stock on hand must have the same characteristics set. |
| • | The line item is a descriptor. |
Pick Detail Required
The field is grayed out under these conditions and entries must be made in the Pick Detail sub-tab:
| • | Stock is on hand in two or more locations and the When Stock Is in Multiple Locations setting in the Inventory Defaults screen is set to the Require Location Selection option. |
| • | Stock on hand consists of multiple characteristic sets. |
Remaining
This is the line item’s remaining quantity, which is its quantity picked to date subtracted from its Order Qty.
Allocated
This is the stock on hand allocated to this sales order line item, which takes into account demand from other sales order lines. The Allocated quantity is the suggested Picked Qty and is the quantity used by the Pre-Fill process.
NOTE: This amount is displayed in bold red text when it is less than the Remaining quantity. This gives you a visual cue that this line item cannot be picked in full.
How stock allocation works
The same stock allocation batch process used in the Picking Manager screen is applied to sales order lines in the Order Picking screen. For each item with sales demand, stock on hand is allocated to demand events in this hierarchy:
1.Stock is allocated first to Released status job components in planned Job Start date order.
2.Remaining stock is then allocated to sales orders in ascending line item Required Date order.
3.When sales order lines share the same Required Date, remaining stock is allocated in ascending SO No order.
On Hand
This is the total stock on hand among all locations.
NOTE1: This amount is displayed in bold red text when it is less than the Remaining quantity. This gives you a visual cue that this line item cannot be picked in full.
NOTE2: This field is left blank on descriptor line items.
Line No, Reference ID, Description
These fields identify the line item.
Order Qty, UM
This is the line item’s order quantity and unit of measure.
Unit Cost
This is the unit cost that will get applied to this picking transaction. In the case of a stock item, this is the item’s current Inventory Cost. In the case of a descriptor, this is its current Estimated Cost.
Line Type
‘Stock’ indicates that this line item is a stock item. ‘Descriptor’ indicates that this line item is a descriptor.
Required
This is the line item’s Required Date.
Pick Detail Sub-Tab
Upper Panel
Line No, Ref ID
These fields identify the line item highlighted in the SO Lines grid above.
Magnifying Glass Icon
Click this icon to launch the Stock Status inquiry screen for this stock item.
Qty to Pick
This is the quantity to be picked, which is equal to the line item’s Allocated quantity in the grid above.
Tot Pick Qty
This is the total Picked Qty in the grid below.
Balance
This is the Tot Pick Qty subtracted from the Qty to Pick, which is the balance remaining to be picked in order to pick this line item in full.
Grid Fields
Each line in the grid represents the stock on hand for each location and unique set of characteristic values.
Picked Qty
Enter the quantity to be picked against this location and set of characteristic values.
NOTE1: Negative stock on hand is not permitted. Therefore, you cannot enter a Picked Qty greater than the Stock Qty.
NOTE2: When the word ‘Transitory’ is displayed in red text, it indicates that this is a ‘Transitory’ location from which stock cannot be picked. Transitory locations are used for a temporary process such as inspection. Using the Stock Transfer screen, stock must be transferred from the transitory location to a non-transitory location and then the stock can be picked for shipment.
Location
This is the location associated with this stock quantity.
Primary
This read-only checkbox identifies the stock item’s Primary Location (as designated in the Stock Items screen).
Transitory
This read-only checkbox is only visible when a “transitory” location is displayed. A location flagged as Transitory is used for a temporary process such as inspection or transfer between warehouses. Stock cannot be picked from a transitory location, but transitory stock is displayed here for reference purposes so that you are aware of its existence.
Stock Qty
This is the quantity on hand associated with this location and set of characteristic values.
Characteristic Fields
The remaining columns are only visible when the item is assigned to tracking characteristics such as lot and serial control.
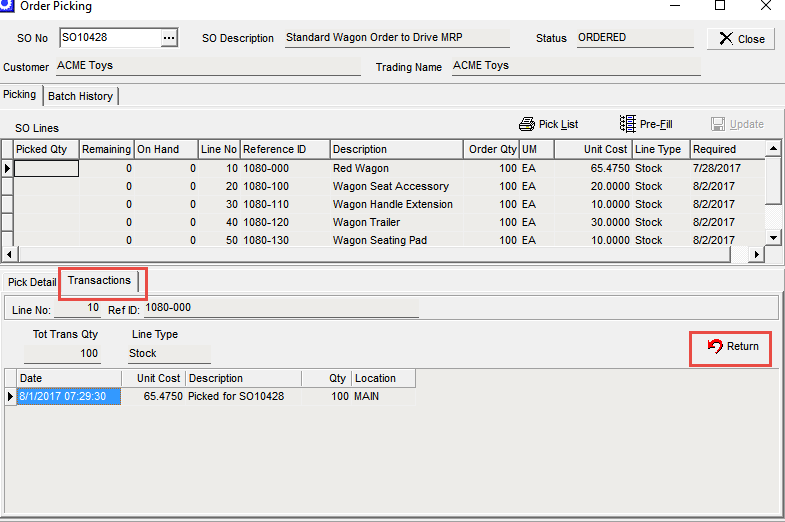
Transactions Sub-Tab
All previously updated picking transactions for this line item are displayed on this sub-tab.
Return Button
Click this button to return all or a portion of the transaction quantity to stock or to reverse a picking transaction that was made in error.
Return Order Pick
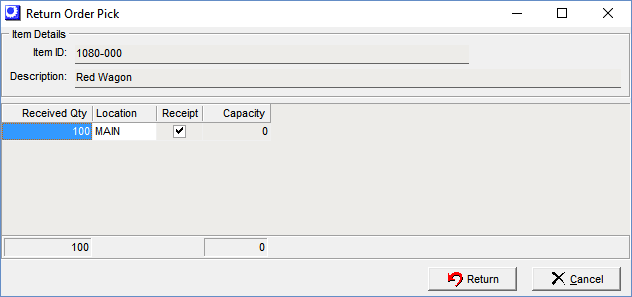
Received Qty
This is the quantity to be returned to stock. It defaults to the full transaction quantity, but you can decrease the quantity if you wish to return a partial quantity to stock.
Location
This is the location to which the stock will be returned. It defaults to the transaction location, but you can use the lookup to select an alternate location, if applicable.
Receipt
This read-only checkbox is selected for reference when this location is the item’s default Receipt Location, as designated in the Stock Items screen.
Capacity
This reference field is this item’s storage capacity for this location.
NOTE: If you want to view existing stock in any location, use the lookup in the Location field and on the location lookup screen, click the magnifying glass icon in the lower panel to view any location’s stock on hand.
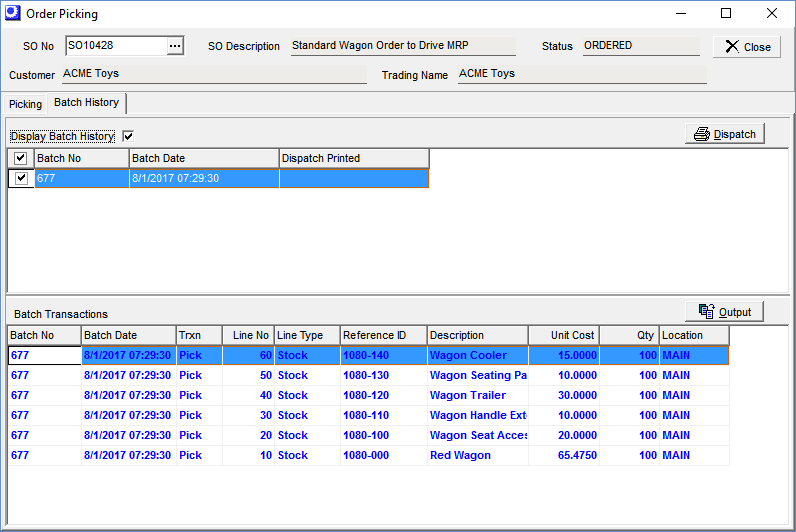
Batch History Tab
Each time the Update process occurs, all the transactions associated with the update are assigned to a “batch” number. This sales order’s batches are listed on this tab.
Upper Panel
Display Batch History
This checkbox is selected by default. When selected, the screen is occupied by two grids: a listing of batches in the upper grid and a listing of Batch Transactions in the lower grid, limited to the batches selected in the upper grid. If you clear this checkbox, the Batch Transactions grid occupies the entire screen and lists all transactions for all batches.
Dispatch Button
This button is only visible when the Display Batch History checkbox is selected at left. You have the option of picking stock on the Picking tab before you physically pick the stock from the warehouse. After Update processing is completed, you can immediately access this tab and click this button to print a “dispatch list” to use as a guide for physically picking the stock.
NOTE: Click the selection checkbox to the left of each batch you want included in the dispatch list. You can combine multiple batches into one dispatch list, if you wish.
After clicking the Dispatch button, you are presented with this screen:
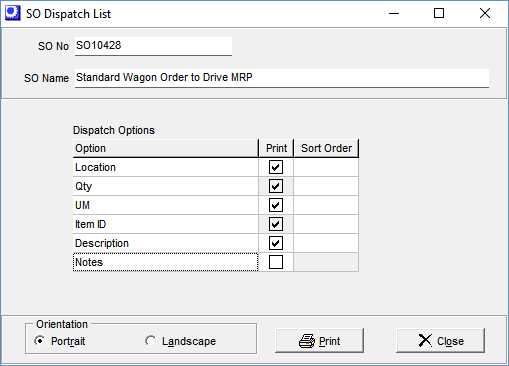
Dispatch Options
Use the Print checkbox to select or de-select the fields you want included on the dispatch list. You can change the order by clicking into the Sort Order field on those cells in the grid that are not grayed out.
Orientation
You can select the Portrait or Landscape option to achieve a vertical or horizontal style printing layout.
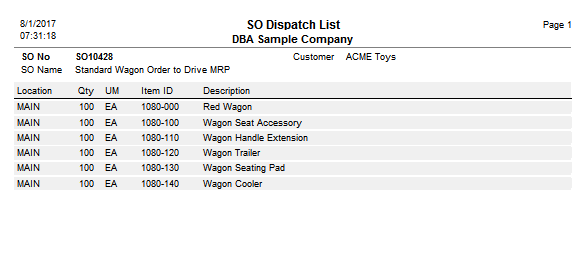
Print Button
After your selections are completed, click this button to print the dispatch list. Here is a sample:
Upper Grid
All update batches for this sales order are displayed in this grid.
NOTE: This grid is only visible when the Display Batch History checkbox is selected at left.
Selection (Checkbox)
This checkbox is selected by default against all batches that have a blank value in the Last Printed column. Selecting this checkbox serves two purposes:
| • | This batch will be included in the dispatch list when you print it via the Dispatch button. |
| • | This batch’s transactions are displayed in the Batch Transactions grid below. |
Batch No
This number identifies the batch and is automatically assigned by the program.
NOTE: Each Batch No is unique such that no two sales orders ever have batches with the same batch numbers.
Batch Date
This field shows the date and time the batch was created.
Last Printed
When you print a hard copy of the dispatch list, the date and time is captured in this field.
NOTE1: This field does not get updated when you preview the dispatch list. It only gets updated when you print a hard copy on your printer.
NOTE2: This field only gets updated the first time you print the dispatch list. It does not get updated when you reprint the dispatch list.
Batch Transactions Grid
When the Display Batch History checkbox in the upper panel is cleared, this grid occupies the entire screen and provides a listing of all picking transactions for this sales order.
When the Display Batch History checkbox in the upper panel is selected, this grid occupies the lower half of the screen and only lists transactions associated with batches that are selected (via the checkbox) in the Batch History grid above.
NOTE: Transactions displayed in bold blue text are associated with the batch that is currently highlighted in the upper grid.
Button
Output
Click this button to output the contents of the grid to an Excel spreadsheet, CSV file, HTML file, or to the printer.
Transactions Grid
| • | If the Display Batch History checkbox at the top of the screen is selected, picking transactions associated with the batches selected in the upper grid are listed in this grid. |
NOTE: Transactions displayed in bold blue text are associated with the batch selected in the upper grid.
| • | If the Display Batch History checkbox at the top of the screen is cleared, all picking transactions associated with all batches are listed in this grid. |
