(Inventory – Inventory Setup – Locations)
“Locations” are used to represent the physical location of on hand stock. Locations are an important element in your inventory management system and should be given careful thought.
Link:

Types and Uses of Locations
Locations are user-defined and can be organized to fit your inventory needs. Listed here are various types of locations for you to consider as you set up your inventory management system.
Bin / Rack / Shelf
Locations are used to represent the specific bin, rack, and shelf locations within storage areas. These location ID’s typically are structured in three segments, separated by dashes, as follows:
Warehouse – Area/Aisle – Bin/Shelf/Rack Number
“Assign” Location
An “assign” location can be useful if you are constantly creating new stock items and you don’t always know at the time of creation where the item will be physically stored in the warehouse.
An “assign” location is not a physical location. It is a temporary location used until an item is assigned an actual Receipt Location and Issue Location.
If you want all your item location assignments to start out with the
“assign” location, create the “assign” location first, perhaps with a location ID of ‘ASSIGN’. Then go to the Inventory Defaults screen and select the “assign” location as the system default Receipt Location and Primary Location. Whenever a new stock item is created, it is given the “assign” location as its default Receipt Location and Primary Location.
Whenever you see an item with an “assign” location or you encounter an inventory transaction designated to the “assign” location, it is your signal that you need to give that item its permanent location assignments.
“Find” Location
A “find” location is used with items that do not have permanent locations. These might be items that are procured or manufactured only on occasion and can be stored in any allowable location within a general area.
Create a location with a location ID of ‘FIND’. Where applicable, assign this location as the item’s default Receipt Location and Primary Location.
When you see the “find” location on a receiving screen, it is your signal to find an actual location.
Inspection Location
Some items must be inspected and labeled before they are put away in the warehouse or issued to the shop floor. In this case, you can create an “inspection” location and designate it as the default Receipt Location against any items that require inspection upon receipt.
After inspection is completed, the Stock Transfer screen is used to transfer the stock from the “inspection” location to its final location.
Work Center Location
Not all items are stored in the warehouse. Raw materials and components that are purchased for jobs can be received directly to the work center where they are consumed. Make to order subassembly items are usually passed on to the next work center rather than received to warehouse locations.
You can create locations to represent each work center that has a receiving staging area and you can designate such work centers as the default Receipt Location against items that are received directly to work centers.
Shipping Location
Products that are made or purchased to order can be received directly to a shipping location rather than a warehouse location.
You can therefore create a “shipping” location, which represents a general staging area for pending shipments. Designate it as the default Receipt Location against any item that is received directly to shipping.
Service Vehicle Location
You may have service vehicles used by field technicians or salespeople that have a small parts inventory. Each such vehicle can be given its own location, so that you can track and replenish field inventories.
Service vehicle locations are not assigned as default locations because they are always secondary locations rather than primary locations.
The Stock Transfer screen will be used periodically to replenish service vehicle stock from each item’s primary storage location.
Transit Location
If you transfer stock between two warehouses, you can create a “transit” location to represent the interval between the time stock is picked from one warehouse and received into the other.
The Stock Transfer screen is used to transfer stock quantities from the source locations to the “transit” location, which may be your own truck or a commercial shipper. When the items arrive at the target destination, the Stock Transfer screen is used to transfer stock quantities from the “transit” location to final locations.
Screen Details
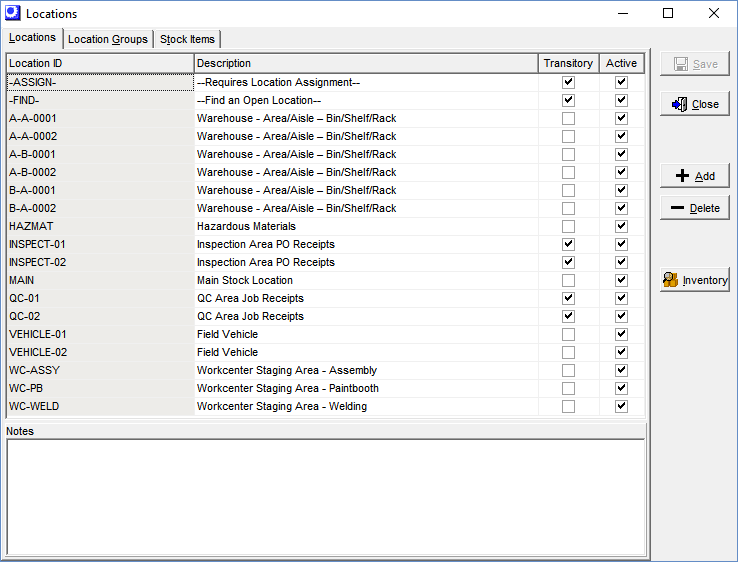
List Tab
Grid
Location ID
Enter an up to 10-character code that identifies this location.
Description (Required)
Enter an up to 50-character description that accompanies the Location ID on lookups and screens. One possible use for this field is to describe the location type, such as ‘Rack’, ‘Floor Area’, ‘Bin’, etc. Transitory locations (see next) can be described as ‘Assign a Location’, ‘Find a Location’, ‘Inspection Area’, etc.
Transitory
Selecting this checkbox identifies this as a “transitory” location, where stock is stored on a temporary basis to perform a process or transfer. Stock quantities in transitory locations are displayed for reference purposes, but are not available for picking or issuing in the Order Picking and Job Issues screens. Select this checkbox against these types of Locations:
• “Assign” Location
• "Find” Location
• Inspection Location
• Transit Location
Active
This checkbox is automatically selected when a new location record is created. Active locations may contain stock quantities and are available for picking, issuing, and receiving transactions. If a location is no longer in use (because it no longer exists or has been renamed), clear this checkbox.
NOTE: You are not permitted to clear this checkbox if the location has a stock quantity. In such cases, use the Stock Transfer screen to transfer stock to an Active location and then you can clear this checkbox.
Lower Panel
Notes
You can enter freeform notes against each location for reference purposes on this screen.
Buttons
Save
This button is visible when one or more new locations have been entered, but not yet saved. Click this button to save your entries.
Cancel
Click this button to cancel any new entries that have not yet been saved.
Add
Click this button to create a new location record in the entry grid.
Delete
Click this button to delete a selected location.
NOTE: You cannot delete a location if it has a stock quantity, transaction history, or is assigned to any stock items or location groups. As an alternative to deletion, you can clear the Active checkbox.
Inventory
Click this button to view current stock in this Location.
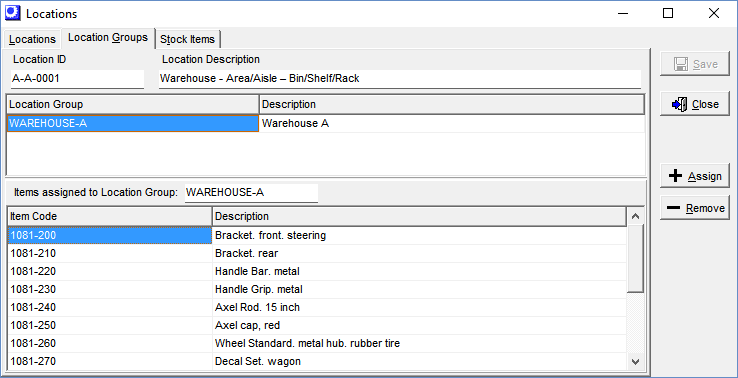
Location Groups Tab
“Location groups”, which are sets of stock items with common location assignments (see next chapter), can be assigned to the selected location on this tab.

Upper Panel
Location ID, Description
The location selected on the List tab is displayed for reference.
Grid
Location Group, Description
This is the location group currently assigned to this location.
Buttons
Assign
Click this button to assign a location group to this location. You are presented with a Location Groups lookup, from which you can make a selection.
Remove
Click this button to remove the selected location group from the list.
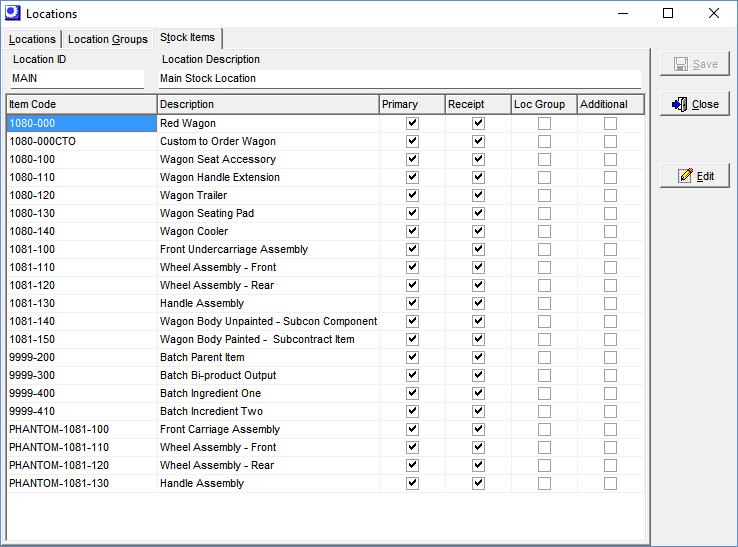
Stock Items Tab
On this tab are listed all stock items that are either directly assigned to the selected location or are indirectly assigned through a location group.

Upper Panel
Location ID, Description
The location selected on the List tab is displayed for reference.
Display Grid
Item ID, Description
This identifies the stock item that is either directly assigned to this location or is indirectly assigned to it through a location group.
Primary
This checkbox is selected when this location is designated as the item’s Primary Location.
Receipt
This checkbox is selected when this location is designated as the item’s Receipt Location.
Loc Group
This checkbox is selected when this item is assigned to this location through a location group.
Additional
This checkbox is selected when this item is assigned directly to this location as an additional location to its Primary Location and Receipt Location.

