
(Inventory – Inventory Setup – Lot/Serial Control)
Use this screen to assign items to lot and serial tracking characteristics.
When an item is assigned to a characteristic, each time it is received, issued, picked, or counted, its characteristic values must be recorded.
Link:
 Startup - Lot/Serial Assignments

Lot and Serial Tracking Overview
Lot and Serial number tracking requires dedication and organization of your entire shop to execute. When you choose to add lot/serial tracking to an item you must print item labels for each item at the time of PO Receipt or Job Receipt. Job Issues and Order Picks will require accurate verification of your characteristic value. This adds some overhead to your inventory transaction processing and should only be used on critical items.
▪Must be dedicated to accuracy
▪Create item labels at time of PO or Job Receipt
▪Job/Issues and Order Picks require characteristic value verification
Standard characteristics
Our recommendation is to use the system default characteristics for your lot and serial tracking.
LOTNO: Lot No
A lot number identifies a particular production or purchase batch of an item. If you have a product problem, it can be traced back to a particular lot number so that remedial action can be taken.
SERIALNO: Serial No
A serial number is a unique ID number assigned to each unit produced or purchased of an item.
EXPIRYDATE: Expiration
This characteristic is used to track the expiration date of perishable products
User Defined characteristics - not recommended
There is an ability to add user defined characteristics. We recommend that you use the system provided characteristics whenever possible and keep your user defined characteristics to a minimum. A user defined characteristic adds a field to the ITEMH table in the database and can impact performance if too many characteristics are used.
Screen Details
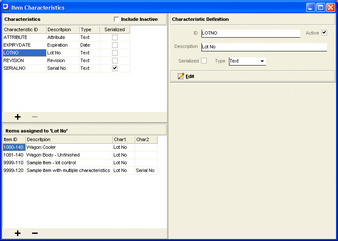
Characteristics
Upper Panel
Include Inactive
By default, only active characteristics are displayed in the list. Select this checkbox to include inactive characteristics as well.
Grid
Characteristic ID
Enter an up to 20-character code that is the primary identifier for the characteristic record.
Description
This is the text that identifies the characteristic on inventory processing screens. We recommend that you enter a short name to conserve screen space, such as ‘Lot No’, ‘Serial No’, ‘Expiration’, and ‘Revision’.
Type
The Type determines the characteristic’s data type. Three types are available:
Date
This characteristic can only be given a date value.
Number
This characteristic can only be given a numeric value.
Text
This characteristic’s values can be freeform alphanumeric text.
Serialized
When this checkbox is selected, it means that this is a serial type characteristic where a unique serial number is assigned to each unit when it is initially received to stock.
Active
This checkbox is only visible when the Include Inactive checkbox is selected in the upper panel. When this checkbox is selected, it means the characteristic is active and available for assignment to items. When cleared, it means that the characteristic cannot be assigned to items and is not visible when processing job and PO receipts.
NOTE: You must remove all item assignments before you are permitted to deactivate a characteristic.
Lower Panel
+
Click this button to create a new characteristic. We recommend that you use the system provided characteristics whenever possible and keep your user defined characteristics to a minimum. A user defined characteristic adds a field to the ITEMH table in the database and can impact performance if too many characteristics are used.

Enter the Characteristic ID, Description, Serialized checkbox, and Type. If the Type is set to ‘Table’, the screen expands and you can enter a table of allowable values. Click Save and the characteristic will be added to the grid above.
▬
Click this button to delete the characteristic. You can only delete a characteristic if it is not currently assigned to any items and there is no transaction history.
Items Assigned to ‘Xxxxxxxx’
In this lower grid you can assign or un-assign stock items to the characteristic selected in the upper grid.
Grid
Item ID, Description
These read-only fields identify the stock item assigned to this characteristic.
Char1, Char2…
All the characteristics to which this item is assigned are listed in these columns.
Lower Panel
+
Click this button to add a stock item to the list of items assigned to this characteristic. You are presented with this screen:
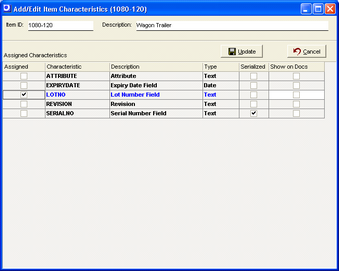
The current characteristic is pre-selected, but you can also select any of the other available characteristics while you are on this screen. Click Update to continue. You are then presented with this screen:
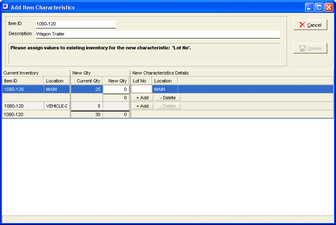
In this screen you must assign values for the new characteristic to existing stock on hand.
For each location listed, click the Add button. This opens up the New Qty and characteristic field to its right, which is ‘Lot No’ in the screen example above. Enter a quantity and a characteristic value; in this case, the lot number.
If you wish to allocate the stock in one location to two or more characteristic values, click the Add button once again and a new line is opened so that you can enter another quantity and characteristic value. Use the Delete button to delete a line if you make an incorrect entry.
Click the Update button to save your entries. The button will not be active until the New Qty amounts within each location equal the Current Qty.
▬
Click this button to delete this item’s assignment to this characteristic. You are presented with this screen:
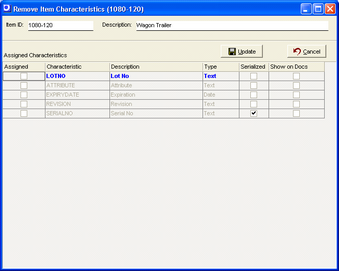
The characteristic’s checkbox is cleared. While you are on this screen, you can delete other characteristic assignments, if needed. Click Update to continue. You are presented with this screen:
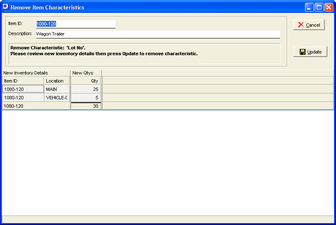
This screen shows you what the on hand stock status will be once the characteristic assignment is removed. Click the Update button to complete the removal process.
NOTE: When you remove a characteristic assignment, be aware that you will not have access to any of the characteristic’s values in the item’s transaction history.
Characteristic Definition
Use this panel to edit the properties associated with the characteristic selected in the grid at left.
Edit
Click this button and you are presented with this screen for any non-serialized characteristic.

You can either change the Description, which is the text that is displayed on inventory processing screens, or if the Type is ‘Table’, you can make changes to the table of allowable values.
If this is a Serialized characteristic, you are presented with this screen:
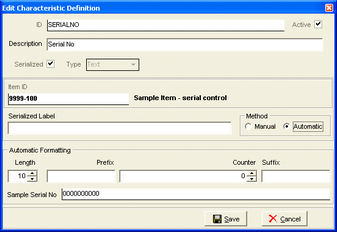
This screen enables you to define serialization at the item level and displays the item selected in the grid at lower left.
You have the option of entering text in the Serialized Label field, which overrides the standard characteristic Description on inventory processing screens. So if you wish to give this item’s characteristic a custom field label use this field. Otherwise, leave it blank.
Select Manual if you wish to assign serial numbers manually. Select Automatic if you wish the program to assign serial numbers automatically. When you select Automatic, additional fields are displayed.
First, establish an overall Length for your serial number. You can optionally enter a fixed value Prefix or Suffix to the core number. In the Counter field, establish the number that will be assigned to the next receipt transaction. This number gets incremented automatically with each new receipt transaction.
