
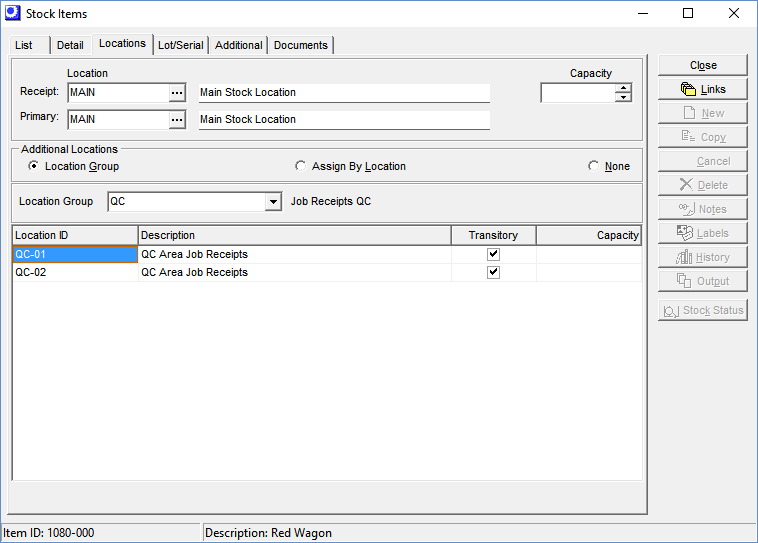
(Inventory – Stock Items - Locations Tab)
Default and allowable inventory locations are assigned to the item on this tab.
Link:
 Startup Guide - Item Location Assignments
Screen Details
Upper Panel
Receipt Location
This setting is initially populated by the Receipt Location designated in the Inventory Defaults screen, but can be overridden with a selection from the lookup. This location is the default location when processing transactions in the Job Receipts and PO Receipts screens.
New Items
Using an “assign” location as the Receipt Location in the Inventory Defaults screen can be useful if you are constantly creating new stock items and you don’t always know at the time of creation where the item will be physically stored in the warehouse.
When you see an item with an “assign” location, it is your signal that you need to give that item its permanent location assignments.
Items without Permanent Locations
A “find” location can be used with items that do not have permanent locations. These might be items that are procured or manufactured only on occasion and can be stored in any allowable location within a general area. When you see a “find” location on a receiving screen, it is your signal to find an actual location among the item’s allowable locations.
Inspected Items
If the item requires inspection and/or labeling, it can be received by default into an “inspection” location. After it passes inspection and/or labeling, the Stock Transfer screen is used to transfer the stock to its Primary Location in the warehouse.
Make to Order Subassemblies
Make to order subassemblies are usually received into a “work center” location rather than a warehouse location.
Buy for Job Items
Purchased items that are procured only when required by jobs are usually received into a “work center” location rather than a warehouse location.
Make to Order Items
Make to order items are usually received to a “shipping” location for shipment directly to customers.
Primary Location
This setting is initially populated by the Primary Location designated in the Inventory Defaults screen, but can be overridden with a selection from the lookup. The Primary Location is flagged as the item’s primary storage location when picking or issuing stock in the Order Picking and Job Issues screens.
NOTE: It is common for the Receipt Location and Primary Location to be the same location.
Items without Permanent Locations
If the item does not have a permanent location, meaning that it can be stored in any of its allowable locations, we recommend that you use a “find” location as the Primary Location. This lets you know that stock can be found among allowable locations rather than a specific location.
Capacity
This is an optional field. You can enter the maximum quantity of this item that can be stored within the Receipt Location or any of the allowable locations in the grid below. Only make an entry to this field when the location is a specific bin, rack, or shelf. When receiving items to stock, the Capacity setting helps you know which bins, racks, or shelves are full and which ones have room for additional storage.
NOTE: General staging areas and “transitory” locations are not devoted to the storage of one item at a time and are therefore not suitable for the Capacity setting.
Additional Locations
Some items can be stored in other locations besides the Receipt Location and Primary Location. The options in this middle panel enable you to designate additional allowable locations for the item.
Location Group
Select this option if you wish to assign the item to a Location Group. A Location group is a set of allowable locations that can be shared by common types of items. For example, you may have a set of racks that can be used for all your sheet metal items. That set of racks can be represented by a location group. Location groups are created in the Inventory – Inventory Setup – Locations Groups screen.
NOTE: When this option is selected, a new panel is displayed containing a Location Group field. Select a location group from the lookup.
Assign by Location
As an alternative to using a location group, where locations are shared by multiple items, select this option to designate one or more additional locations that apply just to this item. Typically, these would be specific “overflow” locations or locations in other warehouses.
None
Select this option when you do not want to allow any locations other than the Receipt Location and Primary Location.
Grid
Additional locations are listed in this grid. When the Location Group option is selected, all the locations within the location group are listed and cannot be changed. When the Assign by Location option is selected, you can add and remove locations from the list.
Location ID, Description
These fields identify the location.
Transitory
When selected, this checkbox indicates that this is a “transitory” location, which is a location where stock is stored on a temporary basis to perform a process or transfer. Stock quantities in transitory locations are displayed for reference purposes, but are not available for picking or issuing in the Order Picking and Job Issues screens. “Assign”, “find”, “inspection”, and “transit” locations are typically “transitory” locations.
Capacity
You can optionally enter the maximum quantity of this item that can be stored within this location. Only make an entry to this field when the location is a specific bin, rack, or shelf. When receiving items to stock, the Capacity setting helps you know which bins, racks, or shelves are full and which ones have room for additional storage.
NOTE: General staging areas and “transitory” locations are not devoted to the storage of one item at a time and are therefore not suitable for the Capacity setting.
Buttons
+
This button is only visible when the Assign by Location option is selected. Click this button to add a location to the list of allowable locations.
▬
This button is only visible when the Assign by Location option is selected. Click this button to delete a location from the list of allowable locations.
