
(Inventory – Stock Adjustments)
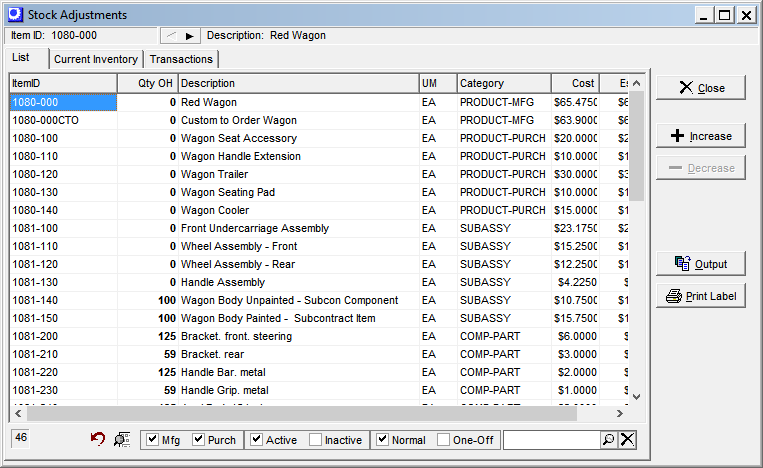
Use this screen to adjust an item’s on hand stock quantity.
Do not bypass standard processes
Do not use stock adjustments to bypass a standard process. Always use the inventory processing screens (Stock Transfer, Stock Counts, Order Picking, Job Issues, Job Receipts, PO Receipts) for inventory transactions. Doing so maintains the integrity of your cost reporting and GL posting.
For example, never receive stock by making a stock adjustment. Always receive stock through the Job Receipts or PO Receipts screens.
As another example, do not return unused material from jobs by making a stock adjustment. Instead, use the Return feature in the Job Issues screen to return unused material to stock.
Purposes of Adjustments
Stock adjustments should only be used on occasion, for these purposes:
Non-Sale Usage
An example of non-sale usage is when items are taken from stock for use as sales samples, perhaps for use at a trade show. The expense will be posted to your Adjustments – Inventory account.
Non-Job Usage
An example of non-job usage is when items are taken from stock for internal use in a research and development project. The expense will be posted to your Adjustments – Inventory account.
Count Adjustment
When making an inventory transaction, you may notice that the stock count within a location is not correct, in which case you can make a stock adjustment to correct the count.
NOTE: For formal stock count verification, use the Stock Counts screen instead of this screen because it is optimized for stock counting.
Screen Details
List Tab
Stock items are listed on this tab where they can be selected for adjustment. The current stock on hand (all locations) is displayed for reference.
Increase Button
Click this button to increase the quantity of stock on hand for the selected item. You are presented with this screen:
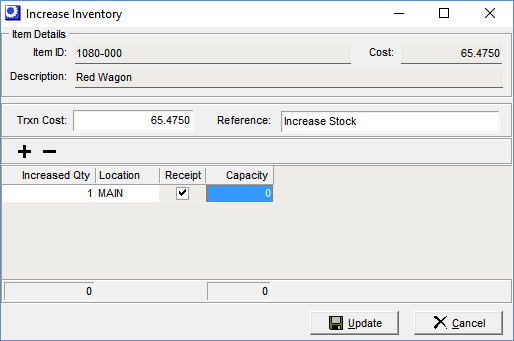
Upper Panel
Item ID, Description, Cost
These fields identify the item being adjusted and its current Inventory Cost.
Trxn Cost
This is the cost that will be applied to this transaction. It defaults to the item’s Inventory Cost.
Note: this cost will be averaged in with stock on hand quantities and values to establish a new Inventory Cost. Always make sure that increases of inventory (Stock Adjust Increase, PO Receipt, and Job Receipt) are done at a reasonably accurate unit cost.
Reference
The text “Stock Adjustment” is displayed by default, but can be overridden. This provides a reference note in the transaction record that explains the reason for or purpose of the adjustment.
+ –
By default, one line is presented in the grid below. Click the plus sign button to add additional lines if you are increasing stock in multiple locations or to specify multiple characteristic values. Click the minus sign button to delete lines.
Grid
Enter a line in this grid for each quantity associated with each location and set of characteristic values.
Increased Qty
Enter the increase in stock quantity associated with the location and characteristic values in the fields at right.
NOTE: If you enter a quantity that causes the total quantity in this location to exceed this item/location Capacity setting, you are given a warning.
Location
This field value defaults to the item’s default Receipt Location. You can make an alternative selection from this lookup screen.
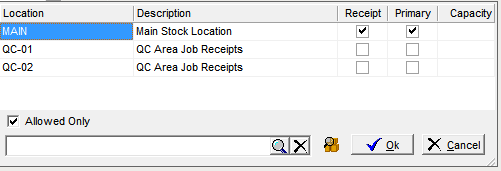
Only allowable locations for this item are listed. If you wish to use a non-allowed location, clear the Allowed Only checkbox in the lower panel and the list will be expanded to all locations.
The Receipt and Primary checkboxes identify the item’s default Receipt Location and Primary Location. The Capacity field shows you how many units of the item can be stored in the location.
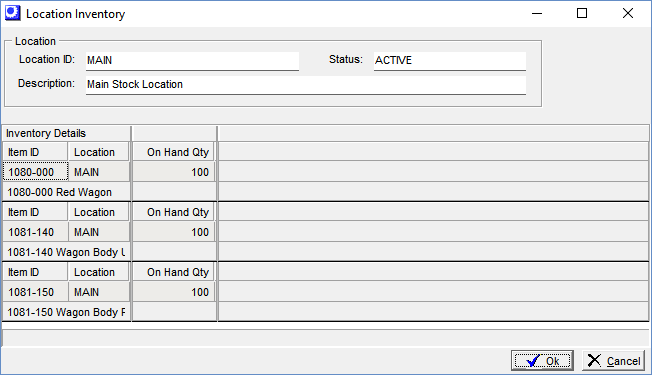
You can view the stock on hand within a location by clicking the magnifying glass icon in the lower panel, which presents this screen
This inquiry screen enables you to find an open location that is not currently occupied.
Receipt
This checkbox is selected when the location at left is the item’s default Receipt Location. This is for reference purposes only.
Characteristic Fields
If the item is assigned to one or more tracking characteristics (such as lot or serial control), each characteristic is represented by its own field, which is identified by the characteristic’s Description. You are required to enter a value against each characteristic, which, depending on the characteristic, can be a date, a number, a lookup on a table of allowable values, or freeform text.
Lower Panel
Update Button
After your entries are completed, click this button to update the transaction. The total amount is debited to your Inventory account and the offsetting credit is to your Adjustments – Inventory account.
Cancel Button
Click this button to cancel your entries. No updating will take place.
Decrease Button
Click this button to decrease the quantity of stock on hand for the selected item. You are presented with this screen:
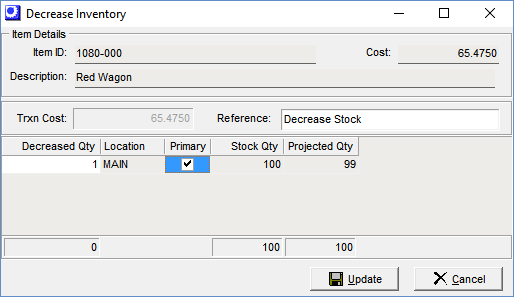
Upper Panel
Item ID, Description, Cost
These fields identify the item being adjusted and its current Inventory Cost.
Trxn Cost
This is the cost that will be applied to this transaction, which is the item’s current Inventory Cost. This cost cannot be changed.
Reference
The text “Stock Adjustment” is displayed by default, but can be overridden. This provides a reference note in the transaction record that explains the reason for or purpose of the adjustment.
Grid
All available stock is listed in the grid. Each line represents a set of characteristic values within a location.
Decreased Qty
Enter the decrease in stock quantity associated with the location and characteristic values in the fields at right.
NOTE: If this is a “transitory” location, the text “<Transitory>” is displayed in red. You are not permitted to use stock in a transitory location, but that stock is listed in the grid for reference purposes. Stock may be in an “inspection” location, for example, waiting to get inspected before being transferred to a final destination location.
Location
This is the location associated with the stock quantity and set of characteristic values to the right.
Primary
This checkbox is selected when the location at left is the item’s Primary Location. This is for reference purposes only.
Stock Qty
This is the current on hand stock quantity associated with this location and set of characteristic values.
Characteristic Fields
If the item is assigned to one or more tracking characteristics (such as lot or serial control), each characteristic value is represented by its own field, which is identified by the characteristic’s Description.
Projected Qty
This is the quantity that will be associated with this location and characteristic set after the transaction is updated.
NOTE: The projected quantity cannot be less than zero. A negative stock quantity is not permitted.
Lower Panel
Update Button
After your entries are completed, click this button to update the transaction. The total amount is debited to your Adjustments – Inventory account and the offsetting credit is to your Inventory account.
Cancel Button
Click this button to cancel your entries. No updating will take place.
Chg Lot/Ser Button
Click this button to change a lot/serial characteristic value within an item’s stock on hand. For example, stock may have been received and given an incorrect lot number. You can use this screen to list the lot numbers currently on hand for the item so that you can change the erroneous lot number value.
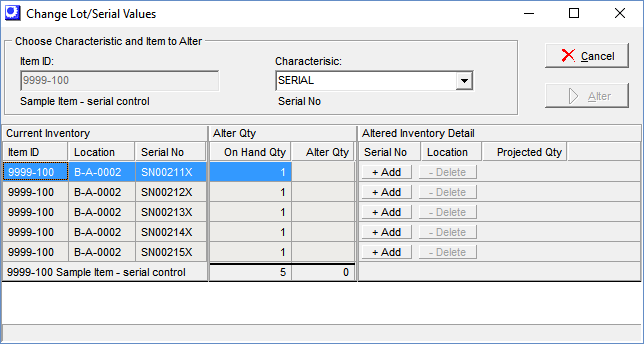
Screen Details
Upper Panel
Characteristic
Select the characteristic you wish to change.
Item ID
Select the item that requires the change in characteristic value. The lookup is confined to items assigned to the characteristic specified at left.
Load Button
You must click this button to populate the grid below.
Alter Button
When you entries are completed in the grid below, click this button to apply the changes to the item’s stock on hand.
NOTE: Altering a characteristic value has no effect on the general ledger.
Grid
All stock on hand for the item and characteristic specified in the upper panel is listed in the grid. Each line is a unique location/characteristic value combination.
NOTE: The grid remains empty until you click the Load button in the upper panel.
Current Inventory
Item ID
The Item ID selected above is repeated here for reference purposes.
Location
This is the location associated with the on hand quantity and characteristic value at right.
Characteristic Field
The characteristic value associated with this line is displayed in this field.
Alter Qty
On Hand Qty
The current on hand stock quantity for this characteristic value within this location is displayed in this field.
Alter Qty
You must click the Add button to the right to make this field available for entry. Enter the quantity to be changed to a different characteristic value in the field at right that is now visible where the Add button was located.
NOTE: The Alter Qty is not allowed to exceed the On Hand Qty.
Alter Inventory Detail
Add Button
Click this button to initiate a characteristic value change for this line. After clicking this button, it is replaced by a field where you specify the changed characteristic value. The Alter Qty field at left becomes an entry field where you enter the quantity subject to the characteristic value change.
Multiple Value Change
Whenever a line is opened up for a change in characteristic value, another Add button becomes visible below the line. If you wish to change a portion of the on hand quantity to a second characteristic value, click the Add button and another line opens up within which you can enter another alter quantity and characteristic value.
Characteristic Fields
When the Add button is clicked, this field becomes visible for entry of the changed characteristic value.
Location
When the Add button is clicked, this field becomes visible, for reference purposes.
Projected Qty
This is the quantity that will be associated with this location/characteristic value after the alter quantity is updated.
Delete Button
If you click the Add button and then decide you don’t wish to make the entry, click this button to delete the line.
Print Labels Button
Click this button to launch the Stock Item Labels screen, from which you can print item labels for this item for product identification or packaging purposes.
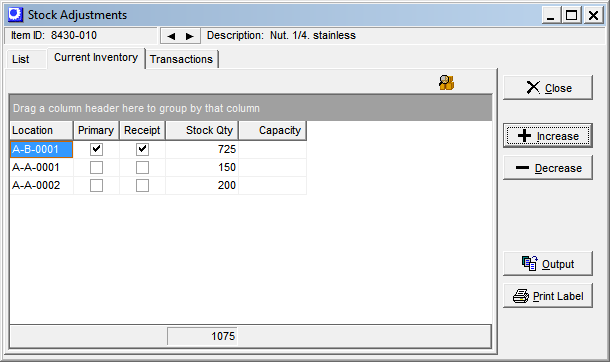
Current Inventory Tab
This tab is an inquiry screen that displays current stock on hand, broken out by each set of characteristic values within a location.
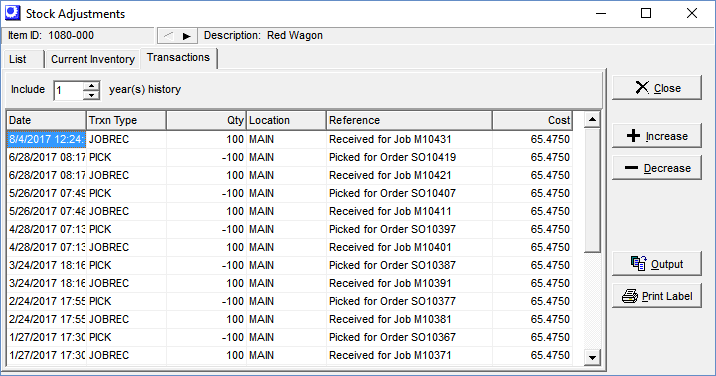
Transactions Tab
This tab is an inquiry screen that provides a listing of past inventory transactions associated with all the inventory processing screens (Stock Adjustments, Stock Transfer, Stock Counts, Order Picking, Job Issues, Job Receipts, PO Receipts).
Upper Panel
Include “X” year’s history
By default, one year’s history is displayed in the grid. You can use this setting to expand the number of years that comprise the list.
