(Inventory – Stock Transfer)
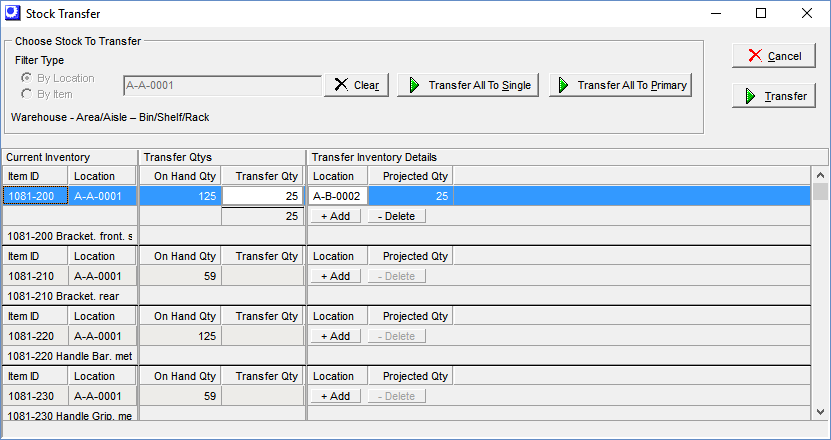
Use this screen to transfer stock from a source location to one or more destination locations. You can transfer stock from multiple source locations for a single item or for multiple items from a single source location.

Transitory Locations
This screen is especially useful with “transitory” locations, such as “inspection” and “transit” locations.
Inspection Location
In the case of an “inspection” location, you can receive a set of items on a PO to the inspection location. After inspection is completed, you can use this screen to make a single transaction that transfers stock from the inspection location to each item’s final destination location.
Transit Location
In the case of a “transit” location, which is a location that represents your truck or a commercial shipper, you can use this screen to transfer stock for a set of items into the transit location. Each location/item transfer is a separate transaction. When the set of items is received at the destination warehouse, you can make a single transaction in this screen to transfer stock from the transit location to each item’s final destination location.
Screen Details
Choose Stock to Transfer
Filter Type
Two options are available:
By Location
This option enables you to filter the screen by a single location, which lists all items with stock on hand in that location.
By Item
This option enables you to filter the screen by a single item, which lists all locations with stock on hand for the specified item.
Load
Click this button to populate the grid below. When a location is specified, two additional buttons become visible:
Transfer to Single
When you select this option, you can select a location that is used to pre-fill the destination location against all items with a single location.
Transfer to Primary
Clicking this button pre-fills the destination location with each item’s primary location, which is particularly useful when items are received first to an inspection and labeling location and are then mass-transferred to primary locations.
Transfer
After your entries are made in the grid below, click this button to process the transaction.
NOTE: A stock transfer does not create a general ledger transaction.
Grid
All stock on hand within the location(s) and item(s) specified in the upper panel are displayed in the grid.
NOTE: The grid remains empty until you click the Load button in the upper panel.
Current Inventory
Item ID
Each item is given its own “block” of lines within this panel. Each line represents a location and set of characteristic values.
Location
This is the source location associated with the On Hand Qty at right.
Characteristic Fields
If the item is assigned to one or more tracking characteristics (such as lot or serial control), each characteristic value is represented by its own field, which is identified by the characteristic’s Description.
Transfer Qtys
On Hand Qty
The current on hand stock quantity for this set of characteristic values within this location is displayed in this field.
Transfer Qty
You must click the Add button to the right to make this field available for entry. Enter the quantity to be transferred from the source location at left to the destination Location field at right that is now visible where the Add button was located.
NOTE: The Transfer Qty is not allowed to exceed the On Hand Qty.
Transfer Inventory Details
Add Button
Click this button to initiate a transfer for this line. After clicking this button, it is replaced by a Location field where you specify the destination location. The Transfer Qty field to the left becomes an entry field where you enter the quantity to be transferred. If the item has characteristics, the characteristic values are now visible to the right of the Location field.
Multi-Location Transfer
Whenever a line is opened up for transfer to a destination location, another Add button becomes visible below the line. If you wish to transfer a quantity to a second destination location, click the Add button and another line opens up within which you can enter another transfer quantity and destination location.
Location
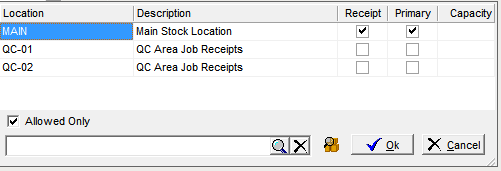
When the Add button is clicked, this field becomes visible. Select the destination location from the following lookup.

Only allowable locations for this item are listed. If you wish to use a non-allowed location, clear the Allowed Only checkbox in the lower panel and the list will be expanded to all locations.
The Receipt and Primary checkboxes identify the item’s default Receipt Location and Primary Location. The Capacity field shows you how many units of the item can be stored in the location.
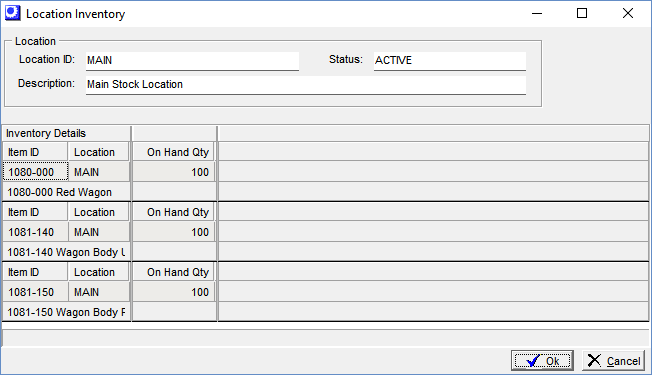
You can view the stock on hand within a location by clicking the magnifying glass icon in the lower panel, which presents this screen

This inquiry screen enables you to find an open location that is not currently occupied.
Characteristic Fields
Any characteristic values associated with this line become visible to the right of the destination Location field, for reference purposes.
Projected Qty
This is the quantity that will be associated with this location and characteristic set after the transfer is updated.
Delete Button
If you click the Add button and then decide you don’t wish to make the entry, click this button to delete the line.
