
(AR – Customer Payments)
This screen is used to enter customer payments against open invoices.
Links:

•Customer Payment
•Over-Payment
•Payment Reversal
•Credit Memo
•Customer Refund
•Bad Debt Write-Off
•Credit Card Processing
•Bank Deposit
•Customer Statement
How are credit memos created?
Credit memos are sometimes needed to make adjustments to a customer’s account. Credit memos are created in the Sales Orders screen by entering a descriptor for a negative Price. You should set up a descriptor for each type of credit memo transaction you need. When you generate the invoice from the sales order, the negative amount converts it into a credit memo.
GL posting is handled through each descriptor’s Item Category, which can be mapped to a specific GL account via the Sales – Exceptions tab in the Account Assignments screen.
How are customer refunds processed?
In order to send a customer a cash refund, the customer must be set up as a supplier and paid through Accounts Payable. See chapter 6A, RMA Processing, for details on the steps involved in this process.
Screen Details
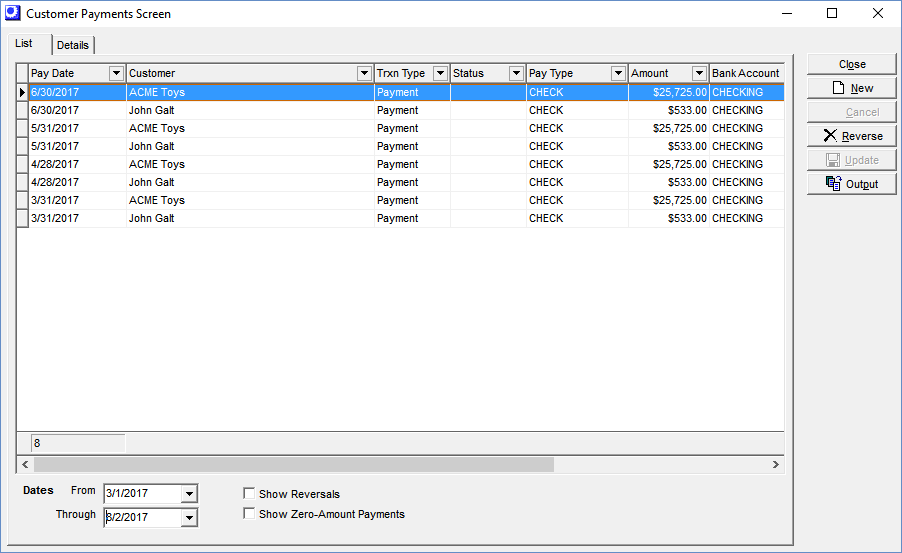
List Tab
Previous payments are listed on this screen, most recent Pay Date first. To view the details of any payment, highlight the payment and click the Details tab.
Buttons
New
Click this button to enter a new customer payment. You are taken to the Details tab, which is cleared for new payment entry.
Reverse
Click this button to reverse a customer payment. After you confirm that you wish to reverse the payment, you are asked “Is this an NSF check?” If you are reversing the payment because the bank returned the check due to insufficient funds, click Yes. If you are reversing the payment because you made an error, click No.
NOTE: You cannot reverse a non-NSF payment if it is already assigned to a deposit record in the Bank Deposits screen. You must first go to that screen and reverse the bank deposit, then you can return to this screen and reverse the customer payment.
Processing
| • | The original payment record is given a Status of ‘Reversed-NSF’ or ‘Reversed’. |
| • | A reversal payment record is created that is identical to the original record except it has a negative amount. The reversal record is assigned today’s date and is given a Status of ‘Reversal-NSF’ or ‘Reversal’. Reversing entries are posted to the general ledger. |
| • | If this is an NSF reversal, the reversal payment record flows through to the Account Reconciliation screen for matching to the bank statement. |
Lower Panel
Dates
The list is limited to payments made within this date range, which by default displays the past 30 days.
Show Reversals
Select this checkbox if you wish to see reversed payments. The original payment is listed with a status of ‘Reversed’ and the reversal payment is listed with a status of ‘Reversal’.
Show Zero-Amount Payments
Select this checkbox to display payment transactions made against zero value invoices.
Details Tab
Upper Panel
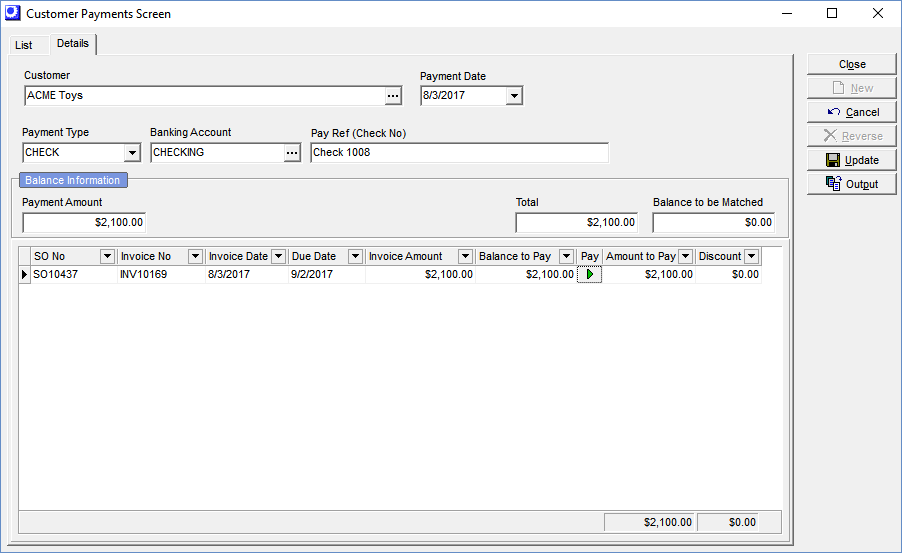
Customer
Select the Customer from the lookup. Once selection is made, the customer’s open invoices display in the lower grid.
Payment Date
This defaults to today’s date, but you can make an alternate selection if you wish.
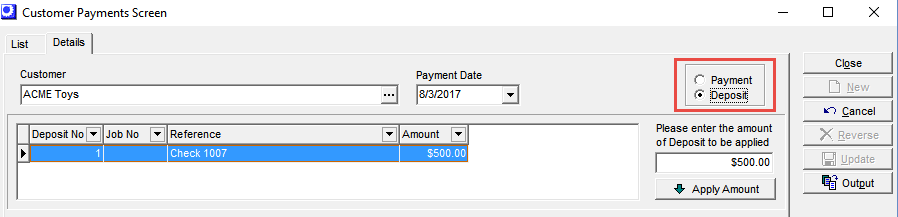
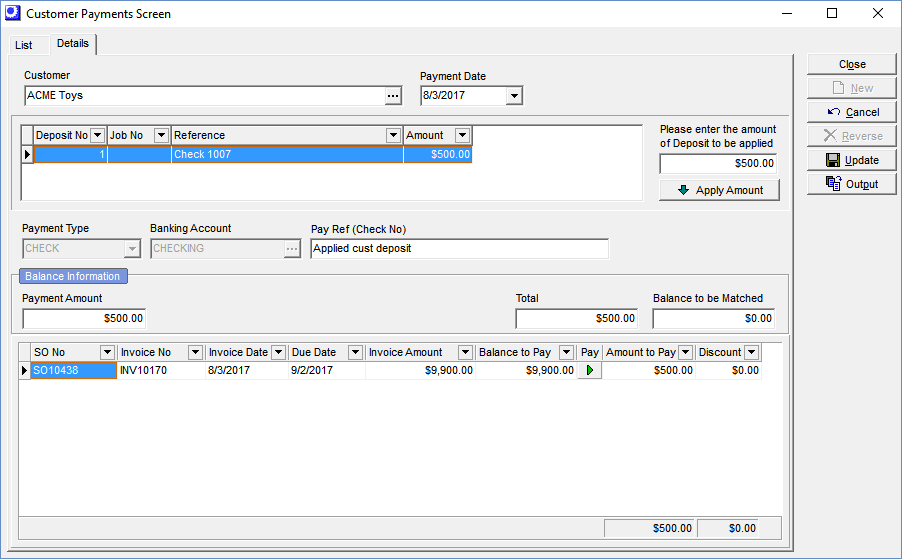
Payment or Deposit
This radio button choice is only visible when unapplied deposits (created in the Customer Deposits screen) exist against this customer. If you select Deposit, the unapplied deposits for the customer display in a panel below the Customer field. Highlight a deposit and enter the amount to be applied in the field to the right. Click the Apply Deposit button and that amount is inserted into the Payment Amount field. You can then apply that amount to specific invoices in the lower grid.
Payment Type
Select the appropriate Payment Type from the lookup. This defaults to the Customer Payment Type setting from the Admin – System Defaults screen.
Banking Account
Select the banking account to which the payment will be deposited. This defaults to the Customer Payment Bank Account setting from the Admin – System Defaults screen.
Pay Ref (Check No)
You must enter a reference to help identify this payment. If the customer is paying by check, enter the check number in this field.
Balance Information
Payment Amount
Enter the total amount of the payment in this field.
Total
This read-only amount gets updated each time entries are made in the Amount to Pay, Discount, and Rounding fields in the lower grid.
Balance to be Matched
This read-only field displays the balance of the Payment Amount at left that has not yet been matched with entries in the Amount to Pay column.
NOTE: Discounts and Rounding do not affect this amount.
Grid Columns
Invoice No, Invoice Date, Due Date
These read-only fields help you identify the invoices to which the payment is to be applied.
Invoice Amount
This read-only field displays the original invoice amount.
Balance to Pay
This is the original invoice total less all previous payments that have been made against this invoice.
Pay
Select this checkbox if you want to copy the Balance to Pay amount into the Amount to Pay field.
Amount to Pay
Enter the portion of the actual Payment Amount that is to be applied towards this invoice.
Discount
If the customer has taken a discount for early payment, enter the discount amount in this field.
Writing off an invoice
If you wish to write off an invoice for non-payment, you have two options.
The easiest option is to enter the full amount of the invoice in the Discount field. This will write off the invoice to your AR Discounts Taken account.
If you wish to write off the invoice to your Bad Debt Expense account, you must create a credit memo by entering a sales order for a “bad debt” descriptor with a negative Price equal to the value of the invoice. Once you have created the credit memo, return to this screen. Enter a zero Payment Amount and enter the full Amount to Pay against the invoice and the credit memo, which applies one against the other.
Mapping the “bad debt” descriptor
The “bad debt” descriptor must post to your Bad Debt Expense account, which is done through its Item Category. Create an Item Category specifically for bad debt expense. The Item Category can then be mapped to your Bad Debt Expense account via the Sales – Exceptions sub-tab in the Account Assignments screen.
Update Button
When you are finished distributing the Payment Amount and the Balance to be Matched is zero, click this button to process the payment.
