
(GL – General Ledger Setup – COA Conversion)
Training Course
Support Center – Videos–Setup – COA Conversion
Overview
This screen is used on a one-time basis to convert your existing Chart of Accounts to DBA’s standard Chart of Accounts, which is optimized for a manufacturing company and for the DBA system.
Why the standard Chart of Accounts?
Prior to May 2008, when we began supplying the Main Company with our standard Chart of Accounts, companies created their own chart of accounts from scratch. Many companies simply recreated their old accounting system’s chart of accounts in DBA and added a few new accounts for some of the DBA-specific postings.
Unfortunately, using a non-manufacturing chart of accounts doesn’t work with DBA, for a variety of reasons:
| • | In DBA you have only two inventory accounts: Inventory and Work-in-Process. No further breakdown of inventory is provided and any such sub-accounts can no longer be used. Instead, detail inventory analysis is done outside the General Ledger using the Inventory Value report. |
| • | In a manufacturing chart of accounts, factory operating expenses need to be clearly separated from general operating expenses and must be grouped as Cost of Sales accounts adjacent to an Absorbed Factory Overhead offset account. Non-manufacturing charts of accounts are not organized this way. |
| • | Departmental expense accounting is common in non-manufacturing environments, but is not used in a WIP-based accounting system where work center costs are absorbed into inventory and are not directly expensed. Therefore, work center related departmental expense accounts no longer have any purpose. |
| • | In DBA virtually all purchasing is automatically posted to your Inventory or Work-in-Process accounts, which are Asset accounts, not expenses. Most purchasing expense accounts are no longer needed except those used for miscellaneous expenses. |
| • | In a manufacturing chart of accounts, payroll expense accounts need to be clearly separated for direct labor, indirect labor and supervision, and general clerical and administration. Direct labor expenses must be Cost of Sales accounts located adjacent to an Absorbed Labor offset account. Indirect labor and supervision must be Cost of Sales accounts located with other factory overhead accounts adjacent to an Absorbed Factory Overhead offset account. |
The DBA standard Chart of Accounts is organized for manufacturing analytics. Its structure makes it relatively easy to determine shop rates for direct labor and factory overhead for accurate product costing. Operating costs are grouped by the following logical cost centers that apply to virtually any manufacturing company:
| • | Direct Labor |
| • | Factory Overhead |
| • | Sales & Marketing |
| • | Research & Development |
| • | General & Administrative |
It is extremely difficult to adapt a non-manufacturing chart of accounts to meet all these manufacturing requirements. It is much easier to use the DBA standard Chart of Accounts as a template that you can then customize for the various accounts that are unique to your company.
How the COA Conversion Works
The COA Conversion screen is split into an upper grid and lower grid. Your existing Chart of Accounts is displayed in the upper grid and the standard Chart of Accounts in the lower grid.
Each account in the upper grid must be assigned to an account in the lower grid, which is done via drag-and-drop. You can also add and assign new accounts on the fly to the standard Chart of Accounts.
When all of your existing accounts are assigned to the standard Chart of Accounts, you click Update and all your existing General Ledger data, including the Chart of Accounts, Account Assignments, Supplier default accounts, and GL transactions, will be converted to standard accounts.
NOTE: Be aware that if you reprint any past financial statements, they will be structured with different accounts (as well as Account Classes and Account Groups) and may be quite different in appearance, even if the underlying numbers are still the same.
Check with your CPA first
Be aware that the COA Conversion will alter the appearance of past financial statements and possibly their financial results, especially if you change any Account Types. Before you convert your Chart of Accounts, we advise that you consult with your CPA to verify that the conversion is not in conflict with acceptable accounting practices.
If you have an empty Chart of Accounts
If up to now you have not created a Chart of Accounts at all, you can use the COA Conversion screen to instantly create the standard Chart of Accounts. Simply launch the screen and click the Update button. Because there are no existing accounts, no matching is required.
Phase 1 – Conversion Planning
Before you make assignments in the COA Conversion screen, it is best to plan your conversion on paper first to save time and achieve a smooth conversion with no surprises.
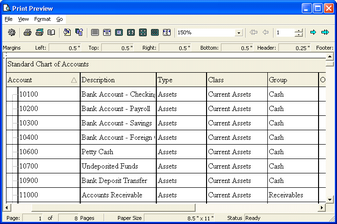
Print the standard Chart of Accounts
Click the Output button at the bottom of the lower grid of the COA Conversion screen and select the ‘Output Standard COA’ option to get a printout of the standard Chart of Accounts. Your printout will look like this:
Cross-reference standard accounts to existing accounts
Next, go to the Chart of Accounts screen. Take each account on the printout and find its equivalent in your Chart of Accounts. Whenever a matching account is found, enter the standard account number in its X-Ref Account field. If a matching account cannot be found, indicate so on your printout and move on to the next account on the list.
NOTE: A standard account can be cross-referenced to more than one existing account, where applicable. There may be areas where you have more account breakdown than is necessary, in which case you can consolidate multiple existing accounts by assigning them to a single standard account.
Plan any new accounts that are needed
When you are finished cross-referencing all the accounts on your printout, observe the X-Ref Account column on the List tab. Any accounts with blank values are special accounts that only pertain to your company. In these cases you will be creating new standard accounts during the COA Conversion.
In each case, decide on a new standard account number (based on its location among related accounts listed on the printout) and enter the new number in the X-Ref Account field against the existing account, followed by the word ‘New’ to let you know during the COA Conversion that a new account must be created.
Delete non-used accounts
If you have any existing accounts that will never be used and have never had any transactions or assignment settings, remove them from your Chart of Accounts so they don’t clutter up the conversion process. To do so, select the account and click the Delete button.
Continue until all accounts have an X-Ref Account value
Continue this process until all existing accounts have a value in the X-Ref Account field. Once this is done, you are ready to perform the actual conversion.
Phase 2 – COA Conversion
You will now use the COA Conversion screen to formally assign existing accounts to standard accounts and to create new standard accounts where needed.
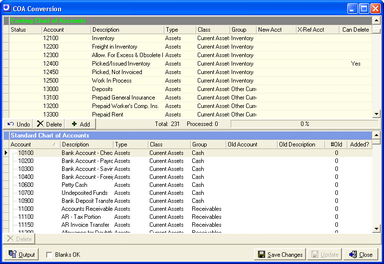
Begin with the first account listed in the upper grid. The X-Ref Account column displays the standard account that you cross-referenced during the Advance Planning phase.
Assigning to a Standard Account
Select the account in the upper grid and drag and drop it onto the account in the lower grid that matches its X-Ref Account number. You do this by holding your left mouse button down and dragging the account onto its matching account, then releasing your mouse button.
After doing so, the Status value in the upper grid changes to ‘Assigned’. In the lower grid the existing account is displayed in the Old Account and Old Description columns.
NOTE: If you assign multiple existing accounts to a single standard account in the lower grid, additional lines are added by the program under the standard account so that each existing account is given a value in the Old Account and Old Description columns. The number of accounts assigned to the standard account is displayed in the #Old column.
Adding a New Standard Account
When an account in the upper grid has an X-Ref Account number followed by the word ‘New’, it means that a new standard account must be created. To do this, click the Add button or right click on the account and select the Add Standard Account option. You are presented with this screen:
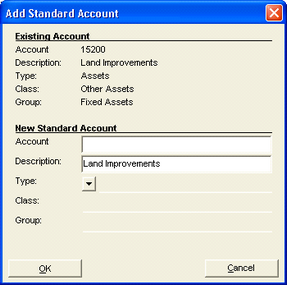
Enter your new standard Account and Description. From the Type field lookup, select an account Type-Class-Group combination to which this new account will be assigned. Click OK and the new standard account will be created and assigned to your existing account.
Undoing an Assigned Account
If you assigned an account in error and wish to undo it, select your account in the upper grid and click the Undo button. You can also right click on the account and select the Undo “Assigned” Status option.
Deleting an Existing Account
When ‘Yes’ is displayed in the Can Delete column in the upper grid, it means that this account has never had any transactions posted to it or is used in any account assignment screens. This may indicate an account that is not needed. If you wish to delete the account instead of matching it to a standard account, click the Delete button or right click on the account and select the Delete option.
Deleting a Standard Account
You can only delete a standard account that was newly added within this screen. If you wish to delete a standard account that was not added, you must finish the conversion process first and then you can delete the account in the Chart of Accounts screen using the normal account deletion process.
When ‘Yes’ is displayed in the Added? column in the lower grid, it indicates that the account was newly added within this screen. To delete this account, select it and click the Delete button in the lower grid or right click and select the Delete Standard Account option. The Status value in the upper grid will be cleared for any existing accounts that were assigned to this standard account.
Saving Your Assignments
You can freely leave this screen and return later to complete the assignment process. When you click the Close button, you are prompted to save your assignments.
Starting Over
If midway through the process you are dissatisfied with your assignments, you can start over by simply clicking the Close button and indicating at the prompt that you do not wish to save your assignments. The next time you launch the screen, it will be cleared of any assignments.
Click Update when all existing accounts have a Status value
All accounts in the upper grid must have a Status value before you will be permitted to click Update, which performs the actual conversion.
All other users must exit the system
You are not permitted to run the conversion if any other users are on the system.
Make a backup before converting!
Once you run the COA Conversion, there is not way to restore the old Chart of Accounts. As a safety precaution, we highly recommend that you make a backup before you run the conversion.
When you click Update and confirm that you wish to run the conversion, the program does the following:
| • | Deletes the existing Chart of Accounts and creates a new Chart of Accounts using the standard accounts listed in the lower grid. The X-Ref Account field in each new account is populated with the old account for reference purposes. |
| • | Replaces the existing account with its assigned standard account in all GL transaction records. |
| • | Populates all default settings in the Account Assignments screen with standard accounts and replaces existing accounts with their assigned standard accounts in the Sales – Exceptions, Purchasing – Exceptions, and Banking tabs. |
| • | Replaces the existing account with its assigned standard account in the GL Account sub-tab in the Suppliers screen. |
Phase 3 – Payroll Accounts Conversion
After you have completed the COA Conversion, you must change the account structure in your payroll system to conform to the new Chart of Accounts.
Refer to chapter 13D, Payroll Accounting, for complete setup details.
