
(Transfer – GL Summary Transfer)
This screen is used to transfer GL account totals from DBA to your outside accounting system.
How often should I transfer?
Our recommendation is to post GL summary batches daily for fully completed days. The daily posting will improve the visibility of the balancing entries in DBA and provide improved feedback to your system. Alternatively, you can choose to post your summary entries by period. We do not recommend to post by week or month, as these could potentially cross accounting periods.
NOTE: The Sales and COGs values for your invoices flow through to your financial accounting system within the GL Summary Transfer. Your AR will be transferred daily to your accounting system. Daily GL Summary Transfers can help you better understand the clearing account entries (AR Invoice Transfer GL Account) for your vouchers.
Link:
 Training Guide - GL Summary Transfer
 Video - Financial Transfer Overview
Financial Transfer Screenshot Series
 Financial Transfer using Transaction Pro Importer
Advance Setup
Step 1 – Inventory & WIP Accounts
| • | Verify that your outside system has one main Inventory account. DBA only posts to one Inventory account. |
| • | Create a Work in Process account in your outside chart of accounts. Locate it immediately following your Inventory account. Designated it as a Current Asset. |
| • | Go to the DBA Chart of Accounts screen. Against account 12000, Inventory, enter your outside system’s Inventory account number in the X-Ref Account field. Against account 12300, Work in Process, enter your outside system’s Work in Process account number in the X-Ref Account field. |
Step 2 – Sales & COGS Accounts
| • | In your outside chart of accounts, create a default Sales account and a default Cost of Goods Sold account. These are “catch-all” accounts for any sales that are not assigned to specific item categories or customer types. |
| • | You can optionally create pairs of Sales and Cost of Goods Sold accounts that correspond to various item categories or customer types. These accounts may already exist, but should be reviewed. |
| • | Go to the DBA Chart of Accounts screen. Against account 40000, Sales – Products, enter your outside system’s default Sales account in the X-Ref Account field. Against account 5000, Cost of Goods Sold, enter your outside system’s default Cost of Goods sold account in the X-Ref Account field. |
| • | Add Sales and Cost of Goods Sold accounts in the DBA chart of accounts that correspond to each pair of non-default Sales and Cost of Goods Sold accounts that exist in your outside system. Assign account numbers that fit into the DBA account numbering scheme. Against each of these new accounts, enter your outside system’s account number in the X-Ref Account field. |
| • | Go to the Account Assignments screen. Navigate to the Exceptions sub-tab on the Sales tab. All your item categories or customer types are listed on this screen. Assign Sales and Cost of Goods Sold accounts against each applicable Item Category or Customer Type. Any categories or types left blank will have their sales and costs posted to the system default Sales and Cost of Goods Sold accounts. |
Step 3 – Tax & Shipping Accounts
| • | Verify that your outside chart of accounts has a Sales Tax Payable account. If not, create one as a Current Liability account. |
| • | Verify that your outside chart of accounts has a Shipping Income account. If not, create one as an Income account. |
| • | Go to the DBA Chart of Accounts screen. Against account 21100, Sales Tax Payable, enter your outside system’s Sales Tax Payable account number in the X-Ref Account field. Against account 42000, Shipping Income, enter your outside system’s Shipping Income account number in the X-Ref Account field. |
Step 4 – You will be adding and cross referencing 4 Absorbed Costs accounts to your financial accounting general ledger
1.Absorbed Labor
2.Absorbed Mfg Overhead
3.Absorbed Subcontract Cost
4.Absorbed Misc Cost
You will reorganize your Chart of Accounts to Isolate your direct costs for production workers and manufacturing overhead
One of the new concepts that DBA brings to the table is absorbed accounting for your Labor and Manufacturing Overhead. In your accounting setup, you will be organizing your chart of accounts cost of sales section, so you can more easily isolate your costs for your production workers and the costs that you designate as manufacturing overhead. This reorganization will help align your income statement to more properly handle your absorbed costs. These costs will also be used to periodically update your calculated Shop Rates (BOM>Shop Rates) so that you get a more accurate reflection of your Labor and Manufacturing Overhead costs in the items that you manufacture.
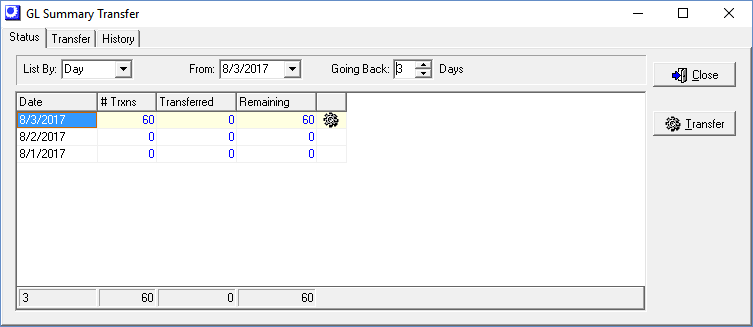
Status Tab
The Status tab displays the number of GL transactions that have not yet been transferred.
Screen Details
Upper Panel
List by
By default, the data in the grid are summarized by accounting period. For transfer purposes, leave this set to ‘Period’. You also have the option of viewing data by monthly, weekly, or daily increments. Our recommendation is to perform complete day entries. Daily summary entries will be easier to understand the how the transactions from DBA balance out in your financial accounting system.
From Period
This determines the starting point of the data view in the grid below.
Going Back ___ Periods
This number determines how many periods back from today’s date are displayed in the grid. It defaults to 12 periods, but can be changed on the fly for different views of your transaction status.
Grid Fields
Period, From Date, Thru Date
The period name and starting and ending dates are displayed in the first three columns.
# Trxns
This column displays the total number of transactions within the date range at left, including non-transferred and transferred transactions. You can click on this field to display the transaction detail.
Transferred
This column displays the number of transactions within the date range at left that have already been transferred. You can click on this field to display the transaction detail.
Remaining
This column displays the number of transactions within the date range at left that have not yet been transferred. You can click on this field to display the transaction detail.
Last Column
When non-transferred transactions exist, the icon in this last column is visible. You can click on this icon to open the Transfer tab and display the account summaries to be transferred.
Transfer Button
Click this button to initiate a transfer for the selected period in the grid.
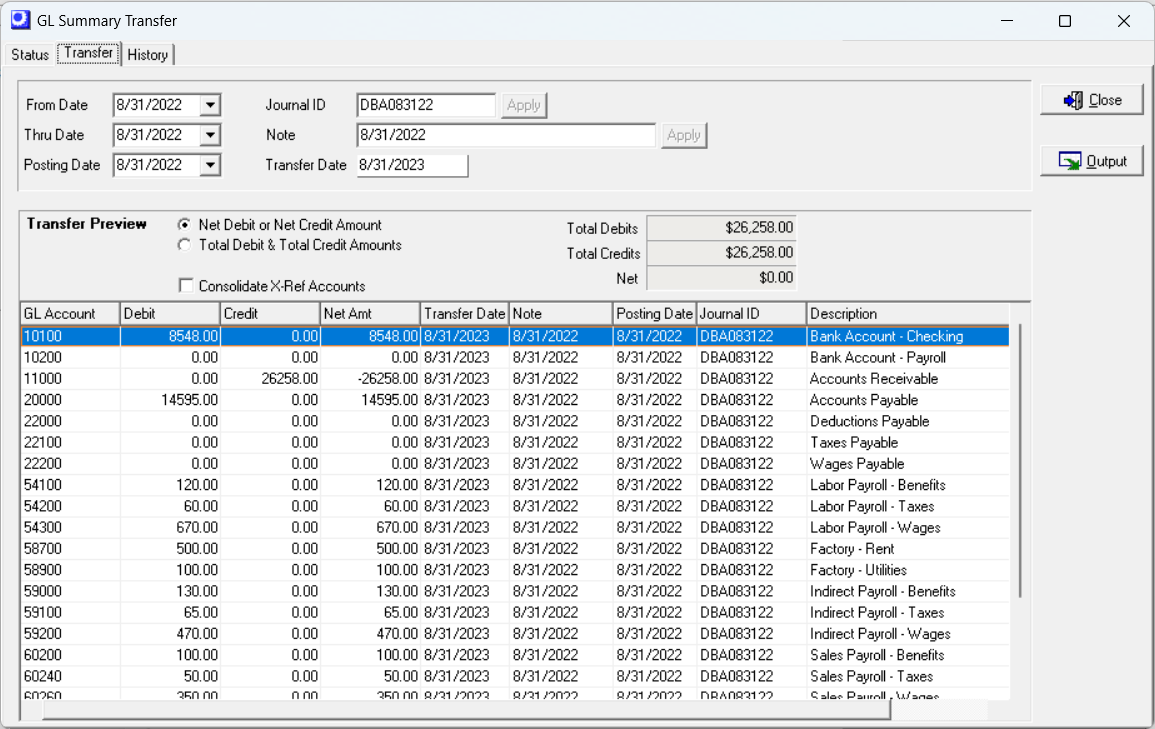
Transfer Tab
NOTE: Before performing a GL transfer, always run GL – Batch Posting first to ensure that all transactions have been posted to the General Ledger.
Upper Panel
From Date, Thru Date
These two fields display the date range associated with this accounting period. You can manually change these dates, if you wish, which alters the contents of the grid below.
Posting Date
This defaults to the Thru Date above or today’s date, whichever is earliest. This is the posting date that gets applied to all the transactions within this transfer.
Journal ID
If you are importing this transfer into your outside system, your system may require a Journal ID to identify the batch journal entry. This defaults to a value of ‘DBA’, but you can override it, if you wish. If you do so, click the Apply button to apply your entry to all the rows in the grid below.
Note
This is a reference note that can be included in your transfer file to help describe the journal entry in your outside system. It defaults to the period number, but you can override it, if you wish. If you do so, click the Apply button to apply your entry to all the rows in the grid below.
Transfer Date
This read-only field records the actual date that the transfer took place.
Transfer Preview
Net Debit or Net Credit Amounts
This option is selected by default. A single net debit total or a single net credit total is calculated and displayed for each account.
NOTE: Select this option when importing into QuickBooks®.
Total Debit & Total Credit Amounts
When this option is selected, separate debit and credit totals are calculated and displayed for each account.
Consolidate X-Ref Accounts (legacy feature)
We recommend that you clear this checkbox. This is a legacy feature. We currently recommend that you have a matching account in your financial accounting system for all account assignment accounts in DBA. .
Instructions for those using this egacy feature: Each X-Ref Account in your outside system can represent multiple accounts in DBA, especially your Absorbed Mfg Costs account, which is associated with 14 DBA accounts. Selecting this checkbox consolidates the grid contents into one row per X-Ref Account, which significantly reduces the number of rows in your transfer file.
Total Debits, Total Credits, Net
These read-only fields provide a grand total for all debit amounts and a grand total for all credit amounts that comprise this transfer. Total Debits should equal Total Credits and the Net amount should always be zero.
Grid Columns
GL account totals to be transferred are displayed in the grid.
GL Account
Each DBA account within the date range specified above with totals to be transferred is listed.
NOTE: This column is not visible when the Consolidate X-Ref Accounts option is selected in the upper panel.
X-Ref Account
This is your outside system’s account number.
Debit
This is the debit amount to be transferred to your general ledger for the X-Ref Account.
Credit
This is the credit amount to be transferred to your general ledger for the X-Ref Account.
Net Amt
This is the net difference between the Debit and Credit totals. If the total is a credit amount, a minus sign precedes the amount.
Transfer Date
This column displays the Transfer Date from the upper panel.
NOTE: Do not use this date as the posting date. Use the Posting Date instead.
Note
This column displays the Note from the upper panel.
Posting Date
This column displays the Posting Date from the upper panel.
Journal ID
This column displays the Journal ID from the upper panel.
Description
This column displays the Description associated with the DBA account.
NOTE: This column is not visible when the Consolidate X-Ref Accounts option is selected in the upper panel.
Output Button
Click this button to generate an Excel spreadsheet, CSV file, or report containing the grid contents for import or journal entry into your outside general ledger. You can select either the Output to excel, Output to CSV, or Output to printer option from the drop-down list.
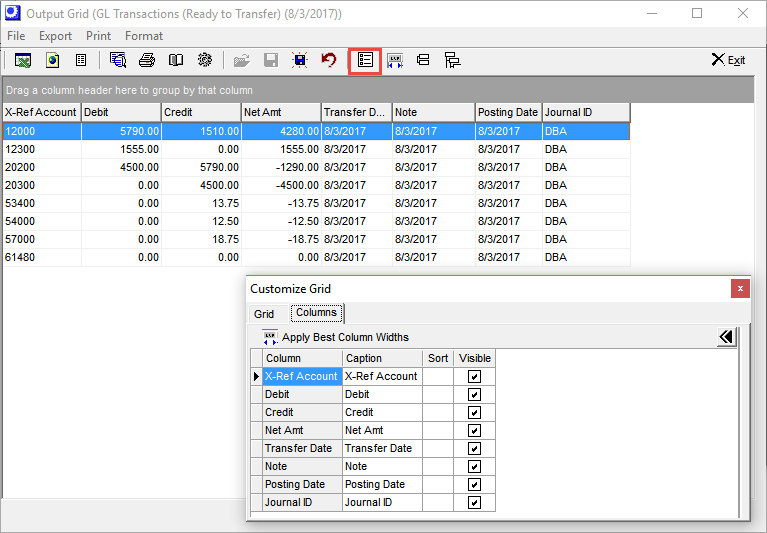
If you output to Excel or CSV, you are presented with the standard Windows ‘Save as’ screen. Your transfer file is given the name ‘GLTransfer’ and is saved to the default Output File Location specified in the Financial Transfer Defaults screen.
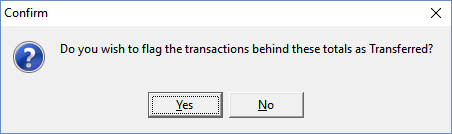
After your transfer file has been created, you are asked:
Do you wish to flag the transactions behind these totals as Transferred?
If you click Yes, the ledger transactions will be flagged as ‘transferred’ in the database and will not be listed for transfer again.
Transfer Immediately
If you are importing GL account totals, once your transfer file is created, import it immediately into your outside system. If you delay the import, there is always a chance that it can be overlooked and your transfer file gets overwritten by mistake. So always make transfer file generation and importing a single process.
Manual journal entry is a practical alternative
Because you only need to make a single transfer at period end and the so few accounts impacted in your outside system, transferring GL account totals through a manual journal entry is a practical alternative to data import.
History Tab
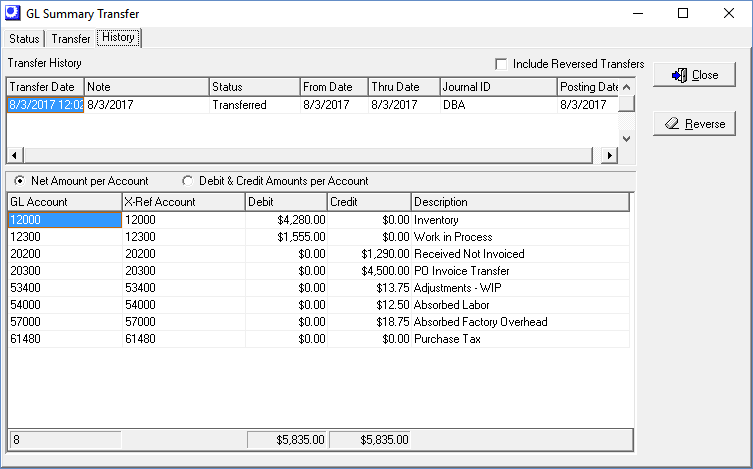
All previously transferred batches can be viewed on this screen.
Include Reversed Transfers
Select this checbox if you wish to include reversed transfers in the upper grid.
Transfer History Grid
All previous transfers are listed in the upper grid.
Lower Grid
The account summary detail listed in the lower grid corresponds with the transfer highlighted in the upper grid.
Reverse Button
If for any reason you wish to reverse a transfer, highlight that transfer in the upper grid and click this button.
NOTE: Be aware that reversing a transfer in DBA has no effect on any corresponding batch journal entered in your general ledger. So if you reverse a transfer in DBA, make sure you also reverse the corresponding batch journal entry in your general ledger.
