
(Admin – User Setup)
Use this screen to create user accounts and to manage user settings.
List Tab
User accounts are created on this tab.
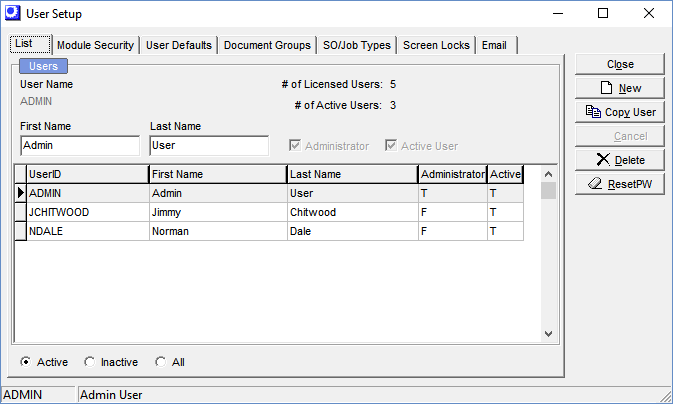
The ADMIN user cannot be deleted
Every system must have a default ADMIN user active. You can change the first name and last name against the default user.
Creating a new user
To create a new user, click the New button. Enter a User Name, which is the name used to log into the system. Enter a first and last name. If this user is to have “administrator” status, which allows access to certain screens that are off limits to other users, select the Administrator checkbox.
Active User Checkbox
Even though you can set up an unlimited number of users, the number of users that can be designated as active users (via selection of the Active User checkbox) is limited by the # of Licensed Users displayed in the upper right corner of the screen. Only active users will be allowed to log on to the system.
Change Password Screen
When each new user is created, the system assigns that user a password of ‘pass’. The user can log into the system and go to the File – Change Password screen and can then change the password to one of his or her choice.
Password Length & Case-Sensitivity
The password can be up to 15-characters long and is not case-sensitive.
Copy User Button
Many users have identical setup profiles. You can create a new user by highlighting an existing user and clicking the Copy User button. Enter the new User Name. This will copy all the highlighted user’s settings to the new user.
Module Security Tab
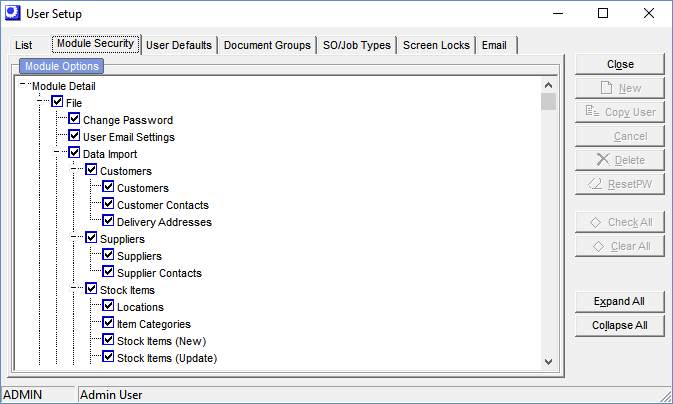
Use this tab to assign security permissions to the system’s menu options. Note that the checkboxes in the left column remove entire menus, while those to the right remove individual menu options.
NOTE: Each user will only see the menu options he or she has permission to access. Options without access permission will be invisible.
User Defaults Tab
Two settings are located on this tab.
Allow Grids to be Customized
Some entry grids in the system can be customized by changing the order and width of grid columns. Each time the user exits the screen and returns to it, the customized settings are lost. If you want this user’s settings to be retained and not lost, select this checkbox.
Document Groups Tab
DBA offers a Documents Directory, which provides links to key company documents such as employee manuals, contracts, warranties, instruction manuals, etc.
Use this tab to list the Document Groups to which this user is to have access. See chapter 10 for more information on the Documents Directory.
SO/Job Types Tab
All SO/Job Types are visible by default (when all types are unchecked). If you would like to restrict your opening lists for SOs and Jobs to specific SO/Job Types select the types by user. Our recommendation is to leave all types unchecked.
Screen Locks Tab
If this user occupies a “locked” screen, that screen is listed on this tab. A locked screen is not accessible to other users. The system administrator can unlock a locked screen by clearing the checkbox preceding the screen name.
This unlocking capability is only needed in situations where the user is in a locked screen and experiences a system failure, such as the computer being turned off. The program still thinks the user is in the locked screen and thus the screen cannot be used by anyone. In this case, clearing the locked screen frees it up for access to other users.
At present, the Batch Posting screen on the GL menu is the only screen in the system that locks out other users in the manner described.
Email Tab
User Email settings are entered on this tab. Your company email policy will be determined by the settings in Admin > Main Setup > Email.
SMTP Authentication Setting = Company Setup in Admin > Main Setup > Email
All emails will use the company SMTP credentials when sending emails. By default all emails will be sent from your company email address.
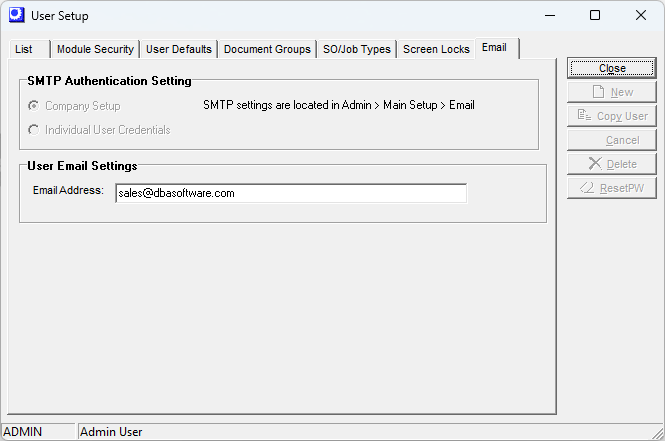
User Email Settings
Email Address
This will default to the company email address. If your Admin setup has checked "All users to override company email address for sending" you will be able to provide the user's email address. This email address must use the same verified domain as your company email address.
oThis field will be a non entry field if your company policy does not allow for a company email override.
SMTP Authentication Setting = Individual User Credentials in Admin > Main Setup > Email
All emails sent will use the sign in credentials of each DBA User.
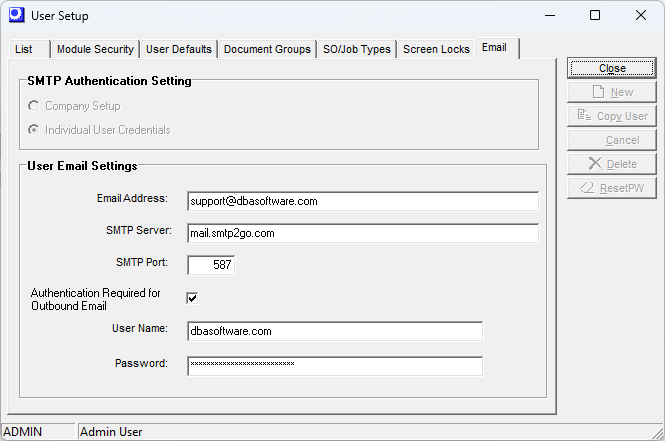
User Email Settings
Email Address
This will default to the company email address. You can optionally change this to the individual user email address.
SMTP Server
Specify the address of your outbound SMTP server.
SMTP Port
Enter the port that is required by your outbound SMTP server. Port 587 (Recommended), Port 465, or Port 2525. Port 25 is no longer recommended.
Authentication Required for Outbound Email
Select this checkbox if this user’s SMTP server requires user authentication. When selected, two additional fields become visible.
User Name
Enter this user’s authentication user name.
Password
Enter this user’s authentication password.
