
(File – Data Import – BOM – BOM Components)
Import Steps
Take the following steps to import a set of BOM components.
•Create a BOM parent record in the Bills of Manufacturing screen using the + button and lookup. If the BOM parent needs a Revision Name other than the default name, assign it an appropriate name.
•Create the routing so that imported components can be assigned to the routing sequence to which they are issued.
•In your import spreadsheet, populate the Sequence column with the routing sequence number to which the components are issued. In most instances all the components are issued to the same sequence, in which case you would copy and paste that sequence number to the entire Sequence column.
•After your spreadsheet has been edited with Sequence assignments, map the fields and import the BOM components per the specifications below.
Supporting Tables
Some or all of the following tables must be created in advance before you can import your BOM components. Refer to the Startup Guide for details.
Stock Items (Required)
All BOM parent items and components should be entered or imported before you can import BOM components.
BOM Parents (Required)
Each BOM parent item must be given a BOM parent record in the Bills of Manufacturing screen.
Routing
Routings should be entered or imported before BOM components so that components can be assigned to the routing sequences in which they are consumed.
*.csv File Format
Make sure you save the BOM components spreadsheet as a *.csv file type, which is required by the mapping screen.
Excel - Special Warning Regarding Leading Zeroes in your Reference IDs
Excel will automatically drop leading zeros from a Reference ID in a spreadsheet data column. This can lead to an "unable to find value" error during data import. If you encounter this issue, you may consider using the Open Office spreadsheet tool. The Open Office spreadsheet .csv format will not auto-format your data.
Spreadsheet Columns
Your spreadsheet can consist of some or all of the following columns. Be sure and insert a title in row one of each column heading so that the column can be identified during the import process.
BOM Parent (Required, String, 30)
This is the BOM parent item associated with this component. Any value in this field must correspond to an ‘M’ (manufactured) item record in the stock items table.
BOM Type (String, 1)
This is a one character field that corresponds to the following BOM type values. The BOM Type is only needed if you are setting up your BOMs for the first time. If you have already created the BOM header record and defined your Routings in the BOM screen, you do not need to map the BOM type field.
B = BOM
P = Phantom
F = Batch
C = One-Off
NOTE: If you leave this field blank, the program assigns ‘B’ (BOM) by default.
Revision (String, 20)
This is the revision associated with this BOM parent. If you leave this field blank, the default revision specified in the BOM Defaults screen will be assigned by the program. If a default revision is not specified in BOM Defaults, a value in this field is required.
Component (Required, String, 30)
Values in this column must correspond to a record in the stock items or descriptors table.
Line No (Float)
This field enables you to bring in your existing line numbers. If you delete this column from your spreadsheet and do not map it, the import program will automatically assign line numbers in increments of ‘10’ in the order that components are listed.
NOTE: Do not map the column if it has blank values or else all line numbers will be given a value of ‘0’ (zero).
Sequence (String, 10)
You can optionally assign each component to the routing sequence in which it is consumed. This field value must correspond to a valid sequence number within the routing for this BOM revision.
Type (String, 1)
Stock item components should be identified with an ‘S’ and descriptors with a ‘D’. If you leave this column blank, the program assigns a value of ‘S’.
Usage Qty (Required, Float)
This is the quantity required to make one unit (or batch size) of the BOM parent. Decimal quantities are permitted.
Fixed Qty (String, 1)
Set this to ‘T’ if you want this component to have a fixed usage quantity, regardless of the BOM parent’s job quantity. Set this to ‘F’ if you want a variable usage quantity, which generally applies to most components. If you leave this field blank, the program assigns an ‘F’ value by default.
Overage % (Float)
This is the expected scrap percentage associated with the component.
NOTE: You may need to edit the overage percentage field values. Some systems use a yield factor instead of a scrap percentage. 90% yield is the opposite of a 10% scrap factor in DBA. So if your old system uses yield, you must convert the values in this column to their opposite values.
Notes (Blob)
These are freeform notes associated with the component.
Spreadsheet Import
The BOM components spreadsheet is imported using the Import BOM Components screen shown below.
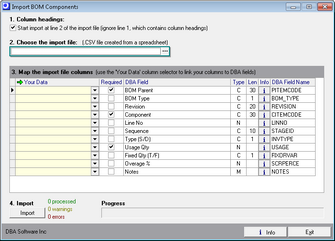
1. Column headings
This checkbox is selected by default and tells the program to skip row one of the spreadsheet because it contains column headings.
2. Choose the import file
Click the 3-dot button to navigate to your *.csv file, which is your spreadsheet.
3. Map the import file columns.
Om this step you will map each DBA field, where applicable, to the corresponding column on your spreadsheet. Field explanations are as follows:
Your Data
Click the down arrow and select the column heading from your spreadsheet that matches the DBA Field.
Required
This checkbox is selected when the field is required, which means all rows in your spreadsheet must have a value. Non-required fields do not have to be mapped to a spreadsheet column.
DBA Field
This is the descriptive name of the field in DBA.
Type, Len
‘C’ in the Type column indicates an alphanumeric field with a limit of so many characters as specified in the Len column. ‘N’ in the Type column indicates a numeric field.
Info
You can click the button in this column for additional information regarding this field.
DBA Field Name
This is the actual name of the field in the database.
4. Import
When you are done with your mapping, click the Import button. The program will attempt to import your data. If any errors are found, the data will not be imported and you will be given an error report. You should print out the report and make corrections to your spreadsheet.
NOTE: After you print out your report, do not close the Import BOM Components screen. If you do so, you’ll have to re-do all your mappings once again.
When the program is able run through the data without finding any errors, it will then ask you if you wish to import the data. Click Yes and all the data on the spreadsheet will be imported.
Copyright Notice
Portions of this import program Copyright 2005-2006 White Peak Software Inc
