
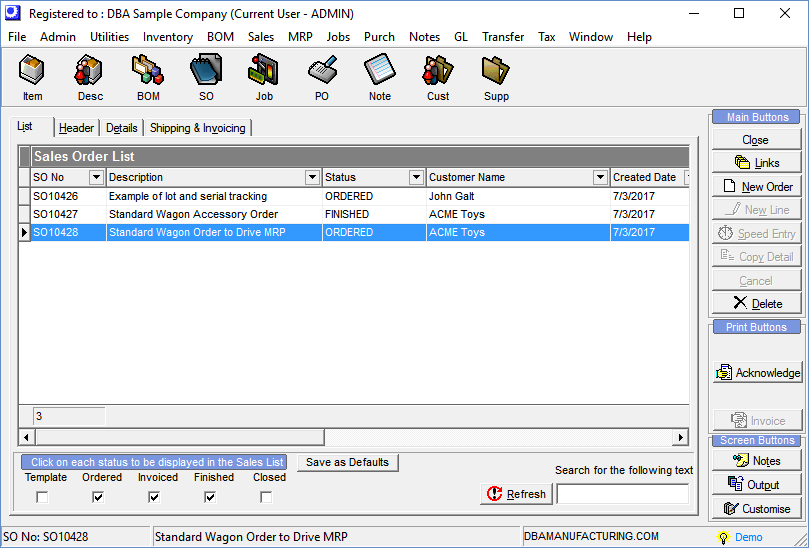
(Sales – Sales Orders - List Tab)
All or selected sales orders are listed on this screen, depending on the Status filters selected in the lower panel. You can highlight a sales order and then click any of the tabs to the right to enter order details.
Screen Details
Lower Panel
Template, Ordered, Invoiced, Finished, Closed
Select or clear the checkboxes in this panel to filter the list above by sales order Status. When Closed status is selected, we default to Sales Orders closed within the past year.
Save as Defaults Button
Each user can preserve his or her Status checkbox settings by clicking this button. Each time the screen launches, these settings will be selected by default.
Refresh Button
Click this button after selecting or clearing any Status checkboxes or entering any search text to re-display the list above.
Search for the following text
You can enter text in this field and then click the Refresh button to limit the list to SO Names containing that text string. If the Closed status is checked, the text search will be performed on all closed sales orders.
Links Button
You can click this button to link to the following screens. After closing the linked screen, you are returned to this screen.
| • | Order Picking |
| • | Sales Order Inquiry |
New Order Button
Click this button to create a new sales order. You are presented with the New Sales Order screen.
New Sales Order Screen
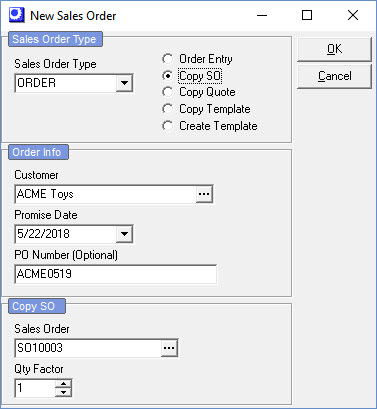
Sales Order Type
Your default SO Type is displayed, but you can make another selection, if you wish.
Order Entry Option
This option is selected by default and indicates that you wish to create a sales order through manual entry.
Customer
You must select a customer from the lookup.
Promise Date
By default the Promise Date is made equal to the current date plus any extra Shop Days specified in the Required Date - Reorder Point Items setting in Sales Order Defaults. '
NOTE: This is a header-level date that is independent from line item Required dates.
Use for sales or customer reference
The Promise Date can be used as a reference date for sales purposes, for communication to the customer, and for printing on the order acknowledgment.
Has no manufacturing purpose
The Promise Date has no manufacturing purpose. It is not a master schedule date and does not affect job or PO required dates. It can freely deviate from line item Required dates, which are master schedule required dates.
Can be used to delay new line Required dates for to-stock items
If you wish to add a delay factor to new line Required dates against to-stock items (those with Forecast Reorder Point or Manual Reorder Point order policy), you can move the default Promise Date out, in which case any new line entered for a reorder point item will be given a Required date equal to the Promise Date.
PO Number
You can optionally enter the customer’s PO number, if applicable.
OK Button
After your selections and entries have been made, click this button to create the sales order. After this screen closes, you are taken to the Header tab.
Credit Checking
The following credit checking is done, per the settings against this customer in the Credit Manager screen:
| • | If there is an SO Warning Message against this customer, the warning message is displayed. |
| • | If the customer has exceeded its credit limit, the Credit Status screen is displayed, which creates an “alert” in the Credit Manager screen. |
| • | If the Block SO setting is selected against this customer, the sales order is prohibited from being created. |
Copy SO Option
Select this option if you wish to originate the new sales order by copying one of this customer’s previous sales orders.
NOTE: When the new sales order gets created, prices and discounts are updated to current prices and customer pricing and discount settings.
When this option is selected, two additional fields are displayed in a new panel at the bottom of the screen:
Sales Order
From the lookup, select the pervious sales order you wish to copy.
Qty Factor
If you wish to increase the order quantities, whatever number you enter here will be multiplied against each order quantity on the sales order being copied. The default value is ‘1’.
Copy Template Option
Select this option if you wish to originate the new sales order by copying a sales order “template.” See the Create Template Option section below for information on how sales order templates are created and used.
When this option is selected, two additional fields are displayed in a new panel at the bottom of the screen:
Template
Select a template from the lookup.
Qty Factor
If you wish to increase the template quantities, whatever number you enter here will be multiplied against each order quantity on the template being copied. The default value is ‘1’.
Create Template Option
Select this option to create a sales order “template” rather than a sales order. The screen changes to this configuration:
How templates are used
A sales order template is used to represent a recurring type of order where the same set of line items is ordered each time. Rather than enter line items from scratch with each new order, you can originate the order from a template.
NOTE: You also have the option of copying in one or more templates into an existing sales order using the Copy Detail button on the Details tab.
When you create a new template, most of the fields on the Header tab are invisible. A customer is not specified. On the Details tab, enter the line items that comprise the template. When entering quantities, be aware that each line item’s Qty can be multiplied by a Quantity Factor at time of sales order creation.
NOTE: Do not enter prices because when a sales order gets generated from the template, each customer’s pricing rules are applied to the line items and overwrite any prices stored in the template.
Field Explanations
Type
Select the origination type. Three options are available:
Normal
Select this option if you wish to create the template from scratch.
Copy SO
Select this option if you wish to create the template by copying an existing sales order.
Copy Template
Select this option if you wish to create the template by copying an existing template.
Template Name
Give the template a name that identifies it on lookups.
Sales Order
This field is visible when the Copy SO option is selected. Select the sales order from the lookup from which the template is to be copied.
Template
This field is visible when the Copy Template option is selected. Select the template from the lookup from which the new template is to be copied.
Qty Factor
This field is only visible when the Copy SO or Copy Template option is selected. If you wish to increase the template quantities, whatever number you enter here will be multiplied against each order quantity on the sales order or template being copied. The default value is ‘1’.
Acknowledge Button
Click this button to print an acknowledgment for the highlighted sales order, which can be sent to the customer to verify the details of the order. The acknowledgment can also be used as a pro-forma invoice.
