
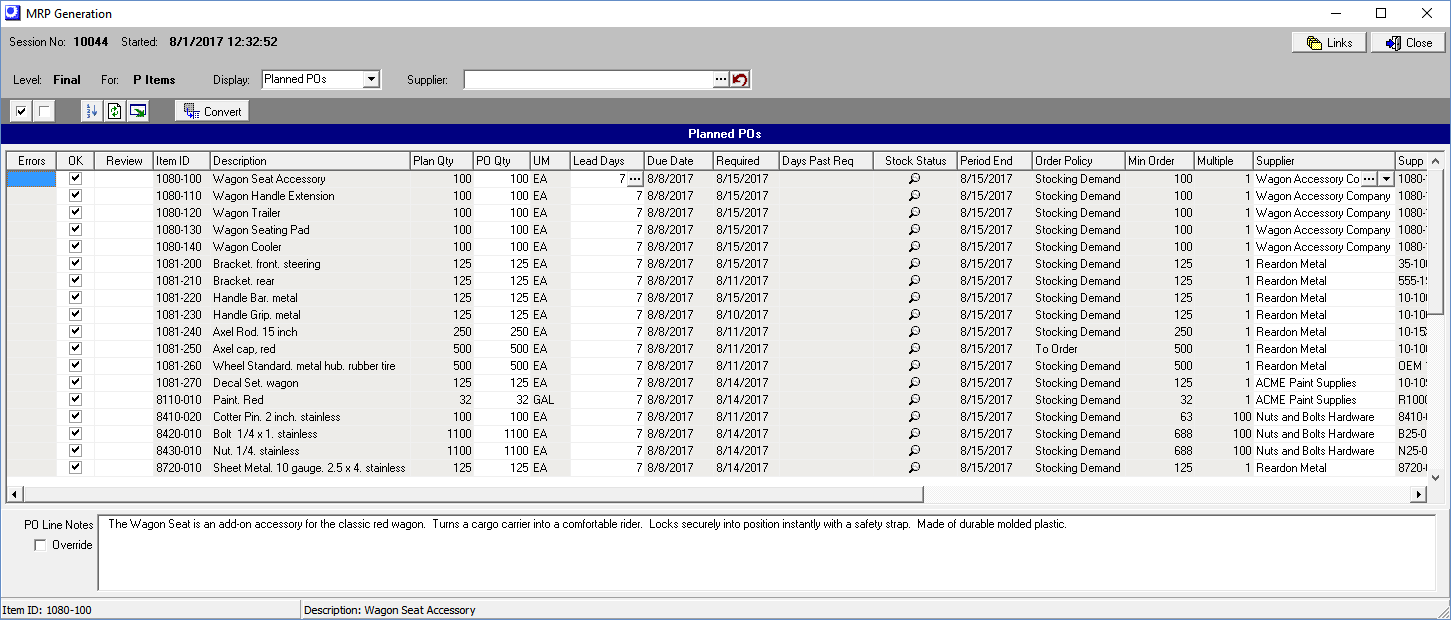
(MRP – MRP - MRP Generation - Planned POs)
This screen presents all purchase materials for the default supplier for each item. Price verification and supplier line card maintenance is built into this screen to ensure that your purchase prices are always accurate.
MRP Overview
You must convert all suggested Jobs and POs in an MRP Session
You must convert all suggested Jobs through all levels to meet your current requirements. The planned start dates of your converted Jobs drive the demand for your Purchased items. You must do a complete MRP run of all Jobs and suggested POs within each MRP session to ensure the integrity of your plan.
Item Time to Shipment targets generate sales order line item Required Dates to provide the demand that drives daily MRP generation. Jobs and POs are generated and converted level by level in response to current net demand within item planning periods relative to Reorder Points and Min Order quantities. Job and PO dates are derived and aligned from standard lead times with coordinated system target dates.
Demand Dates |
Supply Dates |
SO Line Required Date |
Job Finish Date |
Job Planned Start Date |
PO Line Expected Date |
React to the firm - MRP Action Windows
Instead of reacting to tentative demand, MRP will only react to firm demand. Each item has its own auto-calculated “action window”, which covers the time it takes to make or buy the item. MRP only reacts to demand within the action window, which is firm demand. Any demand outside the action window is tentative demand that is incomplete and highly likely to change as it firms over time.
Reacting to the firm yields miraculous benefits. Planned supply is always aligned with firm demand, which eliminates the misalignments that are the root cause of shortages, overstocking, and the need for constant job and PO revisions. Each item is planned individually, which eliminates the bullwhip effect from BOM explosions and job linking that amplifies misalignments at lower levels.
Screen Details
Grid Columns
Errors
A red icon displayed in this field indicates that errors exist that prevent this planned job from being converted. You can click the icon to get a listing of the error(s), which can include:
| • | The Item ID is invalid. |
| • | The Item ID is inactive. |
| • | The Supplier is invalid. |
| • | The Supplier is inactive. |
| • | This item has not yet been reviewed. |
OK
Select this checkbox to indicate that this planned PO has been reviewed.
Review
An icon is visible in this field when the item has a Review Note, which provides a means for conveying special planning instructions for the item. The icon is initially colored red because planned PO conversion is not permitted until you acknowledge that the Review Note has been read. To do so, click the icon, read the note text, then click Yes against the Review Completed? prompt. The icon will now be colored green to indicate that the note has been reviewed.
Item ID, Description
These fields identify the purchased item.
Plan Qty
This is the planned PO quantity, which is made equal to the item’s Reorder Point or Min Order quantity, whichever is greater. If the item has a Multiple quantity, the Plan Qty is rounded up to the nearest increment divisible by that quantity.
PO Qty
This will be the quantity assigned to the actual PO when the planned PO gets converted. By default, it is made equal to the Plan Qty. This is the minimum quantity needed to meet current requirements. The PO Qty is normally not subject to change, but if for some reason you wish to increase it, you can enter a larger amount.
WARNING: Do not decrease the PO Qty, which serves no purpose. If you do so, MRP will immediately generate another planned job for the shortfall amount in the next MRP session.
UM
This field displays the item’s stocking unit of measure.
Lead Days
This is the items Lead Days allocation which is the number of calendar days allocated by MRP for procuring the item.
Changing the Lead Days allocation
To change the Lead Days allocation, click the button in this field to launch the Change Lead Days screen. Change the Lead Days amount. You have the option of applying the change to the item’s MRP setting or you can make this an exception just for this planned PO.
NOTE: When the Lead Days amount has been reduced, it is displayed in bold blue. When it has been increased, it is displayed in bold red.
Due Date
This is the date the PO is expected to be received and available for issuing to jobs. It is established by forward scheduling the planned PO from the current date by the item’s Lead Days allocation, rounding forward, if needed, so that receipt occurs on a shop day.
Required
This is the planned PO’s Required date, which is established as follows:
| • | The Required date is made equal to the earliest date within the item’s planning period when projected stock goes negative. |
NOTE: This is the expected scenario with the To Order order policy.
| • | If projected stock does not go negative within the item’s planning period, the Required date is forward scheduled by the item's Replenish Time (Lead Days + MRP Interval + Non-Shop Days). |
NOTE: This is the expected scenario with the Stocking (Monthly Demand), Stocking (Safety Factor), and Stocking (Manual) order policies.
Days Past Req
If the planned PO’s Due Date is past its Required date, this is the number of calendar days between the two dates. This is for reference only. Typically, this is caused when actual demand exceeded forecasted demand for an item with a Reorder Point, resulting in a projected shortage.
Stock Status
You can click this icon to open the Projected tab of the Stock Status inquiry within which you can view the item’s supply and demand details.
A yellow icon indicates demand beyond the planning period
When the icon is yellow in color, it means that demand events exist beyond the planning Period End date. This is for information only and requires no additional action at this time.
Link:

Period End
This is the item’s planning Period End date. The item’s Planning Period is the total number of calendar days allocated by MRP for assessing net demand. It consists of the following elements, which can be viewed by clicking the down arrow in this field:
MRP Interval + Lead Days + Non-Shop Days + Extra Shop Days = Planning Period
The Non-Shop Days accounts for non-shop days such as weekends when the shop is not in production. The Extra Shop Days are extra planning period shop days specified in MRP Defaults.
How is it used?
MRP only generates a planned PO when an item’s required date is within its planning period, which is the “action window.” Any requirements outside the action window will be responded to in a future MRP run.
Order Policy, Min Order, Multiple
These read-only fields display the item’s current MRP settings for reference purposes.
Supplier Line Card and Price Updating

Supplier
The actual PO for this item will be assigned to this supplier. The item’s default supplier is selected automatically, but can be changed using one of the following options:
Selecting an alternate supplier
To select an alternate supplier, click the 3-dot button to launch a lookup on the item’s existing suppliers. .
Adding a new supplier
To designate a new supplier not yet assigned to this item, click the down arrow and select the Add option to launch the Add Supplier Line Card screen. All the fields that are normally entered in the Sources tab of the Stock Items screen (Supp Part No, Description, Supp UM, Multiple, Price) are presented for creation of a new supplier line card record
Editing an existing supplier line card
To change the line card record for the designated supplier, click the down arrow and select the Edit option to launch the Edit Supplier Line Card screen, within which you can make changes to any of the supplier line card fields (Supp Part No, Description, Supp UM, Multiple, Price).
Supp Part No
This read-only field displays the supplier’s part number, which flows through to the actual PO. To change this value, go to the Supplier field, click the down arrow, and select the Edit option to launch the Edit Supplier Line Card screen, within which you can change the Supp Part No value.
Supp Qty
This field displays the supplier’s quantity, which flows through to the actual PO. The PO Qty is multiplied by the supplier line card Multiplier to calculate this value.
NOTE: This is a calculated value that can be modified as needed. For example, if the supplier has a different unit of measure and the conversion multiplier results in a decimalized Supp Qty, you can edit out the decimals to make the Supp Qty a whole number on the actual PO. You may also wish to increase the Supp Qty to take advantage of a quantity price break.
Supp UM
This read-only field displays the supplier’s unit of measure, which flows through to the actual PO. To change this value, go to the Supplier field, click the down arrow, and select the Edit option to launch the Edit Supplier Line Card screen, within which you can change the Supp UM value.
Supp Price
This field displays the supplier price, which flows through to the actual PO. It can be changed as follows:
Changing the price in the supplier line card
To change the Supp Price in the supplier line card record, go to the Supplier field, click the down arrow, and select the Edit option to launch the Edit Supplier Line Card screen.
Entering a price for this PO only
If you wish to manually enter a price that applies on a one-time basis to this PO only, select the Override checkbox at right and enter the desired price in this field.
Price Origin
This field indicates the origin of the Supp Price and displays these possible values:
Item Source
The price originated from the Supp Price designed in the supplier line card maintained in the Item Sources tab of the Stock Items screen.
Override
The price was manually entered on a one-time basis for this particular PO.
Last Cost
The price originates from the item’s Last Cost under two conditions – when an Item Source price record does not exist or when a price record is past its expiration date.
Est Cost
If the Last Cost is to be used, but has no value, the item’s Estimated Cost is used instead.
DBA Unit Cost
This field displays the Supp Price translated into a unit cost that will be the cost basis when the PO is ultimately received to stock. It is calculated as follows:
Supp Price / Currency Exch Rate / Multiplier = Unit Cost
Manufacturer
You can optionally designate a Manufacturer and Mfgr Part No for this item. The item’s default manufacturer is selected automatically, but can be changed using one of the following options:
Selecting an alternate manufacturter
To select an alternate manufacturer, click the 3-dot button to launch a lookup on the item’s existing manufacturers.
Adding a new manufacturer
To designate a new manufacturer not yet assigned to this item, click the down arrow and select the Add option to launch the Add Manufacturer screen, within which you can add a Manufacturer and corresponding Mfgr Part No.
Editing an existing manufacturer
If you wish to change the Mfgr Part No or Default status against the designated manufacturer, click the down arrow and select the Edit option to launch the Edit Manufacturer screen.
Mfgr Part No
This read-only field displays the part number associated with the Manufacturer at left. To change this value, click the down arrow in the Manufacturer field and select the Edit option.
Item Category
This read-only field is provided for reference and sorting purposes.
Lower Panel
PO Line Notes
The text displayed in this panel will flow through to the actual PO line upon conversion and can be used to pass special instructions or comments to the supplier. The item’s SO / PO Notes maintained in the Stock Items screen are inserted by default.
Override
This checkbox is automatically selected when the default PO Line Notes have been edited, which helps you discern standard notes from customized notes.
