
(Jobs – Work Center Schedule - Schedule Tab)
The work center’s queue is displayed on this tab. Use this screen to assign job sequences to workers, issue materials in real time, and to update labor as job sequences are finished.
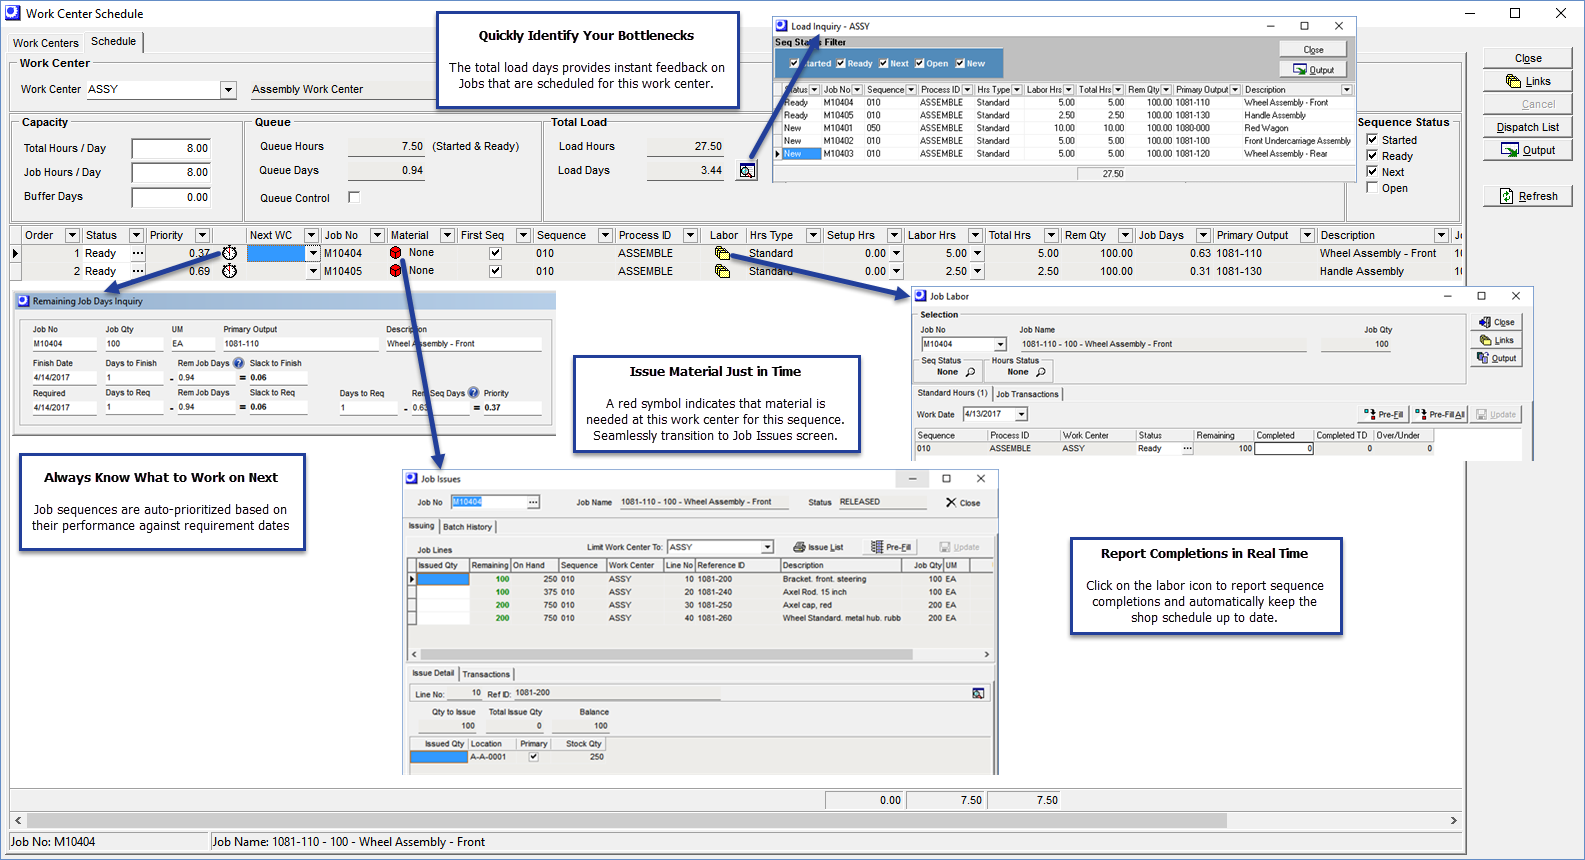
Work Center Schedule Overview
The Work Center Schedule screen prioritizes production activities and is used to execute the released job schedule.
Capacity settings are required for all work centers
Work Center capacity settings are a required to help us translate your cycle time raw hours into a more understandable Job Days value that more closely approximates your shop days of operation.
Jobs spend more time in queues than in production
A job typically spends more time in work center queues than it does in actual production. Whenever a job arrives in a work center, it competes with other jobs and must wait its turn to begin production. The Work Center Schedule manages this process by allocating queue time based on job priority.
Each job is automatically prioritized
Each released job is prioritized based on remaining production time relative to its target demand date. Jobs running behind schedule get higher priority over jobs running ahead of schedule
Larger jobs get higher priority
When a job has an unusually large quantity, it has more production time, which gives the job higher priority than would otherwise be the case with a normal quantity. The job will experience less waiting time in work center queues, which is how it can meet its target demand date in spite of the larger quantity.
Prioritized production expedites jobs and optimizes production flow
Prioritized production, where work centers are run by job priority, is far more efficient than ad hoc expediting done one job at a time. Jobs are efficiently expedited in coordinated fashion, which optimizes production flow and boosts shop throughput.
Labor sequences are updated in real time
Within the Work Center Schedule job sequences are updated in real time to update job priorities, work center queues, and enable real time job tracking. Labor updating is facilitated by applying standard hours to completion quantities as sequences are closed.
Materials are issued in real time
Along with real time labor updating, materials are issued as they are used by job sequences for real time inventory tracking. This facilitates stock counts by eliminating the need to account for materials in WIP.
Deploying workers and machines
Monitoring work center queues in the Work Center Schedule identifies bottlenecks and areas of the shop that need attention. This enables efficient deployment of workers and machines or application of overtime hours and extra shifts.
Screen Details
Upper Panel
Work Center
This field and the description to the right identify this work center.
Capacity (required settings)
Total Hours / Day
This setting represents the typical total hours available at a work center in a day. This value will be used to convert your total work center load and queue hours in the work center to work center Load Days and Queue Days.
Link:
 Shop Control Guide - Setup - Work Center Capacities
Job Hours / Day
This setting represents the total job hours in a day based on your typical job sequence deployment strategy at this work center. This will be the standard shift hours multiplied by the typical number of machines or workers utilized per Job Sequence. The key question is, do you typically assign multiple workers or machines to a single job sequence in production or do you assign one worker/machine per sequence? The Job Hours / Day value will be used to convert sequence hours to days at the individual Job level in the Job Days Inquiry, Job Priority, Slack to Required, Slack to Finish, and the Remaining Job Days Inquiry.
Link:
Shop Control Guide - Setup - Work Center Capacities
Buffer Days
This is what you consider to be the standard queue days for this work center. This can represent the time it typically takes to start a sequence that is added to a work center. A job typically spends more time in work center queues than it does in actual production. The Buffer Days value is used by the Job Days Inquiry to help calculate the item Job Days setting.
Link:
Shop Control Guide - Setup - Work Center Capacities
Queue
Queue Hours
This is this work center’s current queue, expressed in hours. The queue consists of the total remaining setup and labor hours for job sequences with a Status of ‘Started’ and ‘Ready’.
Queue Days
This is the work center’s current queue, expressed in shop days. It is calculated as follows:
Queue Hours / Total Hours/Day = Queue Days
Queue Control
Select this checkbox to activate Queue Control for this work center.
Link:
Shop Control Guide - Using Queue Control
Total Load
Load Hours
This is the total load on the work center, meaning the estimated setup and labor hours for all jobs, new or released. The total load consists of the total remaining setup and labor hours for job sequences including New (Job not released yet), Open, Next, Ready, and Started.
Load Days
This is the total load on the work center, meaning the estimated setup and labor hours for all jobs, new or released, expressed in shop days It is calculated as follows:
Load Hours / Total Hours/Day = Load Days
Sequence Status
You can select or clear these check boxes to filter the contents of the grid by job sequence status. See the Status field below for field value explanations.
NOTE: ‘Open’ status sequences are not eligible for worker assignment and are therefore not displayed by default.
Grid Fields
Order
This is the suggested order that job sequences be performed. Sequences are sorted by Status in this order – ‘Started’, ‘Ready’, and ‘Next’ – and then by ascending Priority value within Status.
Status
The job sequence Status value indicates the progress of the job sequence within the work center. Job sequences are grouped by Status in the order listed below and are described as follows:
Started
The job sequence is assigned ‘Started’ status when one or more job setup or labor transactions have been made or the status has been manually changed from ‘Ready’ to ‘Started’.
Changing from Ready to Started
When the status is ‘Ready’, you can click the button in this field to change the status to ‘Started’ to indicate that a worker has been assigned to this sequence.
Ready
The job sequence is assigned ‘Ready’ status under these conditions:
| • | The job has been released and this is the first job sequence, but no job setup or labor transactions have been made. |
| • | The previous job sequence has a ‘Closed’ status, but no setup or labor transactions for this job sequence have been made. |
| • | The previous job sequence has a ‘Started’ status and a negative Days to Next value, which means that “overlap” exists between the two sequences such that the second sequence can begin production while the first sequence is still in progress. |
Changing from Next to Ready
When the status is ‘Next’, you can click the button in the field to manually change the status to ‘Ready’ if you consider the sequence to be ready for production.
Next
The job sequence is assigned ‘Next’ status when the previous sequence has a status of ‘Started’.
Open
The job sequence is assigned ‘Open’ status when the previous sequence has a status of ‘Open’ or ‘Next’.
Priority
Job sequences are sorted by job Priority within sequence Status, which determines the optimal order in which job sequences should be performed. It is calculated as follows:
Shop Days to Required – Total Remaining Sequence Days = Priority
A negative value means that the job is running behind schedule relative to its Required date. Within each sequence Status, job sequences are listed in ascending Priority order so that jobs running behind schedule get priority over jobs running even or ahead of schedule.
NOTE: You can click the clock icon to the right of the Slack to Req field to launch the Remaining Job Days Inquiry, which displays the Priority calculation and underlying job details.
Link:

Slack to Req
This is the number of “slack days” that exist between today’s date and the job’s Required date. Slack days are a measure of surplus time in the schedule and are calculated as follows:
Days to Req – Rem Job Days = Slack to Req
NOTE: You can click the clock icon at right to launch the Remaining Job Days Calculator, which displays the Slack to Req calculation and underlying job details.
Clock Icon
This icon launches the Remaining Job Days Inquiry, which displays the Priority and Slack to Req calculations and underlying job details.
Link:

Next WC
This field identifies the job’s next work center. You can click the down arrow to view the work center’s actual Queue Days relative to its Buffer Days.
Job No
This identifies the job associated with this routing sequence.
Material
This field indicates the status of job detail lines assigned to this sequence. Click the icon to launch the Job Issues screen, which is pre-filled with the job detail lines assigned to this sequence, as well as any job detail lines for previous sequences that have remaining quantities. The following values are displayed to indicate material status:
None
This value is displayed with a red icon and means that no job issue quantities have been made.
Some
This value is displayed with a yellow icon and means that some issue quantities have been made.
Review
This value is displayed with a green icon and means that issue quantities have been made, but one or more lines still has a partial quantity remaining to be issued.
All
This value is displayed with a green icon and means that issue quantities have been made and there are no partial quantities remaining to be issued.
First Seq
If this is the job’s first sequence, this checkbox is selected. When it is the first sequence, the job has not actually been started and therefore there is no work in process staged in the work center queue. On the other hand, when it is not the first sequence, work in progress exists and occupies staging space in the work center queue.
Sequence
This identifies the job routing sequence.
Process ID
This identifies the work center standard process associated with this sequence.
Machine
This field is only visible when one or more machines are assigned to this work center. It displays the machine to which this job routing sequence is assigned. If multiple machines exist and you wish to change machine assignments, you can select an alternate machine from the lookup.
Labor
This icon launches the Job Labor screen, pre-filled to this sequence so that job labor can be updated when the job sequence is finished.
Hrs Type
This field displays the job sequence Labor Hours setting, which determines how job labor is entered in the Job Labor screen. ‘Standard’ means that only job sequence completion quantities or finished status are entered or selected and then the program applies labor hours based on job routing cycle times. ‘Actual’ means that job sequence completion quantities and actual labor hours are both entered.
Setup Hrs
This is the estimated remaining setup hours for this job sequence, calculated as follows. You can click the down arrow to view the underlying numbers.
Seq Setup Hrs – Actual Setup Hrs = Setup Hrs
NOTE: If any labor transactions have been made, this is given a value of zero.
Labor Hrs
This is the estimated remaining labor hours for this job sequence, calculated as follows. You can click the down arrow to view the underlying numbers.
Expected Qty / Items/Process * Processes/Hr – Actual Labor Hrs = Labor Hrs
The Expected Qty is equal to the completed quantity of the last closed sequence or, if no sequences are closed yet, equal to the first sequence’s completed quantity.
Total Hrs
This is the sum of the Setup Hrs and Labor Hrs.
Rem Qty
This field is only visible when the Completions – Enter Completed Qty option is selected in Job Labor Defaults. This is the remaining quantity expected to be completed for this job sequence, calculated as follows:
Expected Qty – Completed To Date = Rem Qty
The Expected Qty is equal to the completed quantity of the last closed sequence or, if no sequences are closed yet, equal to the first sequence’s completed quantity.
Job Days
This expresses the Total Hrs in shop days, calculated as follows:
Total Hrs / Job Hrs/Day = Job Days
Primary Output, Description
These fields identify the job’s primary output item.
Job Name
This field further identifies the job for reference purposes.
Select this checkbox against each job sequence you want listed on the work center dispatch list. By default, the program automatically selects job sequences with a status of ‘Ready’ or ‘Started’ and when the Next-Q value is not ‘Full’.
