
(Jobs – Jobs - List Tab)
Jobs are listed in the grid can be selected for viewing and editing.
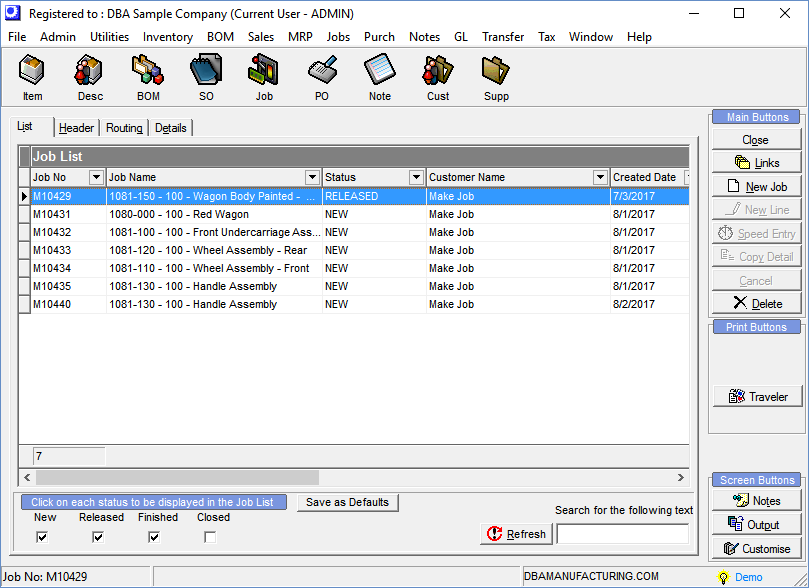
Screen Details
Lower Panel
New, Released, Finished, Closed
You can select and clear these checkboxes to filter the grid by job Status. After you’ve made your selections, click the Refresh button to apply the filtering to the list. When you select Closed status, we will default to Jobs closed within the past year.
Save as Defaults Button
Click this button to save your filtering selections as defaults that display each time the screen is displayed.
NOTE: Default settings are saved at the user-level and do not apply company-wide.
Search for the following text
You can enter a string of text characters and click the Refresh button to limit the list to job names containing that text string. If Closed status is selected, the text search will be performed on all Closed Jobs.
Links Button
This button enables you to link to other job-related screens and reports without having to exit this screen. You are presented with a list of menu options related to job processing and reporting. When you link to one of these screens, the current job is inserted into that screen without requiring a selection. When you close that screen, you are returned to this screen.
New Job Button
Click this button to create a new job. You are presented with the New Job screen.
NOTE: When you are using DBA as recommended, virtually all your jobs are created through the MRP screen (either directly from sales order lines or in response to net demand). The ability to create new jobs from this screen is provided for exception situations and is not intended to be used as the primary means for new job creation.
New Job Screen
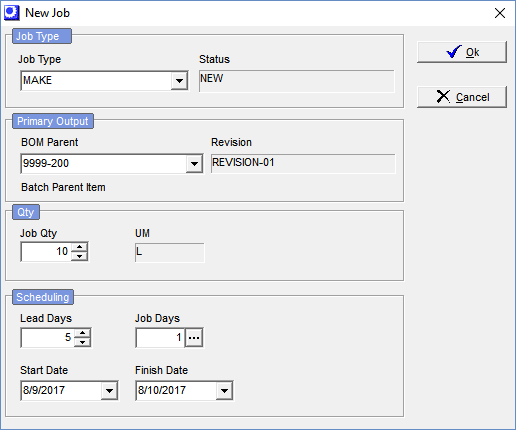
Job Type
Job Type
This displays your default job type, but you can make an alternate selection, if you wish.
Status
This read-only field displays the default status for this job type.
Primary Output
BOM Parent
Select a BOM parent item from the lookup.
NOTE1: The lookup is confined to ‘Current’ status revisions.
NOTE2: ‘Phantom’ and ‘Secondary’ BOM types are not listed for selection because those types cannot be manufactured on their own jobs.
Revision
This field displays the item’s current revision.
Qty
Job Qty
Enter the primary output’s job quantity.
UM
The primary output’s unit of measure is displayed for reference.
Scheduling
Lead Days
This is the number of days prior to the job’s start date. Lead days provide time to procure material or to make lower-level subassemblies. The primary output’s Lead Days setting from the MRP Settings screen is used by default (rounded up to an integer value), but can be overridden.
Job Days
This is the number of estimated workdays that will be required to complete the job, which establishes the interval between the job’s scheduled start date and finish date. The primary output’s Job Days setting from the MRP Settings screen is used by default. You can override the default amount manually or you can click the button in this field to launch the Job Days Calculator screen, which calculates the job days based on the new job make quantity and current work center capacity settings.
Start Date
This will be the new job’s scheduled start date, which is established as follows:
| • | The default date is forward scheduled from the current date by the item’s Lead Days allocation, rounded up to the nearest valid shop day defined in the shop calendar. |
| • | You are not allowed to select a date earlier than the default date, but you can select a later date, which automatically moves out the Finish Date (based on maintaining the Job Days interval while skipping over any non-valid workdays defined in the shop calendar). |
| • | If the Finish Date is changed to a later date, the Start Date is moved out automatically (based on maintaining the Job Days interval while skipping over any non-valid workdays defined in the shop calendar). |
Finish Date
This will be the new job’s scheduled finish date, which is established as follows:
| • | The default date is established by adding the item’s Lead Days to the Start Date while skipping over any non-valid workdays (such as weekends) defined in the shop calendar. |
| • | You are not allowed to select a date earlier than the default date, but you can select a later date, which automatically moves out the Start Date (based on maintaining the Job Days interval while skipping over any non-valid workdays defined in the shop calendar). |
| • | If the Start Date is changed to a later date, the Finish Date is moved out automatically (based on maintaining the Job Days interval while skipping over any non-valid workdays defined in the shop calendar). |
OK Button
Click this button to generate the job and close the screen. The following processing occurs:
| • | The job header record is created and is assigned the default job status and scheduled start and finish dates. Today’s date is assigned as the job creation date. |
| • | A job detail line is created for the primary output using the indicated job quantity. |
| • | When applicable, job detail lines are created for any secondary outputs defined in the primary output’s BOM. Usage quantities for secondary outputs not flagged for a ‘Fixed Qty’ are multiplied by the primary output’s job quantity. |
| • | The primary output’s BOM routing sequences are copied to job routing sequences. Estimated job costs for setup, labor, and manufacturing overhead are calculated using current work center hourly rates. |
| • | The primary output’s BOM components are copied to job detail lines. Usage quantities for components not flagged for a ‘Fixed Qty’ are multiplied by the primary output’s job quantity. Estimated job costs for material are established using each component’s current estimated cost. |
| • | Job detail lines are created for any subcontract services defined as job routing sequences. Estimated job costs for subcontract services are established using the costs stored in each subcontract routing sequence. |
| • | For any component that is a phantom assembly, job detail lines are generated for the phantom’s components and are assigned to the same routing sequence as the phantom parent (a job detail line is not created for the phantom parent itself). Usage quantities for components not flagged for a ‘Fixed Qty’ are multiplied by the phantom assembly job quantity and are assigned to the phantom parent’s routing sequence. Estimated job costs for material are established using each component’s current estimated cost. |
Delete Button
Click this button to delete the selected job.
NOTE: You are not permitted to delete a job that has had any actual transactions. If you don’t intend to finish the job, go to the Header tab and change the job’s Status to ‘FINISHED’. You can then close the job in the Job Control Panel screen.
