
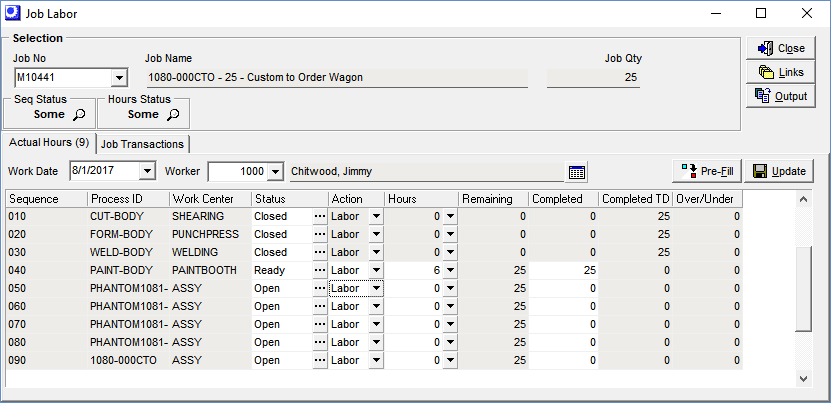
(Jobs – Job Labor - Actual Hours Tab)
Job routing sequences with an ‘Actual’ Labor Hours setting are listed for entry on this tab.
Screen Details
Upper Panel
Work Date
This is the date of the job labor transaction. It defaults to today’s date, but can be overridden.
Worker
You must select a worker from the lookup or you can type the worker number directly into the field. After the worker is selected, the job routing sequences are displayed in the grid.
NOTE: If you enter a transaction and then select another job, the worker remains selected until you select another worker.
Worker Hours Inquiry
Click the search icon next to the worker name for a listing of this worker’s job labor transactions for this work date.
Pre-Fill Button
This button is only visible when the Completions – Enter Completed Qty option is selected in Job Labor Defaults. When a sequence is selected in the grid below, you can click this button to make the Completed quantity equal to the Remaining quantity.
Update Button
You can make one or multiple entries in the grid. When you are finished, click this button to process your entries, which creates the following transaction for each job routing sequence:
Completed Qty
Completed Entry
The Completed quantity entered is posted.
Finished Checkbox
The Remaining quantity is posted as the completed quantity.
Hours
The actual setup or labor hours are posted as entered.
Costs
Setup
Setup Hours * Work Center Setup Rate
Labor
Labor Hours * Work Center Labor Rate
Mfg Overhead
Labor Hours * Work Center Overhead Rate
Grid Columns
Sequence
This field displays the job routing sequence.
Process ID
This field displays the process associated with this sequence.
Work Center
This field displays the work center associated with this sequence.
Status
The sequence status is assigned by the program based on the conditions described below. Where noted, you can manually override the automatic status assignments.
Open
The job sequence is assigned ‘Open’ status when the previous sequence has a status of ‘Open’ or ‘Next’.
Next
The job sequence is assigned ‘Next’ status when the previous sequence has a status of ‘Started’ and has a zero or positive Days to Next value.
Manual Change Option
You can click the button in the Status field to manually change the status from ‘Next’ to ‘Ready’ if you consider the sequence to be ready for production.
Ready
The job sequence is assigned ‘Ready’ status under these conditions:
| • | The job has been released and this is the first job sequence, but no job setup or labor transactions have been made. |
| • | The previous job sequence has a ‘Closed’ status, but no setup or labor transactions for this job sequence have been made. |
| • | The previous job sequence has a ‘Started’ status and a negative Days to Next value, which means that “overlap” exists between the two sequences such that the second sequence can begin production while the first sequence is still in progress. |
Manual Change Options
You can click the button in the Status field to manually change the ‘Ready’ status. Two options are available:
| • | If you consider the job sequence to not be ready for production at this time, you can manually change the status from ‘Ready’ to ‘Next’. |
| • | If you know that production has actually started, but no job setup or labor transactions have yet been made, you can manually change the status from ‘Ready’ to ‘Started’. |
Started
The job sequence is assigned ‘Started’ status when one or more job setup or labor transactions have been made, but the sequence has not yet been closed.
Closing the sequence short
If the Completions – Enter Completed Qty option is selected in the Job Labor Defaults screen, you can click the button in this field to change the status from ‘Started’ to ‘Closed’ if you wish to close the sequence short with less than the remaining quantity.
NOTE: If the Completions – Flag as Finished option is selected in the Job Labor Defaults screen, you cannot close the sequence short.
Closed
The job sequence is assigned ‘Closed’ status under these conditions:
| • | The Completions – Enter Completed Qty option is selected in the Job Labor Defaults screen and the Completed TD quantity is equal to the completed quantity of the last closed sequence. |
| • | The Completions – Flag as Finished option is selected in the Job Labor Defaults screen and the Finished checkbox is selected. |
Reopening a closed sequence
You can click the button in this field to change the status from ‘Closed’ to ‘Started’ if you wish to make additional entries against this sequence.
Action
‘Labor’ or ‘Setup’ indicates what type hours are being entered. ‘Labor’ is selected by default.
NOTE: ‘Setup’ cannot be selected when the Setup – No Entry, Use Standard Hours option is selected in the Job Labor Defaults screen. Instead, the program automatically posts standard setup hours for this sequence when the first actual labor hours are posted.
Hours
Enter (or use the Hours Calculator) the actual setup or labor hours associated with this job labor transaction, in decimal hours.
Hours Calculator
You can optionally click the down arrow to launch the Hours Calculator screen, which works as follows:
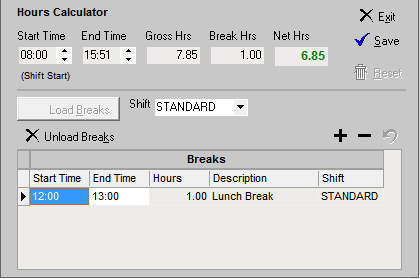
Upper Panel
Start Time
If one or more labor transactions exist for this worker on this work date, the start time defaults to the end time of the most recent transaction. If there are no labor transactions, the start time defaults to the worker’s shift start time.
End Time
If the work date is the current date, the end time defaults to the current time.
Shift End Button
If you click this button, the end time defaults to the worker’s shift end time.
Gross Hrs, Break Hrs, Net Hrs
These values are automatically calculated by the program.
Save
Click this button to save your entries. The Hours Calculator screen is closed and the Net Hrs are inserted into the Hours field. When the transaction gets updated, the Start Time, End Time, and Break Hrs are saved in the transaction record. Break start and end times are not saved.
Lower Panel
Load Breaks Button
After the start time and end time are established, click this button to load any shift breaks that occurred during the interval between the start time and end time, which can be edited if you wish. The total break time is inserted into the Break Hrs field above.
Shift
This defaults to the shift assigned to this worker, but you can select another shift, if you wish.
Remaining
This is the expected quantity remaining to be completed. It is calculated as follows:
First Sequence
Primary Output Job Qty – This Sequence Completed TD
Subsequent Sequences
Last Closed Sequence Completed TD – This Sequence Completed TD
If no sequences are closed yet:
Primary Output Job Qty or First Sequence Completed TD (whichever is greater) – This Sequence Completed TD
Finished
This field is only visible when the Completions – Flag as Finished option is selected in the Job Labor Defaults screen. Select this checkbox when the sequence is fully completed, which changes the sequence status to ‘Closed’.
Completed
This field is only visible when the Completions – Enter Completed Qty option is selected in the Job Labor Defaults screen. Enter the completion quantity associated with this transaction.
Maximum Allowable Qty
If this is the first sequence, you are allowed to enter a completed quantity that causes the Completed TD to exceed the primary output’s job quantity, to allow for overruns.
On subsequent sequences, you cannot enter a completed quantity that causes this sequence’s Completed TD to exceed the Completed TD of the last closed sequence. If there are no closed sequences, this sequence’s Completed TD cannot exceed the primary output job quantity or the Completed TD of the first sequence, whichever is greater.
Completed TD
This field is only visible when the Completions – Enter Completed Qty option is selected in the Job Labor Defaults screen. This is the total completed quantity for all transactions associated with this sequence.
Over/Under
This field is only visible when the Completions – Enter Completed Qty option is selected in the Job Labor Defaults screen. If an overrun occurred on the first sequence, the overrun quantity is displayed in this field as a positive number. If any sequence was closed short, the shortage quantity is displayed in this field as a negative number.
