(BOM – Work Centers - Processes Tab)
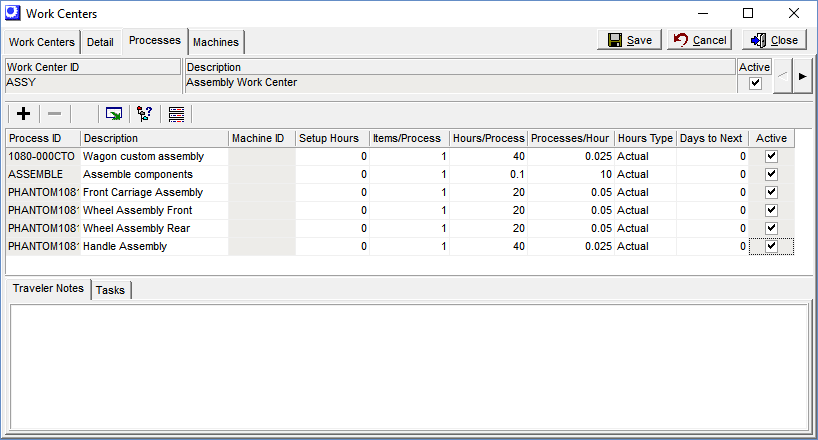
On this tab you can optionally set up commonly performed “processes” that are performed in this work center. Processes are used to originate new routing sequences within the Bills of Material and Jobs screens.
Link:
 Startup Guide - Work Center Processes

Processes are not required
You are not required to define specific processes at each Work Center. It is OK to use the DEFAULT process for each Work Center and you then define your Routing sequences from scratch in each respective BOM.
Potential Benefits of Using Processes
Instead of creating each routing from scratch, creating a set of common processes makes it easier and faster to create new routings. You simply select a process from the lookup, or a set of sequential processes using the Routing Generator, to create routing sequences. Once the sequence is created, its description, cycle times, or traveler notes can be edited as needed to suit the particular item being made. Using processes also helps impose a consistency to your process descriptions and job traveler notes.
What is considered a process?
Each production step can be defined as a process (potential routing sequence) if it meets these two criteria:
It must be measurable
Only production steps that are capable of being measured in terms of time per process should be set up as a process. Small steps that can’t easily be measured should be set up as “tasks” that are performed as part of a larger process. For example, in the sample company, assembling the wagon components is set up as a single routing sequence. There are many small steps involved in assembling the wagon, but it is not practical to measure how long each such minor step would take. On the other hand, the total time it takes to assemble a wagon is easily measurable and therefore can be considered a single process.
It must be able to be scheduled
Only production steps that are capable of being scheduled should be set up as a process. This means that it is appropriate for the routing sequence to be listed in the Work Center Schedule screen. Routine inspection, for example, may not be worthy of being listed on the work center schedule and is more appropriately defined as a task within a process.
When you update settings against a Process ID it does not automatically get applied to existing BOM sequences
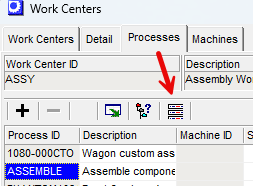
If you update any of the settings against a Process ID, or if you update the Traveler Notes or Tasks, these do not automatically get applied to existing BOM sequences. You will need to highlight the sequence and select the icon for BOM Mass Update to apply the settings to existing BOM sequences using the Process Replace screen (see details below).
Screen Details
Upper Panel
Work Center, Description, Active
These read-only fields identify the work center.
◄ ►
Click these buttons to select the previous work center listed on the Work Centers tab or to advance to the next work center.
Buttons
+
Click this button to add a process to the grid below.
–
Click this button to delete a process.
NOTE: This button is grayed out if the process is assigned to an existing BOM or job routing sequence. As an alternative to deletion, clear the Active checkbox against the process.
Output Grid
Click this button to launch the Grid Output screen. Buttons in the upper panel of that screen enable you to output the grid contents to an Excel spreadsheet, an HTML file, a CSV file, or to a printout.
Process Where Used
Click this button to launch the Process Where Used inquiry, which provides a listing of the routing sequences to which the selected process is assigned.

Warning: Changes to the Process ID default settings do not automatically apply to existing BOM sequences
BOM Mass Update
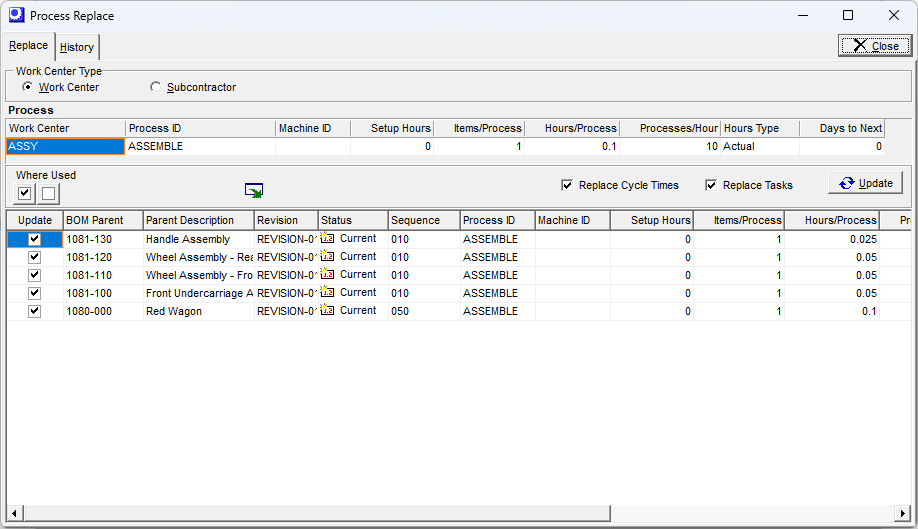
Click this button to launch the Process Replace screen, which enables you to apply cycle time or task changes to all BOM routing sequences assigned to this process.

How to apply Process ID settings to Existing BOM sequences
•Highlight the Process ID, and update the cycle times, Traveler Notes and Tasks from the Work Centers>Processes Tab list, and select Save to update the changes
•Select the BOM Mass Update Icon
•Choose the sequences you wish to replace with the default Process ID
•If you click Replace Cycle Times, this will update the Machine ID, Setup Hours, Items/Process, Hours/Process, Hours Type, and Days to Next for all selected sequences
•If you click Replace Tasks, this will replace the tasks from the default Process ID for all of the sequences selected to Update
•Hit Update button, and it will update the sequences selected.

Screen Details
Upper Panel
This process’s cycle times are listed in this panel. These cycle times will be applied to all BOM sequences listed in the grid against which the Update checkbox is selected.
Middle Panel
Display Descriptions
Select this checkbox to display descriptions in the grid for the BOM Parent, Revision, and Sequence.
Replace Cycle Times
By default, this checkbox is selected, in which case this process’s cycle times will replace the cycle times for all listed BOM sequences that are flagged for updating.
Replace Tasks
Select this checkbox if you want this process’s tasks to replace the tasks against all listed BOM sequences that are flagged for updating.
Update Button
Click this button to apply this process’s settings to all BOM sequences listed in the grid against which the Update button is selected.
Grid
Update
This checkbox is selected by default, but you can clear it against any BOM process that you do not want updated.
Grid Fields
Process ID
Enter an up to 20-character alphanumeric name or code that identifies the process on lookups, screens, and reports.
DEFAULT Process
At least one process must be assigned to each work center. If you add a new work center and save it without creating at least one process, the program will automatically create a process with an ID of ‘DEFAULT’. If you choose not to use processes, the DEFAULT process will be used to originate all new routing sequences for this work center. If you use processes, you can delete the DEFAULT process and enter your own set of processes.
Description
Enter an up to 50-character description of the process to be performed.
Machine ID
This identifies the machine assigned to this process, if applicable. If the work center consists of multiple interchangeable machines, we recommend that you select one as the default machine and then change the machine assignment if needed at production time.
Setup Hours
Enter the estimated setup time for this process, expressed in decimal hours. For example, 30 minutes would be entered as ‘.5’. You can click the button in this field to launch a calculator to help you convert standard time into decimal hours.
Items/Process
If this process yields one unit of this item, leave this field at the default setting of ‘1’. If this process yields a set of items (such as with a multi-cavity mold), enter the number of items in this field. The Hours/Process is divided by the Items/Process to determine the time required to make one unit of the item.
Hours/Process
Cycle time is expressed in terms of “processes.” A process can be an assembly operation, a hit from a punch press, a mold cycle, etc. A process can produce a single part or several parts at a time. Enter the time (hours, minutes, seconds) required for each process.
NOTE1: As an alternative to making a time entry, you can enter the Processes/Hour (see next), which automatically calculates the Hours/Process.
NOTE2: The maximum number of hours you can enter in this field is 24 hours. If you have a cycle time longer than 24 hours, leave this field blank and use the Processes/Hour field instead. In that field, enter time based on this formula: 1 / # Hours. A cycle time of 40 hours, therefore, would be given a Processes/Hour value of ‘.025’. (When you do this, the Hours/Process field receives a nonsensical, value which you can safely ignore).
Processes/Hour
As an alternative to entering Hours/Process, you can express the cycle time in terms of Processes/Hour. The entry of either field automatically updates the other.
Hours Type
This setting determines how labor hours for this sequence are to be processed. Two options are available.
Standard (Recommended)
With this option, actual labor hours are not collected. Instead, standard hours from the job routing specifications are used for job costing purposes, based on completion quantities or finished status entered in the Job Labor screen.
Standard hours are recommended for improved throughput
When the Standard hours type is used against job sequences, labor can be quickly updated in just a few clicks because standard setup and labor hours are applied instead of actual hours. Using standard hours eliminates all the mechanical processes that are required to collect and report actual labor hours. Our recommendation is to use Standard hour sequences and commit to reporting completions when sequences are finished.
Use Standard hours for partially attended processes
Some work center machines can be started and run without the need for a worker to be present the entire time. To handle this scenario, the cycle time should be for the complete run time for the process. You can adjust the labor costing using the Labor Cost Factor in the BOM > Work Center > Details tab. For example, if the work center process is attended 20% of the time you can set the Work Center Labor Cost Factor to .20 and the Mfg OH Factor to 1. The costing will adjust the absorbed labor rate and leave the mfg overhead rate fully intact.
Use Standard hours for work center processes that require a team of workers
Some work centers require a fixed team size to perform a process. To handle this scenario, the cycle time should be for the complete run time for the process. You can adjust the Labor Cost Factor in the BOM > Work Center > Details tab to adjust the labor cost rate to reflect the team. For example, if the process requires a team of 2 workers, you can set the Labor Cost Factor to 2.
Actual (Use Sparingly)
With this option, actual worker hours are to be collected against this sequence and entered in the Job Labor screen. Here are a few possible scenarios that may utilize Actual hours:
▪When a process is one-off, custom in nature and has high variance potential from the estimated cycle time.
▪Job Shop environments that typically manufacture with a Job Quantity of 1
Special Warning Regarding Actual Hours
Our experience has shown that it is very difficult to perform actual hours in most manufacturing environments. The reality of most shops are that once an item is finished it is shipped out as soon as possible regardless of whether all of the costing information has been submitted. It is very easy to make errors or omissions in labor entry that can have a very consequential effect on your cost of sales accounts and make your income statement a challenge to interpret. Since the product is likely already out the door, there is not an opportunity to fix the costs after the fact. We strongly recommend Standard hours completions for most companies
Days to Next
This represents the number of workdays between the completion of this process and the start of the next process. This setting is used with cycle times for three purposes:
Move Time
There may be a predictable move time involved in getting these parts from this work center to the next.
Forced Wait Time
Sometimes an item must wait before it can move on to the next process. A painted part might require drying time, for example.
Overlap
This can also be a negative number for situations where items produced on one routing sequence can be started in the next sequence without having to wait for the entire run to be completed before doing so. In scheduling terminology this is referred to as “overlap.”
Active
Clear this checkbox to inactivate the process. This removes the process from lookup and the Routing Generator so that it is no longer available for new routing sequence creation.
NOTE: You are not permitted to clear this checkbox when the process is assigned to a routing sequence associated with a current or pending BOM revision.
Traveler Notes Sub-Tab
You can enter unlimited freeform notes to describe the process to be performed. These notes print on the job traveler and provide instructions to your shop personnel.
Tasks Sub-Tab
“Tasks” can be used to break the process down into specific steps, for reference purposes. All this information prints on the job traveler.
NOTE: Tasks are for documentation purposes only (such as inspection procedures) and have no effect on costing or scheduling.
Order
This number determines the order in which the tasks are performed. The program automatically assigns this number in increments of ‘10’, which can be overridden.
Task
You can enter a task name or you can select a “task template” from the lookup. Task templates are maintained in the Task Templates screen.
Description
Enter an up to 50-character description of this task.
Task Notes
Enter freeform notes to further describe this task.
