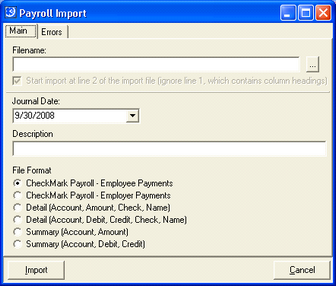
(GL – Payroll Import)
This screen is used to import payroll transaction detail or account summaries into the Journal Entry screen. Once the information is in the Journal Entry screen, it can be reviewed and posted to the General Ledger.
Training Videos
Support Center – Videos–How Do I? – General Ledger Training Course
Segments: Payroll Setup, Payroll Journal Entry, Payroll Import, CheckMark Payroll Import
Payroll Setup
Refer to chapter 11-3B, Payroll Accounting, for details on setting up your payroll system to conform to the DBA standard Chart of Accounts.
Detail or Summary Import?
You have the option of importing the complete detail associated with each payroll payment or you can import a summary debit or credit total for each GL account.
| • | Whenever possible, especially if you are using an outside payroll service, we recommend importing summary information as the more efficient alternative. Importing all the payroll detail into DBA simply duplicates the detail that is stored in your payroll system and needlessly clutters up the general ledger. |
| • | The detail options are available for companies that feel a need to reconcile their payroll bank account through the Account Reconciliation screen. |
| • | The CheckMark options are for users of CheckMark Payroll®, which is a stand-alone payroll software package. With CheckMark you are required to import payroll detail. |
File Types
You can import records from a CSV file (Excel spreadsheet) or you can import a comma delimited Text file.
Screen Details

Filename
Click the 3-dot button to navigate to your import file location. You can select a file type of ‘*.txt’ or ‘*.csv’.
Start the import at line 2 of the import file
If the first row or line of your import file is used for column headings, select this checkbox.
NOTE: This option is grayed out if you select any of the CheckMark Payroll options.
Journal Date
Select the posting date that will be applied to your Journal Entry. Make sure this date is equal to the actual payment date of the payroll transactions.
Journal Description
Enter the Journal Description that will be applied to your Journal Entry.
File Format
Six file format options are available:
NOTE: If you select a Detail or Summary option below, your spreadsheet columns or text file field positions must be in the exact order listed in parentheses.
CheckMark Payroll, Employee Payments
Select this option if your using CheckMark Payroll year 2009 version or later. Complete transaction detail for each employee payment gets imported.
CheckMark Payroll, Employer Payments
Select this option if your using CheckMark Payroll year 2009 version or later. Complete transaction detail for each employer payment made to payroll vendors gets imported.
Detail (Account, Amount, Check, Name)
We recommend either of the two Detail options when you process payroll in house using a stand-alone payroll software package. Complete transaction detail for each employee or payroll vendor payment gets imported. Select this Detail option if each import record contains a single amount with a minus sign in front of credit values.
Detail (Account, Debit, Credit, Check, Name)
Select this Detail option if each import record contains separate debit and credit amounts instead of a single amount.
Summary (Account, Amount)
We recommend either of the two Summary options when you outsource payroll to a payroll service provider. Only a single debit or credit amount per GL account gets imported. Select this Summary option if each import record contains a single amount with a minus sign in front of credit amounts.
Summary (Account, Debit, Credit)
Select this Summary option if each import record contains separate debit and credit amounts instead of a single amount.
Import Button
Click this button to import your file. After the import is completed, you are swapped to the Journal Entry screen.
Journal Entry Screen
The program creates a batch Journal Entry. Your import records are listed in the lower grid with Debit or Credit amounts. If you imported check numbers and employee or payroll vendor names, that information is displayed in the Chk No and Payee columns.
The next step is to review the Journal Entry and then post it, the same way you would post any other Journal Entry. If your batch is not in balance, you must find the source of the imbalance and make appropriate corrections.
Errors Tab
Your file will not be imported if any errors are encountered, which are listed on the Errors tab. Each import record within your file must have a valid GL account and an amount greater than zero. If any errors are listed, you must edit your file and make appropriate corrections, then you can attempt the import once again.
