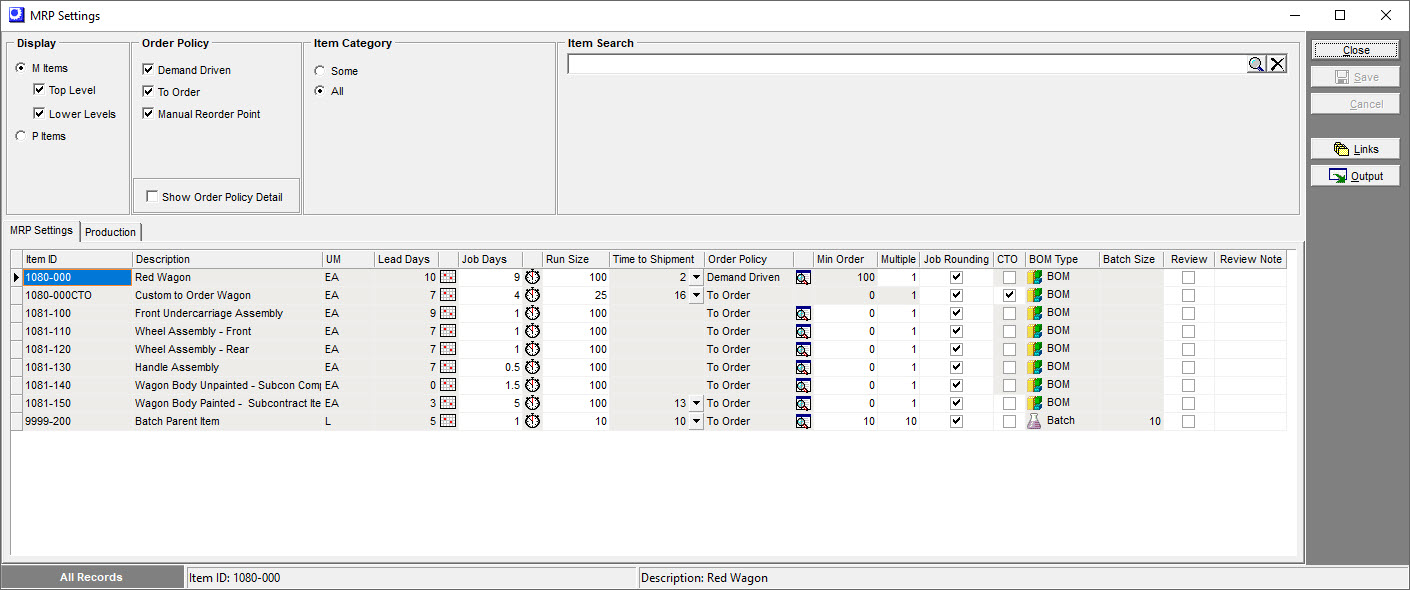
(MRP – MRP Settings - M Items Grid)
Use the M Items grid to enter MRP settings for your manufactured items. You must enter a Job Days allocation for all of your manufactured items.
Recommended Reading:
 MRP Guide - Phase 1 - Plan Times to Shipment
Educational Video:

MRP Settings Overview
Make sure that all Manufactured (M) items have Job Days allocations and all Purchased (P) items have Lead Days allocations. These allocations are required for proper inventory levels and target dates throughout the system.
DBA requires the “Big 3” lead time settings
Whether you run MRP or not, the DBA workflow requires the “Big 3” lead time settings – a realistic Lead Days target for each P item, a realistic Job Days target for each M item, and the correct item Order Policy based on lead day contribution.
DBA auto-calculates the following:
Pre-Job Lead Days for your manufactured items
The pre-Job Lead Days for each M item is calculated based on the longest Lead Days + Jobs Days among its To Order policy components. Pre-Job Lead Days set the job Planned Start date for Jobs to ensure that you have time to produce To Order subassembly Jobs and procure To Order purchased components.
A Time to Shipment target for your for-sale manufactured items
A Time to Shipment target for your top level for-sale manufactured items is calculated based on the item's own pre-Job Lead Days + Job Days + SO Default Extra Days.. The Time to Shipment target is used to establish SO line Required Dates that drive the MRP system demand, priorities, and material allocations.
MRP Replenishment Time Action Windows
The MRP “action window” refers to each item’s planning period replenishment time. For Manufactured items, replenish time is comprised of the item’s pre-Job Lead Days + Job Days allocations (+ MRP Interval + Non-Shop Days + Extra Shop Days). For Purchased items, replenish time is comprised of the item’s Lead Days allocation (+ MRP Interval + Non-Shop Days + Extra Shop Days). MRP only reacts to demand within the action window, which is firm demand. Any demand outside the action window is tentative demand that is incomplete and highly likely to change as it firms over time. Any requirements outside the action window will be responded to in a future MRP run.
System wide settings: The MRP Interval reflects the typical number of shop days between MRP sessions specified in MRP Defaults The Non-Shop Days accounts for non-shop days such as weekends when the shop is not in production specified in the Shop Calendar. The Extra Shop Days are extra planning period shop days specified in MRP Defaults.
Replenishment Time Reorder Points
For items that you choose to stock using the Demand Driven order policy, a Monthly Potential Demand rate is translated to daily rate and it is multiplied to by the Item's Replenishment Time to come up with a dynamically calculated Reorder Point. The basic principle of Demand Driven stocking is that you trigger an order with enough time to replenish the stock before you run out. This aligns your inventory with your firm demand.
DBA Innovation - Dynamic Calculations
When you change any one of the Big 3 MRP Settings, or if you make system wide changes to your MRP Interval, MRP Defaults Extra Days or change your Shop Calendar work days, the system will automatically perform calculations for all items through all levels of production via system triggers. This is an incredibly powerful innovation that is unique to the DBA system.
For example, if you change a long lead day purchased item order policy from To Order to Demand Driven stocking it would remove that component as a lead day contributor in all places it is used. Now imagine that item was used in 100 different bills of material at several different BOM levels. The trigger automatically applies changes from lowest level BOM order to top level manufactured items. There would be an immediate change in M item Lead Days, Time to Shipment targets, Replenishment Times, and Reorder Points for all impacted items.
Screen Details
Grid Fields
Item ID, Description, UM
These read-only fields identify the manufactured item.
Lead Days
This read-only field is the pre-job Lead Days allocated for buying or making components to order before a job for this item can be started. It is automatically made equal to the longest lead time among the item's To Order policy components. The Lead Days value is always auto-calculated for your manufactured items.
Purpose
The pre-job Lead Days allocation establishes the earliest allowable job start date and combines with the standard Job Days to determine the item's time to shipment. The pre-job Lead Days + Job Days + MRP Interval determine the item's MRP planning period action window and Replenishment Time.
Reducing the Lead Days value:
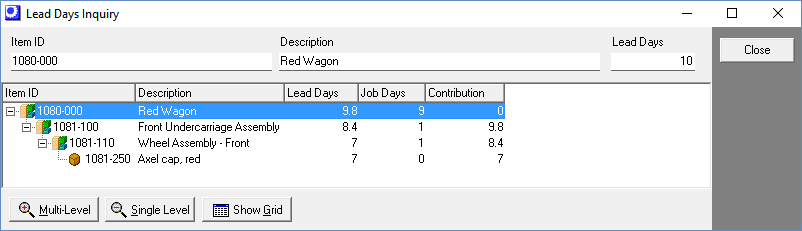
The item’s pre-job Lead Days allocation can be reduced by removing contributor components. Click the icon at right to launch the Lead Days inquiry, which displays the item's To Order policy components. The Lead Days value is equal to the component with the longest lead time listed in the Contribution column, rounded up to a whole number. Remove that component as a contributor by assigning it a Demand Driven stocking order policy. After doing so, examine the effect on the Lead Days value. Continue removing contributor components until the Lead Days value is reduced to your satisfaction.
Job Days
The M item's standard Job Days is maintained in this entry field.
The Job Days is a required MRP setting for all of your manufactured items
The manufactured item Job Days is an integral element of Demand Driven MRP and is a required setting that cannot be skipped or given artificial values. Without exception a standard Job Days must be assigned to each and every M item.
The Job Days is standard production time
The Job Days setting is the item's standard production time for a typical job quantity, expressed in shop days.
Job Days Purposes
Establishes job dates
The Job Days is accompanied by the pre-job Lead Days, which is automatically calculated and is the time allocated for making subassemblies or procuring materials to order before a job can be started. Together the two settings comprise the item’s lead time and establish job start and finish dates.
Contributes to higher-level lead times
A job that uses a component item with a To Order policy must wait until the item is procured or manufactured before the job can be started. When several To Order policy components exist, the one with the longest lead time determines the parent item's pre-job Lead Days allocation. Therefore any lower level M item with a To Order policy is a lead time contributor to higher-level items.
Contributes to Time to Shipment
When a top level sell item has a To Order policy, its pre-job Lead Days and standard Job Days contribute to its Time to Shipment target for sales order required dates. This provides sufficient time for making the item to order.
Enables late job tracking and job rescheduling
The standard Job Days determines job finish dates for late job tracking in the Job Schedule screen and for job rescheduling in the Job Control Panel - Release Jobs screen.
Determines item planning periods
The pre-job Lead Days and standard Job Days (along with the system MRP Interval setting) determine each item's planning period action window for job generation. Any demand beyond the planning period will be responded to in a future MRP session when it falls into the action window and becomes current demand.
Replenishment Time helps determine the amount of inventory you carry
The pre-job Lead Days and standard Job Days (along with the system MRP Interval setting) determine each item's Replenishment Time. For Demand Driven order policy items, your Monthly Potential Demand value is converted to a daily rate that is multiplied by the item's Replenishment Time to come up with a dynamically calculated Reorder Point. An accurate Job Days allocation is therefore essential to maintaining an efficient inventory.
The Job Days and pre-job Lead Days are not isolated settings
The Job Days and pre-job Lead Days are not isolated settings. When a lower level subassembly item has a To Order policy, its lead time contributes to the lead times of higher-level items. If you give the Job Days a padded or inflated value, you get inflated lead times at higher levels, inflated time to shipment targets, and distorted sales order required dates. Inflated Job Days can also contribute to inflated Replenishment Times and excessive inventory levels. So it is essential that the Job Days is a realistic value that approximates actual production time.
Job Days Guidelines
•Enter a realistic value that is standard production time for a typical job quantity, expressed in shop days. Production time is the total number of days between job start and job finish and includes actual processing time, work center queue time, and move time between work centers.
•Many M items have similar or identical production processes, in which case the same standard Job Days can be applied to multiple items.
•An approximate value based on judgment and past experience will provide good results. Standard Job Days values can be refined over time as you get feedback from actual results.
How can a standard Job Days apply to different job quantities?
How can a standard Job Days setting apply when job quantities vary from job to job? The standard Job Days is for time to shipment planning where the ultimate objective is to achieve consistent ship dates over time from order to order. When a job has an unusually large quantity, the job gets higher priority in work center queues, which reduces overall queue time and enables the job to meet its required date. So dates stay fixed for consistent scheduling and shop activities flexibly adapt to meet the schedule.
Never adjust Job Days for particular situations
One thing you must absolutely avoid is adjusting standard Job Days values on a situational basis to accommodate a particular requirement or order quantity. Doing so will disrupt date alignment within the master schedule. Use standard Job Days settings and the system automatically adjusts job priorities to accommodate unusual quantities.
Never pad or inflate Job Days to expand item planning periods
Another thing you must absolutely avoid is to pad or inflate Job Days settings in order to expand item planning periods. Inflated Job Days settings inflate higher-level lead times and time to shipment targets and distort sales order required dates.
If you prefer longer planning periods:
Item planning periods keep inventory lean because they prevent jobs from being generated prematurely before they are needed. That being said, if you feel more comfortable with longer planning periods, never pad or inflate Job Days settings, which has harmful consequences. Instead, go to the MRP - MRP Defaults screen and use the Planning Period - Extra Days for Lower Level M Items setting to expand all subassembly item planning periods by a set number of days.
Planning periods are never expanded for top level items
Planning periods are never expanded for top level items because premature job generation at the top level will generate premature demand for lower items that would cause excessive inventory and introduce long term dates into what should be a firmly set master schedule. The planning period for top level items is also ideally suited for handling blanket sales orders because it excludes demand from future required dates that does not need current action.
Use the Production Inquiry for guidance
For guidance in establishing the standard Job Days, click the Production tab to reference actual shop days for past jobs.
Use the Job Days Inquiry for reference
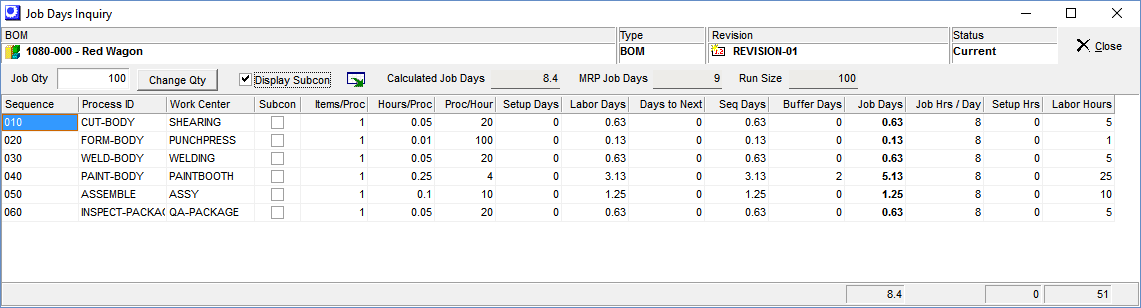
For assistance in establishing the standard Job Days, click the button in the Job Days field to launch the Job Days Inquiry, which calculates an estimated Job Days based on applying the item’s standard Run Size to current work center capacity settings and routing cycle times.
CAUTION: The calculated Job Days will only have meaningful value if work center capacity settings are properly established.
Production Inquiry
For additional assistance in establishing the Job Days allocation, click the Production tab to reference actual shop days for past jobs.
Run Size
Each item's standard Job Days is accompanied by a standard Run Size in this field, which represents a typical job quantity.
Run Size Purposes
Used for Job Days Inquiry calculations
The standard Run Size is used to calculate an estimated Job Days amount in the Job Days Inquiry (see below), which can be used as a reference to help establish the standard Job Days value.
Amortizes setup and fixed usage quantity cost
The standard Run Size is used by the Cost Rollup to amortize total fixed setup cost and fixed quantity component cost into a unit estimated cost.
Run Size Entry
Enter a standard Run Size that represents a typical job quantity.
Use the Production Inquiry for guidance
For guidance in determining an appropriate Run Size, click the Production tab to reference past job quantities.
Time to Shipment
Each top level item has a calculated Time to Shipment target that establishes sales order required dates and shipping priority.
Time to Shipment targets establish SO Required Dates
Top level item Time to Shipment targets establish sales order Required Dates, which drive job generation and job and shipping prioritization.
Enables a company-wide time to shipment strategy
Time to Shipment targets enable you to formulate an overall time to shipment strategy for staying competitive in your marketplace. This is a company-wide strategy because planned times to shipment and underlying lead times and order policies can be shared with management, sales, and production personnel to achieve common objectives.
How is Time to Shipment calculated?
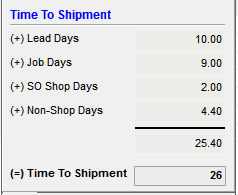
A Time to Shipment target is calculated for each of your top-level M items as follows. You can click the down arrow in the Time to Shipment field to view the calculation variables.
To Order Policy Items
When the item has a To Order policy, it is planned to be made to order, in which case Time to Shipment is calculated from the following variables:
Lead Days
This is the item's standard Lead Days for pre-job procurement or production of to order materials or subassemblies.
Job Days
This is the item's standard Job Days for production time.
SO Shop Days
With To Order policy items the extra Shop Days enables you to extend SO line item Required Dates by an extra day or two.
NOTE: If you specify any extra shop days, all jobs for To Order policy items will be delayed by that number of days. Unless you purposely want a widespread delay to all such jobs, we do not recommend using this setting.
Non-Shop Days
Time to Shipment is factored by this number of days to account for weekly non-shop days defined in the Shop Calendar.
Stocking Order Policy Items
When the item has a Stocking order policy, it is planned for immediate shipment from stock. In this case Time to Shipment is calculated from the following variables:
SO Shop Days
An extra Shop Days can be specified in the SO Required Dates screen against Stocking order policy items to add an extra day or two to account for orders that are received today, but can’t be shipped until tomorrow or the next day.
Non-Shop Days
Time to Shipment is factored by this number of days to account for weekly non-shop days defined in the Shop Calendar.
Review and refine Time to Shipment targets as needed
You should review all Time to Shipment targets to verify that they have realistic values and meet your marketing objectives. When you encounter a value that needs refinement, you can take any of the following measures:
Make sure standard lead times are realistic
Make sure that all your P item Lead Days and M item Job Days settings are realistic. It these lead time settings are padded or inflated, your Time to Shipment targets will be inflated as well.
Make sure stocked items have a Demand Driven order policy
Make sure the items you stock in actual practice are given a Demand Driven or Manual Reorder Point order policy or else those items will contribute to higher level lead times, which will inflate top level Time to Shipment targets.
Eliminate Time to Shipment with strategic stocking
You can eliminate Time to Shipment altogether (except for SO Shop Days and Non-Shop Days) by assigning the top level item a Demand Driven or Manual Reorder Point order policy.
Reduce pre-job Lead Days by removing lead time contributors
You can reduce the item’s pre-job Lead Days by removing contributor components. To do so, examine the item’s Lead Days inquiry, which displays the To Order policy component that contributes the longest lead time. Assign that component item a Demand Driven order policy to remove it as a lead time contributor. After doing so, examine the effect on the Lead Days and continue removing contributor components as needed.
Reduce the item’s standard Job Days
You can reduce the item's standard Job Days over time as you get more efficient with demand driven manufacturing.
Order Policy
This setting is for lead time planning and determines whether the item is a lead time contributor or not.
A standard Order Policy is a required MRP setting
A standard Order Policy for each item is an integral element of Demand Driven MRP and is a required setting that cannot be ignored or conflict with your actual planning behavior. Without exception a clear and consistent Order Policy must be assigned to each and every P and M item. Refer to the Order Policy Screen link below for more details.
Order Policy Definitions
Demand Driven
Assign the Demand Driven order policy when you intend to maintain stock on hand sufficient to cover a high probability of your potential demand scenarios. You will enter a Monthly Potential Demand value and a Supply Days target and the system will dynamically calculate the Reorder Point and Min Order quantity values that are used generate demand-driven jobs or purchase orders. Because your planning intent is to have stock on hand readily available, these items are not lead day contributors in the jobs and SOs where they are used.
To Order
Only assign the To Order policy when a component item is always ordered before parent jobs can be started or when a sell item is always made for each sales order. These items are always lead day contributors where they are used.
Note: It is important that To Order policy items remain strictly To Order. If you intend to sometimes carry extra stock or if you want a minimum quantity for price break reasons, the Demand Driven order policy is recommended. You can go to the MRP > Order Policy Review screen to audit your To Order items.
Manual Reorder Point (not recommended)
This is for manual planners that do not use MRP for jobs or purchase orders. The planning assumption used by the software is that you intend to have stock on hand for all demand scenarios. Because your planning intent is to have stock on hand readily available, these items are not lead day contributors in the jobs and SOs where they are used. Data Import - Convert Manual Reorder Point to Demand Driven
Order Policy Screen
Click the icon to the right of this field to launch the Order Policy screen
NOTE: The icon is not visible against CTO items, which are automatically assigned a To Order policy.
Link:

Min Order
When MRP generates a planned job, the job quantity will be equal or greater than the Min Order quantity. It is maintained within the Order Policy screen, which is accessed by the icon to the right of the Order Policy field. For Demand Driven order policy items, the Min Order is usually calculated based on the Supply Days setting. To Order items should typically not have a significant Min Order because this introduces supply in excess of demand. If a To Order item has a significant Min Order requirement, we recommend the Demand Driven order policy instead
Multiple
When an item must be manufactured in increments of a particular quantity, perhaps to reflect a machine batch quantity, enter a Multiple quantity. MRP will round planned job quantities up to the next increment divisible by the Multiple quantity.
NOTE: When an item has a BOM type of ‘Batch’, by default the Multiple is given a value equal to the current revision’s Batch Size.
Job Rounding
When this checkbox is selected and this item is used as a component in a higher-level job, the component job quantity will always be rounded up to a whole number.
Clear this checkbox when you purposely want a decimal quantity for the job component, such as with m items that are cut, divided, apportioned, etc.
NOTE: Even though the component job quantity can be a decimal amount, all jobs that get generated for the item can only have a whole number as the job output quantity.
CTO
This checkbox field is only visible against top level items. When an item is flagged for CTO job linking it is assigned a To Order policy and jobs are linked to and generated directly from sales order lines for the exact quantity ordered.
Avoid CTO job linking with standard items
CTO job linking is ideally suited for one-off, custom items that are made to order and never stocked. For standard items, however, CTO linking is counter-productive and should be avoided because such items are interchangeable from order to order and subject to stocking. There is no ability to adjust CTO jobs to account for stock on hand or to consolidate demand into more efficient job sizes. Furthermore, CTO linking forces items to be made to order, even in cases where items with frequent orders could be planned with a Demand Driven stocking order policy to enable immediate shipment from stock.
Subassembly jobs are always net demand
There is not an option to set subassembly items to CTO. The demand will be combined if there are multiple jobs requiring that subassembly within that subassembly's planning period. If you run MRP on a daily basis, the demand and supply will mostly align one for one, but you gain the added benefit of covering multiple demand points if they arise. The net demand approach allows you to more easily set the Order Policy to Demand Driven for commonly used subassembly items. Having commonly used subassemblies readily available from stock can significantly improve your overall manufacturing efficiency and reduce times to shipment.
BOM Type
This read-only field displays the item’s BOM Type for reference purposes, which can have a value of ‘BOM’ or ‘Batch’.
NOTE: Items with a BOM Type of ‘One-Off’, ‘Phantom’, or ‘Secondary’ are not listed in the grid because such items are not given MRP settings.
Batch Size
When the BOM Type = ‘Batch’, this read-only field displays the Batch Size stored against the default revision, for reference purposes.
Review
Select this checkbox to activate the icon in the Review Note field at right.
Review Note
Click the icon in this field to launch the Edit MRP Review Note screen, within which you can enter unlimited freeform text.
How the Review Note is used in MRP
Each planned job generated by MRP represents a minimum action profile. An item may have special production requirements, however, that go beyond the minimum action profile. For example, a planned job may have to be split and quantities rounded to conform to machine batch sizes. Any such special requirements can be documented with a Review Note that gets included with each planned job during MRP generation. A planned job cannot be converted until its Review Note is read and confirmed.
Link:
MRP Guide - Using Review Notes
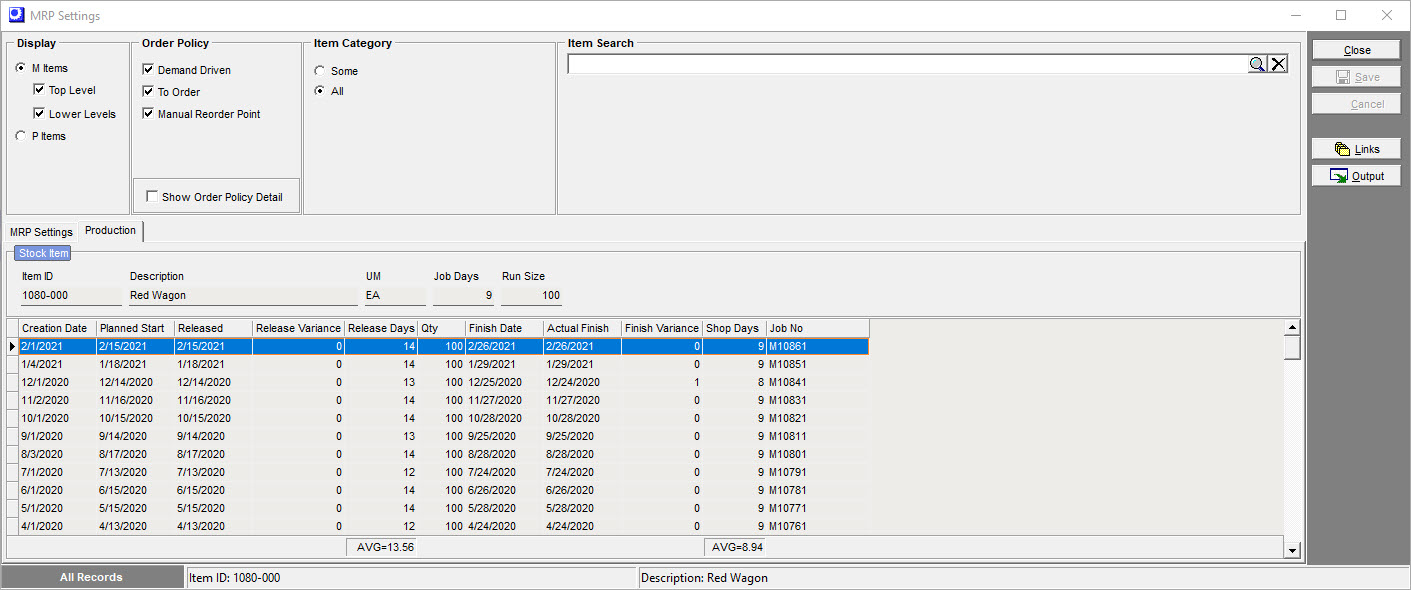
Production Tab
Past job history for a selected item can be viewed by clicking the Production tab at the top of the grid. Only jobs with an Actual Finish date are included in this list. This inquiry can be used to compare current item settings with past results. A Shop Days value is calculated, which is the number of shop days between the job’s Released date and Actual Finish date.
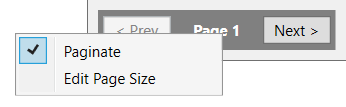
Pagination
Pagination status is found in the lower left hand portion of the screen.
NOTE: Column sorting and output options will only work on the dataset displayed per page.
•To remove pagination and display all records, right click on the page and uncheck the Paginate option.
•To change the page size, right click on the page and select Edit Page Size.