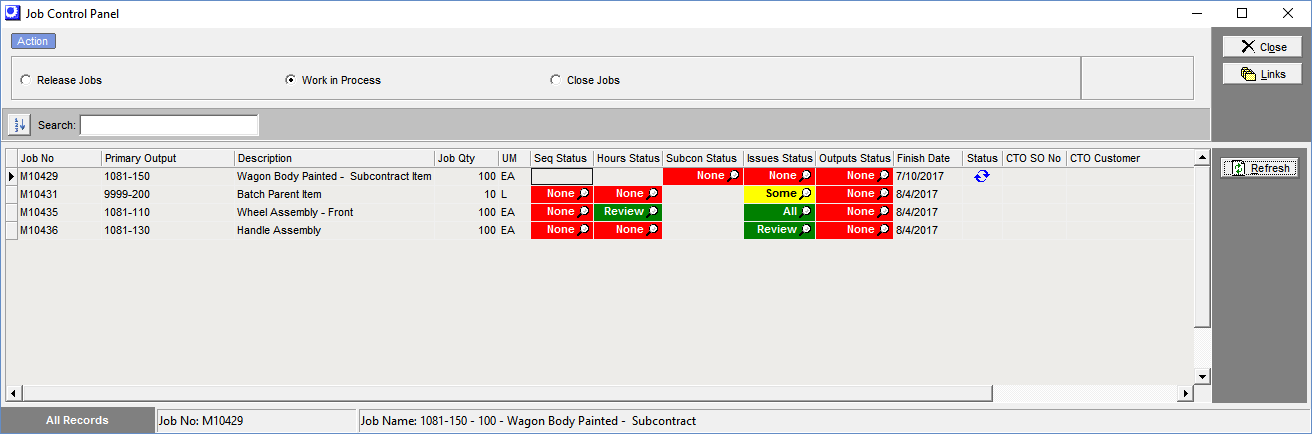
(Jobs – Job Control Panel - Work in Process)
This screen provides an inquiry on your overall progression of your jobs. Your actual shop control of job issues and labor entry should be done in the Work Center Schedule queues.
Screen Details
Grid Fields
All jobs with a status of ‘RELEASED’ are listed in this grid.
Job No
This number identifies the job.
Req by
If the job is linked to a sales order or job line, the sales order or job number is displayed in this field.
Primary Output, Description
These fields identify the job’s primary output.
Finish Date
This is the job’s scheduled finish date, which is for reference only. If you wish to change this date, click the Links button and navigate to the Job Scheduling screen.
Seq Status
This field displays the status of this job’s routing sequences.
| • | A value of ‘None’, which is displayed in a red cell, means that none of the job’s routing sequences have a status of ‘Closed’. |
| • | A value of ‘Some’, which is displayed in a yellow cell, means that some of the job’s routing sequences have a status of ‘Closed’. |
| • | A value of ‘All’, which is displayed in a green cell, means that all of the job’s routing sequences have a status of ‘Closed’. |
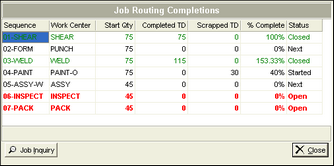
You can click on the lookup icon to launch this screen, which shows you the sequence status details:
Hours Status
This field displays the status of this job’s non-subcontract routing sequence labor hours.
| • | A value of ‘None’, which is displayed in a red cell, means that no labor hours have been entered or backflushed against any of this job’s non-subcontract routing sequences. |
| • | A value of ‘Some’, which is displayed in a yellow cell, means that some labor hours have been entered or backflushed against some, but not all, of this job’s non-subcontract routing sequences. |
| • | A value of ‘All’, which is displayed in a green cell, means that some labor hours have been entered or backflushed against all this job’s non-subcontract routing sequences. |
NOTE: Be aware that even though some labor hours have been reported against each sequence, it does not guarantee that all labor hours have been reported.
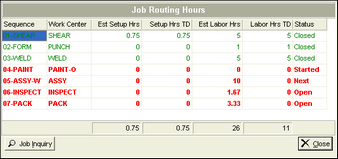
You can click on the lookup icon to launch this screen, which shows you the non-subcontract sequence status details, including estimated versus actual hours:
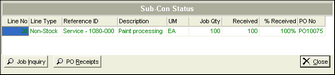
Subcon Status
This field displays the status of this job’s subcontract purchase orders.
| • | A value of ‘None’, which is displayed in a red cell, means that none of this job’s linked subcontract POs have a receipt quantity. |
| • | A value of ‘Some’, which is displayed in a yellow cell, means that some of this job’s linked subcontract POs have a receipt quantity. |
| • | A value of ‘Review’, which is displayed in a green cell, means that all of this job’s linked subcontract POs have receipt quantities, but one or more still has a partial quantity remaining to be received. |
| • | A value of ‘All’, which is displayed in a green cell, means that all this job’s linked subcontract POs have been fully received. |
You can click on the lookup icon to launch this screen, which shows you the details of this job’s linked subcontract POs:
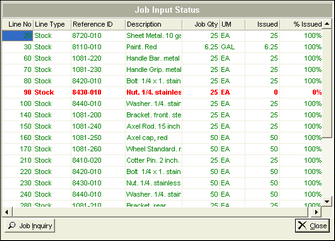
Issues Status
This field displays the status of this job’s issues to job detail lines.
| • | A value of ‘None’, which is displayed in a red cell, means that no job issue quantities have been made against any non-subcontract job detail lines. |
| • | A value of ‘Some’, which is displayed in a yellow cell, means that some issue quantities have been made against some non-subcontract job detail lines. |
| • | A value of ‘Review’, which is displayed in a green cell, means that issue quantities have been made against all of the non-subcontract job detail lines, but one or more lines still has a partial quantity remaining to be issued. |
| • | A value of ‘All’, which is displayed in a green cell, means that issue quantities have been made against all of the non-subcontract job detail lines and there are no partial quantities remaining to be issued. |
You can click on the lookup icon to launch this screen, which shows you the job issue details:
Status
All jobs listed in this screen have a Status of ‘RELEASED’. You can click the icon in this field to change the status. You are given three possible options:
•If no transactions have yet occurred and you do not wish the job to be released at this time, you can change the status from ‘RELEASED’ back to ‘NEW’.
•If no transactions have yet occurred and you wish to cancel the job, you can change the status to ‘FINISHED’ so that the job can be closed in the Close Jobs screen.
•If transactions have occurred and you attempt to manually change the status to ‘FINISHED’, you are warned that you are finishing the job incomplete and you will receive messages indicating which transaction types are incomplete. Manually changing the job status should be a rare exception because the status automatically changes to ‘FINISHED’ when the final receipt is made and all inputs have transactions.
Lower Panel
Job Qty, UM
This is the primary output’s job quantity and unit of measure.
Customer
If this job is for a CTO (custom to order) item linked to a sales order line, this is the customer associated with that sales order.
Links Button
The Job Control Panel provides a single screen from which you can perform all job processing functions. Click the Links button and from the drop-down list you can link to any of the following screens and reports:
| • | Jobs |
| • | Job Issues |
| • | Job Tracking & Labor |
| • | Job Receipts |
| • | Job Scheduling |
| • | Job Inquiry |
| • | Job Cost |
| • | Job Transactions |
When you close any of the above screens, you are returned to the Job Control Panel.
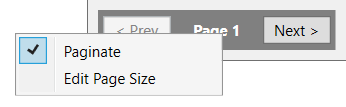
Pagination
Pagination status is found in the lower left hand portion of the screen.
NOTE: Column sorting and output options will only work on the dataset displayed per page.
•To remove pagination and display all records, right click on the page and uncheck the Paginate option.
•To change the page size, right click on the page and select Edit Page Size.