
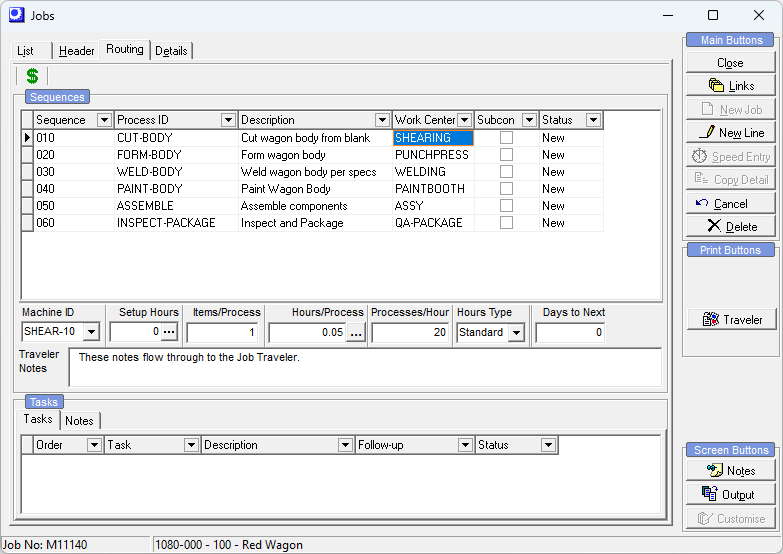
(Jobs – Jobs - Routing Tab)
Setup, labor, and subcontract service specifications are maintained in the Routing tab. When the job originates from a BOM, these specifications are copied in from the BOM’s routing and can then be modified or replaced where needed. You can also manually add routing sequences.
Screen Details
Buttons
New Line
Click this button to add one or more work center or subcontract processes to the routing. Three options are available:
Work Center Process
Use this option to select a work center process. After the process is selected and copied into the routing sequence, the sequence details can be modified as needed.
Subcontract Process
Use this option to select a subcontract process. After the process is selected and copied into the routing sequence, the sequence details can be modified as needed.
Routing Generator
Use this option to generate a routing from a set of work center and subcontractor process selections. You are presented with the Routing Generator screen.
Routing Generator – Screen Details
Filter Panel
Use the settings on the left panel to filter the processes that are listed in the main grid. Using the checkboxes, you can include or exclude processes by all or selected process categories, work centers, and subcontractors. During process selection, you can change these filters multiple times, if needed, to help you find particular types of processes.
Processes Grid
The processes that are listed in the main grid are determined by the filtering selections made in the left panel. Select each process for inclusion in the routing by clicking its Add button. As each process gets selected, it is removed from the Processes grid and is listed in the Selections grid below.
Selections Grid
Your process selections are listed in this lower grid and represent the routing that will ultimately be transferred into the job. If you change your mind and wish to remove a selection, click its Remove button.
Transfer Button
When your selections are completed, click this button to transfer them into the Routing screen.
Delete
Click this button to delete or replace a routing sequence. Two options are presented:
Delete Sequence
Select this option to delete the sequence.
Replace Sequence
Select this option to replace the current sequence with another process. From the lookup you select a process that will be swapped with the current sequence. The sequence number will remain the same.
NOTE1: In the work center process lookup, you can clear the Replace Cycle Times and Replace Tasks checkboxes if you wish to retain the current sequence’s cycle times and task details.
NOTE2: You cannot replace a work center sequence with a subcontract process, or vice-versa.
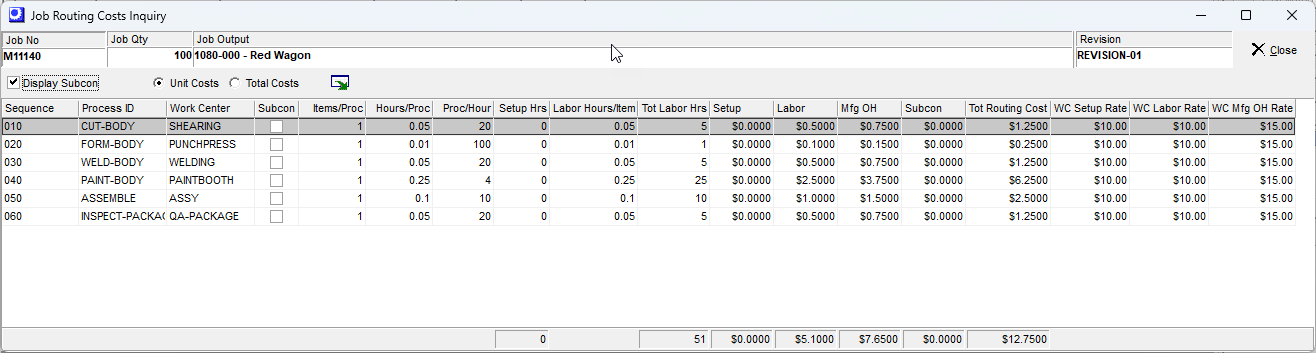
$ Button
Click this button to view the Job Routing Costs Inquiry screen.
•WC Setup Rate, WC Labor Rate, and WC Mfg OH are generated from the BOM > Work Center > Detail tab cost factor settings at time of Job Creation and form the basis for the Estimated Job Costs.
•The most recent cost factor rates for routings can be refreshed for NEW status (Un-released) Jobs by the following two methods:
▪During a batch Cost Rollup, there is an option to update Estimated Costs for NEW Jobs
▪There is also a system setting in Jobs > Jobs Setup > Job Cost Defaults that will update Estimated Costs at Job Release
•After the Job is released, to update the estimated labor cost rates, you must delete the routing sequence and re-enter the sequence. This can only be done if you have not made any labor transactions.
Upper Grid
Sequence
This number identifies the sequence on screens, lookups, and reports and determines the order in which manufacturing processes are performed. As each sequence is added, the program automatically assigns the number in increments of 10, beginning with ‘010’, ‘020’, ‘030’, etc., which can be overridden if desired.
Process ID
This name identifies this process on screens and reports. It originates from the work center or subcontractor process that was used to create this sequence.
Description
This is an up to 50-character description of the process to be performed.
NOTE: On subcontract sequences, this description is also carried forward to the PO that is generated and sent to your subcontract supplier.
Work Center
This identifies the work center within which the process is performed. This can be an in-house work center or a subcontractor work center.
Subcon
This read-only checkbox is selected if this is a subcontractor work center, for reference only.
Status
This field is for reference only and is automatically updated when transactions are made in the Job Labor screen. There are six possible values:
New
The job sequence is assigned ‘New’ status prior to the job being released to production.
Open
The job sequence is assigned ‘Open’ status when the previous sequence has a status of ‘Open’ or ‘Next’.
Next
The job sequence is assigned ‘Next’ status when the previous sequence has a status of ‘Started’ and at least one completion reported, and has a zero or positive Days to Next value.
Ready
The job sequence is assigned ‘Ready’ status under these conditions:
| • | The job has been released and this is the first job sequence, but no job setup or labor transactions have been made. |
| • | The previous job sequence has a ‘Closed’ status, but no setup or labor transactions for this job sequence have been made. |
| • | The previous job sequence has a ‘Started’ status and a negative Days to Next value, which means that “overlap” exists between the two sequences such that the second sequence can begin production while the first sequence is still in progress. |
Started
The job sequence is assigned ‘Started’ status when one or more job setup or labor transactions have been made, but the sequence has not yet been closed.
Closed
The job sequence is assigned ‘Closed’ status when the expected quantity has been completed or it has been flagged as finished in the Job Labor screen.
Center Panel – Cycle Times
If the sequence selected above is assigned to an in-house work center, the following set of fields displays, all related to this sequence’s “cycle times” (production rates).
Machine ID
This field is only visible when one or more machines are assigned to the work center. The machine assigned to this process is selected by default, but you can change the machine assignment at time of production, which is normally done in the Shop Control Panel.
Setup Hours
Enter the estimated setup time for this sequence, expressed in decimal hours. For example, 30 minutes would be entered as ‘.5’. You can click the button in this field to launch a calculator to help you convert standard time into decimal hours.
Items/Process
If this process yields one unit of this item, leave this field at the default setting of ‘1’. If this process yields a set of items (such as with a multi-cavity mold), enter the number of items in this field. The Hours/Process is divided by the Items/Process to determine the time required to make one unit of this item.
Hours/Process
Cycle time is expressed in terms of “processes.” A process can be an assembly operation, a hit from a punch press, a mold cycle, etc. A process can produce a single part or several parts at a time. Enter the time (hours, minutes, seconds) required for each process.
NOTE1: As an alternative to making a time entry, you can enter the Processes/Hour (see next), which automatically calculates the Hours/Process.
NOTE2: The maximum number of hours you can enter in this field is 24 hours. If you have a cycle time longer than 24 hours, leave this field blank and use the Processes/Hour field instead. In that field, enter time based on this formula: 1 / # Hours. A cycle time of 40 hours, therefore, would be given a Processes/Hour value of ‘.025’. (When you do this, the Hours/Process field receives a nonsensical, value which you can safely ignore).
Processes/Hour
As an alternative to entering Hours/Process, you can express the cycle time in terms of Processes/Hour. The entry of either field automatically updates the other.
Hours Type
This setting determines how labor hours for this sequence are to be processed. Two options are available.
Standard (Recommended)
With this option, actual labor hours are not collected. Instead, standard hours from the job routing specifications are used for job costing purposes, based on completion quantities or finished status entered in the Job Labor screen.
Actual (Use Sparingly)
With this option, actual worker hours are to be collected against this sequence and entered in the Job Labor screen. Here are a few possible scenarios that may utilize Actual hours:
▪When a process is one-off, custom in nature and has high variance potential from the estimated cycle time.
▪Job Shop environments that typically manufacture with a Job Quantity of 1
Special Warning Regarding Actual Hours
Our experience has shown that it is very difficult to perform actual hours in most manufacturing environments. The reality of most shops are that once an item is finished it is shipped out as soon as possible regardless of whether all of the costing information has been submitted. It is very easy to make errors or omissions in labor entry that can have a very consequential effect on your cost of sales accounts and make your income statement a challenge to interpret. Since the product is likely already out the door, there is not an opportunity to fix the costs after the fact. We strongly recommend Standard hours completions for most companies
Days to Next
This represents the number of workdays between the completion of this sequence and the start of the next sequence. This setting is used with cycle times for three purposes:
Move Time
There may be a predictable move time involved in getting these items from this work center to the next.
Forced Wait Time
Sometimes an item must wait before it can move on to the next process. A painted part might require drying time, for example.
Overlap
This can also be a negative number for situations where items produced on one routing sequence can be started in the next sequence without having to wait for the entire run to be completed before doing so. In scheduling terminology this is referred to as “overlap.”
Traveler Notes
You can enter unlimited freeform notes to describe the process to be performed in this sequence. These notes print on the job traveler and provide instructions to your shop personnel.
Center Panel – Subcontract Services
If the sequence selected above is assigned to a subcontractor, the following fields are displayed in the center panel:
Line No
When a subcontract sequence is created, the program automatically generates a linked job detail line. The linked Line No is displayed in this field. The linked line contains information that is used to generate a PO within the Job Subcontracting screen for the subcontract service.
Linked Line Fields
The linked job detail line contains the following field values. All this information is passed over to the PO that gets generated by the Job Subcontracting screen.
Sequence
The routing sequence number is automatically assigned to this field.
Line No
The program automatically adds this job line to the end of the list and increments the previous line number by ‘10’.
Line Type
The program automatically assigns this a line type of ‘Freeform’.
Reference ID
The program assigns a reference ID that consists of the word ‘Service’ followed by a dash and then the item ID of the job’s primary output. An example would be:
Service – 1080-000
Description
The sequence description is copied to this field.
Qty
This is made equal to the primary output’s job quantity.
UM
When the job originates from a BOM, this is the UM from the BOM routing sequence. When this sequence is added manually, this is populated by the selected process’s UM.
Est Cost
When the job originates from a BOM, this is the Cost designated in the BOM routing sequence. When this sequence is added manually, this is populated by the selected process’s Est Cost.
Subcon Supplier
When the job originates from a BOM, this is the supplier designated in the BOM routing sequence. When this sequence is added manually, this is populated by the selected process’s supplier.
Notes (Side-Tab)
The text in this notes field gets passed into the PO line that gets generated by the Job Subcontracting screen. If this line originates from a BOM, the PO Notes from the BOM routing sequence get passed into this notes field. When this sequence is added manually, this is populated by the PO notes stored against the selected process.
Supplier
This is the supplier that performs the subcontract service.
Supp Price
This is the price charged by the supplier for the subcontract service.
Supp UM
This is the supplier’s unit of measure, which may differ from your unit of measure. For example, a heat-treater might charge you by the pound or kilo for pricing purposes, but that price is translated (using the Multiplier) into the Est Cost, which conforms to the primary output’s unit of measure.
Multiplier
If the Supp Price and Est Cost have different units of measure, the Multiplier is used to translate the Supp Price into an Est Cost, using this formula:
Supp Price * Multiplier = Est Cost
NOTE: This field is given a value of ‘1’ by default.
Using the Multiplier Wizard
Click the button in this field to launch the multiplier wizard.
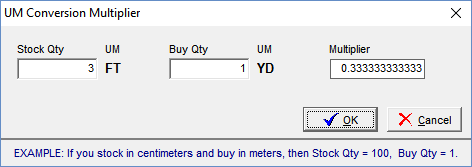
Use the wizard to enter a ratio between your quantity and the supplier’s quantity. For example, if a supplier charges you by the pound for heat treating and the item weighs five pounds, enter ‘1’ as your Stock Qty and ‘5’ pounds as the Buy Qty. The wizard calculates the multiplier for you. Click OK and the multiplier is inserted into the Multiplier field.
NOTE: The wizard entries are not saved and stored. Each time you launch the wizard, you must make new entries.
Est Cost
This is the estimated cost that is used help calculate the total estimated job cost. It is calculated by the program as follows:
Supp Price * Multiplier = Est Cost
UM
This is the unit of measure associated with the primary output and its estimated cost.
Days to Next
This is the number of days it takes to get the items sent out and received back from the supplier.
Traveler Notes
The notes entered here print on the job traveler. These notes are for shop personnel and are not passed over to the PO that ultimately gets generated for this subcontract service.
PO Notes
The notes entered here get passed into the PO that ultimately gets generated for this subcontract service. These notes do not print on the job traveler.
Tasks
“Tasks” can be used to break the sequence down into specific steps, for reference purposes. All this information prints on the job traveler.
NOTE: Tasks are for documentation purposes only (such as inspection procedures) and have no effect on costing or scheduling.
Tasks Tab
Order
This number determines the order in which the tasks are performed. The program automatically assigns this number in increments of ‘10’, which can be overridden.
Task
You can enter a task name or you can select a “task template” from the lookup. Task templates are maintained in the Task Templates screen.
Description
Enter an up to 50-character description of this task.
Follow-up
Enter a date for internal use only. Note: This field is not reportable and does not appear on the Job Traveler.
Status
Select either Open or Closed for internal use only. This field is not reportable and does not appear on the Job Traveler.
Notes Tab
Enter freeform notes to further describe this task.
