
(Purch – Purchase Orders - Header Tab)
Supplier selection and associated details are entered on this screen.
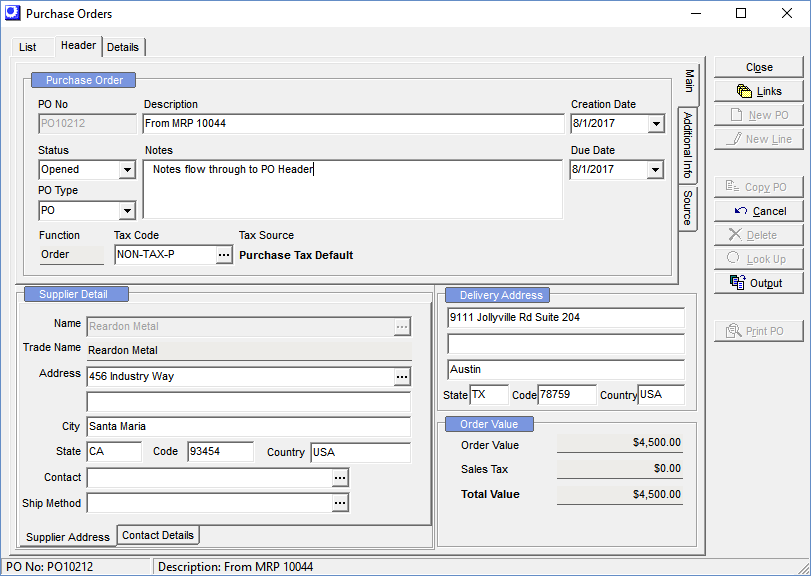
Screen Details
Purchase Order
PO No
The program automatically assigns the PO number, using the Type Prefix from the PO Types screen for this PO type and the Next PO No setting from the Purchasing Defaults screen. If the Auto PO Number option is cleared against this PO type, the numeric portion of the PO number is entered manually when you click the New PO button.
Description
You can optionally enter an up to 50-character description of the PO that is used as a reference on screens and reports.
Creation Date
This is the date the PO was created. It defaults to the system date, but can be overridden, if desired.
Status
Normally this field is automatically updated by the program unless you wish to use the PO as a quote or manually close or reopen a closed PO.
Automatic Status – Opened, Printed, Closed
When a PO is created, its status is automatically set to ‘Opened’. When you print the PO, its status changes to ‘Printed’. As each received line gets matched in the PO Invoices screen, its Line Status value changes from ‘Open’ to ‘Closed’. Once all lines are ‘Closed’, the PO status changes to ‘Closed’.
Quote Status
You can manually change the status to ‘Quote’ if you wish to use the PO to request a quote from a supplier. ‘Quote’ status POs are ignored by the MRP screen when calculating net demand for items.
Manual Close
If the PO has under-received lines that aren’t to be received in full, you have the option of manually closing the PO by changing the status to ‘Closed’. When you do so, you receive a message that the status of all line items will be changed to ‘Closed’ as well.
Reopening a Closed PO
You can reopen a closed PO in the event you wish to add new line items or increase the quantity on an existing line item. To do so, change the status from ‘Closed’ to ‘Opened’.
Notes
You can enter unlimited text in the Notes panel, which print on the printed PO.
PO Type
The PO type that was selected during PO generation or creation displays in this read-only field.
Due Date
This field sets a default Due Date for each descriptor line item entered, which can be overridden at the line item level. The stock item PO line Due Dates will always be forward scheduled from the current date by the item’s Lead Days allocation, rounded forward to the nearest shop day. The PO header Due Date has no affect on MRP or system scheduling.
Tax Code
This is the Tax Code that will be applied by default to all line items unless a tax code exception has been defined against the line’s stock item or descriptor. The source of this tax code is reference in the Tax Code Source field at right.
NOTE: If you change the Tax Code after line items already exist, that tax code will replace the Tax Code at line item level for all lines with a Tax Code Source of ‘Header’.
Tax Code Source
This field identifies the source of the Tax Code at left. There are three possible sources:
Purchase Tax Default
The Tax Code at left is the system level default Purchase Tax Code designated in the Tax Defaults screen.
Supplier
The Tax Code at left is the tax code Exception designated against this supplier in the Suppliers screen.
Manual
The Tax Code at left has been manually changed though selection of a tax code from the lookup.
Currency Panel
This panel is only visible when the supplier is assigned to a foreign currency. It displays the currency code and description, the exchange rate (foreign units per unit of home currency), and the inverse exchange rate (units of home currency per unit of foreign currency). The exchange rate is assigned to the purchase order based on the Currency Table exchange rate in effect at time of purchase order creation and remains fixed for the duration of the purchase order.
Link:
 Financial Transfer Guide - Multi-Currency
If you are using the Legacy Financials accounting configuration:
If you are using the Legacy Financials accounting configuration, be aware that the legacy financial modules --Accounts Receivable, Accounts Payable, and Banking – have no multi-currency capabilities. For multi-currency processing you must convert to the Financial Transfer accounting configuration and a mainstream accounting package for financial processes (receivables, payables, banking, payroll, overall general ledger).
Link:
Legacy Financials Conversion Guide
Supplier Detail
Supplier
If you are entering a new PO, select the supplier from the lookup.
Trade Name
This read-only field displays the supplier’s Trading Name maintained in the Suppliers screen for this supplier, which is the name that will print on the printed PO.
Address, City, State, Code, Country
This is the PO mailing address, which defaults to the values maintained in the Suppliers screen for this supplier. You can override the default values, if you wish.
Contact
This defaults to the Main Contact maintained in the Suppliers screen for this supplier. You can make an alternate selection from the lookup or you can make a manual entry.
Ship Method
This defaults to the Ship Method maintained in the Suppliers screen for this supplier. You can make an alternate selection from the lookup, if you wish.
Delivery Address
This address defaults to your company’s address from the Main Setup screen. You are free to change the address when needed.
Order Value
Order Value
This is the sum of all the PO line item Total Cost amounts.
Tax
This is the sum of all the PO line item Tax amounts.
Total Value
This is the sum of the Order Value and Tax amounts.
Contact Details Sub-Tab
Phone, Fax, Mobile Email, Supplier Code
These fields are for reference purposes and default to the contact settings stored on the Details tab of the Suppliers screen for this supplier. They can be overridden, if desired.
Email Documents
This checkbox defaults to the setting maintained in the Suppliers screen for this supplier. When selected you will be given the option of sending POs via Email at time of printing.
Supplier Code
This defaults to value maintained in the Suppliers screen for this supplier. You can make an alternate selection from the lookup, if you wish.
Additional Side-Tab
Additional Fields
If you created any user-defined fields in the Admin – User-Defined Fields screen, those field values are entered on this panel.
