The Data View utility is a reporting tool used throughout DBA that enables you to filter, sort, and group your data to create your own inquiries, spreadsheets, and reports. It organizes related data from multiple tables without requiring “joins” and other complicated programming techniques.

Selection Screen
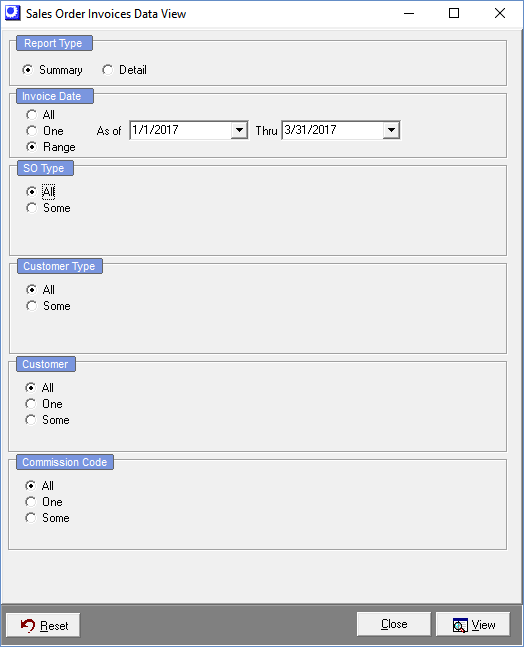
When you click on a data view menu option, you are first presented with a selection screen that is similar to the selection screen used with reports. Use this screen to filter and limit your data view.
View Button
Once your selections are completed, click the View button to advance to the Select Layout screen.
Select Layout Screen
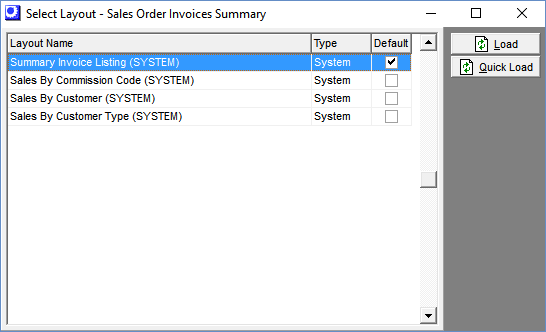
Next, you are presented with the Select Layout screen. Each layout is a configuration of selected fields that are grouped and sorted to present a particular data view. In a sense, each layout is a custom report.
Layout Type
Layouts with a Type of ‘System’ are standard layouts supplied with the system. ‘System’ layouts cannot be changed, but they can be modified and saved to another layout name. Any layouts saved to a new name are identified as ‘User’ types.
Default Layout
One layout is designated as the ‘Default’ layout, which is your most commonly used data view. Assigning the default layout is done on the Layout List screen (see further below). The default layout is always selected at the top of the list when the Select Layout screen is presented.
Load Button
Click the Load button to generate the data view. Be aware that some data views may take several minutes to generate, depending on the size of the data set and the number of data fields involved. This is because each column in the data view is individually indexed to enable column sorting.
Quick Load Button
If you click the Quick Load option, the columns are not indexed or totaled or averaged, which significantly reduces data view generation time. So if you are generating a large data set and you don’t need column sorting, use the Quick Load option.
Data View Screen
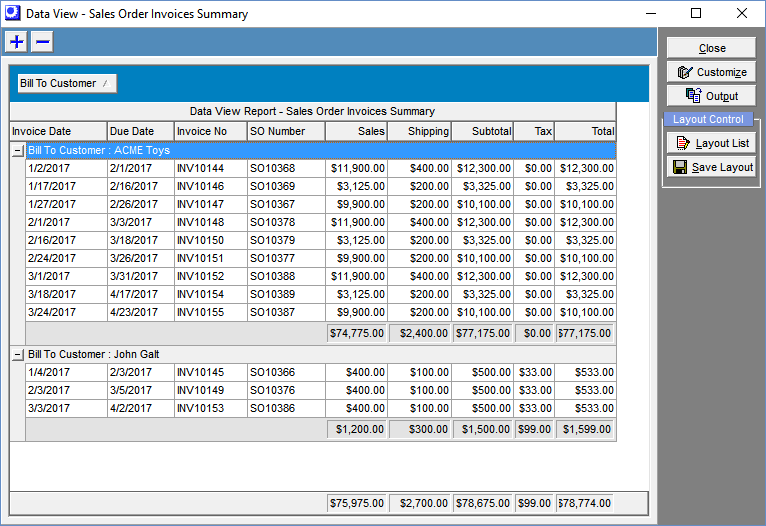
The data set and layout you selected is displayed in the Data View screen, which is a grid that displays all the available fields and associated records.
Column Sorting
You can re-sort the data view by clicking on any of the column headings, which will then sort the entire list by that column. Click the heading a second time and the sort order will change from ascending to descending order or vice-versa.
Grouping
You can create list groupings by dragging a column heading into the header panel above the column headings. For example, if you drag an Invoice Number column heading into the header panel, the lines are then grouped by invoice number. You can even have a group within a group. For example, you could drag a Customer Name column heading into the header panel, which would form a sub-group within invoice numbers.
+ - Buttons
These two buttons become visible at the top of the screen when you use the grouping feature. Initially the groups are displayed in “collapsed” mode without data rows being visible. Click the ‘+’ button to “expand” the view so that the data rows become visible. Click the ‘-‘ button to collapse the view.
Column Footer Total
You can create a total amount at the footer of any column by right clicking on the lower panel directly below the column. The following options are available:
Sum
This option is available on numeric columns only. It provides a grand total of all the column values.
Min
This option is available on numeric columns only. It lists the lowest value within the column.
Max
This option is available on numeric columns only. It lists the highest value within the column.
Count
This gives you a count of the number of records within the column.
Average
This option is available on numeric columns only. This gives you a mean average of the values within the column.
Customize Button
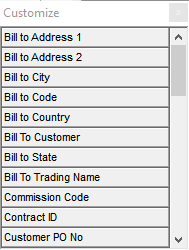
The data view can be limited to just the columns you want by dragging unwanted column headings off the screen. This is done using the Customize button, which presents a box in the lower right corner of the screen. To remove a column, drag its column heading and drop it into the box. Continue removing fields one by one until you are left with the columns you want.
NOTE: Most data view layouts are supplied with optional column headings already dragged into the Customize box. If you wish to use any of these columns, drag the column heading out of the box and drop it onto the column heading row in the desired position.
Output Button
Once the data on the screen are to your satisfaction, click the Output button to transfer the data view into one of the following formats.
| • | Output to Excel |
| • | Output to HTML |
| • | Output to Text |
| • | Output to Printer |
Output to Excel, HTML, Text
When you select any of these options, you are prompted to save the file to a name and location.
Output to Printer
When you select this option, a print preview screen is displayed. You can click File – Page Setup to select various options that will change the report appearance. When the format is to your satisfaction, click the Print button.
Layout List Button
Click this button to display the Layout List screen, which provides a listing of available layouts.
Load Button
Click this button to generate a new data view for the selected layout.
Set as Default Button
Click this button to designate the selected layout as the ‘Default’ layout. The default layout is always selected at the top of the list whenever the layout list is presented.
Delete Button
Click this button to delete the selected layout from the list.
NOTE: You cannot delete a ‘System’ type layout.
Save Layout Button
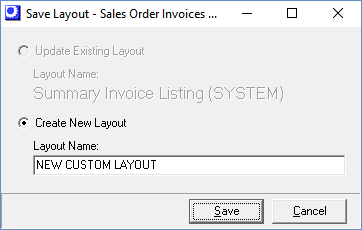
After customizing your data view, you can click this button to update an existing layout or to save your changes to a new layout. Two options are presented:
Update Existing Layout
Select this option and click the Save button to save your customization changes to the existing layout.
NOTE: This option is not available for ‘System’ layout types. To customize a ‘System’ layout, you must save your changes to a new layout name.
Create New Layout
Select this option to save your customization changes to a new layout name. Enter the name in the Layout Name field and click the Save button.
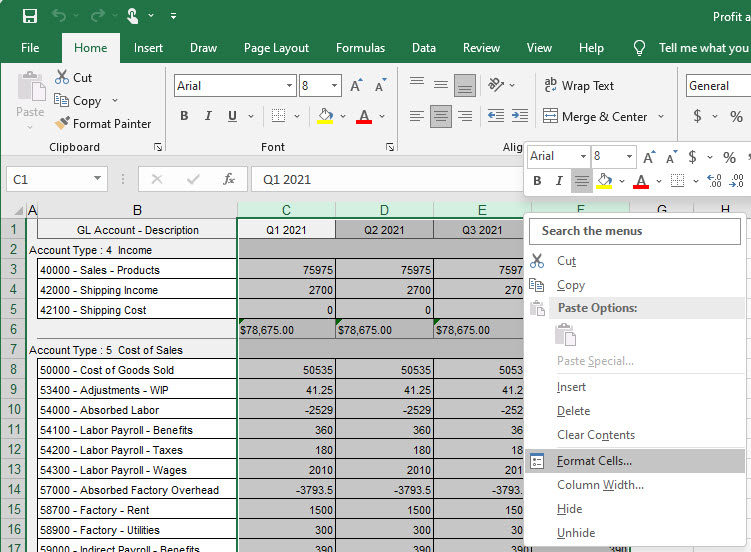
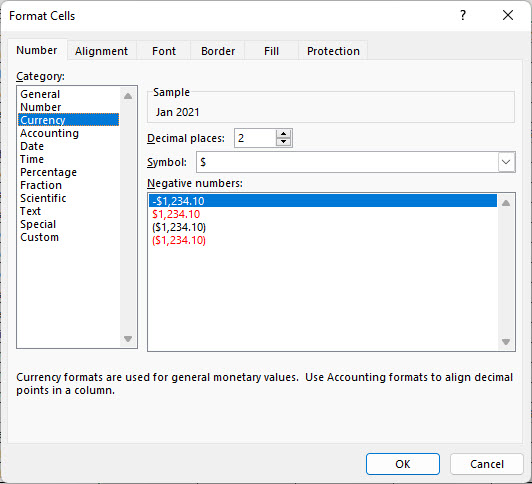
Excel Formatting Tip: Currency formatting does not pass through to Excel. After you export a report to Excel, highlight all of the Excel Column Headers that are currency values and right click, select Format Cells, on Number tab select Category = Currency and choose preferred formatting.