
(BOM – Bills of Manufacturing - Components Tab)
“Components” are entered on this tab and include the subassemblies, phantom assemblies, base formula/recipes, purchased parts, and raw materials that are directly used to manufacture the BOM parent.
Link:
 Startup Guide - BOM Components

Screen Details
Buttons
+
Click this button to add a component. Two options are available:
Stock Item
Select this option for a lookup listing of stock items. Subassemblies, phantom assemblies, base formula/recipes, purchased parts, and raw materials are all stock items.
Link:

Descriptor
Select this option for a lookup listing of descriptors.
Proper Uses of Descriptors
Miscellaneous Cost
You may wish to add a miscellaneous cost to a job. For example, an item may require special packaging, such as crating, that involves materials that are not inventory items. The special packaging can be represented by a descriptor, where the descriptor’s Estimated Cost is the cost that is incorporated into the BOM cost rollup and job cost. Another example would be to use a descriptor to represent the cost of a perishable tool or fixture that gets consumed during the course of a job.
Options Placeholder
For customizable items, you can use zero-cost descriptors to represent possible product options. At time of job creation, you can delete the descriptors and add the actual options ordered by the customer.
Improper Uses of Descriptors
Labor (Use Routing Sequences)
Never use descriptor components to represent manufacturing labor. Labor and setup specifications are entered against routing sequences on the Routing tab.
Subcontract Services (Use Routing Sequences)
Never use descriptor components to represent subcontract services performed by outside suppliers. Subcontract service specifications are entered against routing sequences on the Routing tab.
Stock Item Substitutes (Use Stock Items)
Never use descriptor components to represent stock items in an attempt to avoid inventory processing.
Speed Entry
Select this option to launch the Speed Entry screen, which enables you to rapidly generate a set of stock item components.
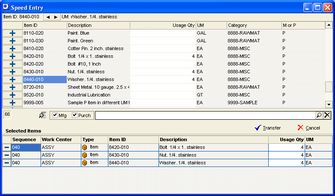
Upper Grid
Components are selected in the upper grid. Options in the lower panel enable you to you filter the grid by manufactured or purchased items, or you can click the search icon for a list of advanced search options.
The screen is optimized for keyboard entry. As you type each character of the item number or description, the cursor progressively moves to the closest match. You can use arrow keys to navigate in any direction. When you find the desired item, click the Add button at left or press the Enter key to launch the Usage Qty prompt.
Usage Qty Prompt
When a selection is made, you are prompted to accept or change the routing Sequence assignment and to enter the component Usage Qty. You can click OK to press the Enter key to close the prompt. The selected item is listed in the Selected Items grid. In the upper grid, the Usage Qty is displayed against the item for reference.
Selected Items Grid
The selected items are listed in the lower grid. You can use the Tab key to toggle back and forth from the upper grid to the lower grid. To remove a selection, navigate to the Delete button at left and click it or press the Enter key. You can also delete a record while in the upper grid by pressing the number pad minus key.
Transfer Button
When your selections are completed, click the Transfer button to add them to the bill of material. The selected components are added in the order of selection and are numbered in increments of ‘10’.
–
Click this button to delete a component.
Renumber
Click this button to renumber component line numbers in increments of 10, beginning with ‘10’, ‘20’, ‘30’, etc., preserving the existing sort order.
Undo
Click this button to “undo” any screen entries that have not yet been saved.
BOM Drill-Down
If the component Type is ‘BOM’, ‘Batch’, or ‘Phantom’, the component is a BOM parent, in which case this button becomes active and can be clicked to view the component’s underlying BOM details.
Where Used
Click this button to launch the Where Used Inquiry, which lists all the BOMs in which the selected component is used.
Output Grid
Click this button to launch the Grid Output screen. Buttons in the upper panel of that screen enable you to output the grid contents to an Excel spreadsheet, an HTML file, a CSV file, or to a printout.
Grid Header
Batch Size
This field is only visible when the BOM parent has a Type of ‘Batch’. The batch size associated with this revision is displayed for reference when entering component usage quantities.
Grid Fields
Line No
The line number is automatically assigned by the program in increments of 10 and controls the sort order of components on screens are reports. You can manually override the line number to change the sort order. You also have the option of clicking the Renumber button to renumber components in increments of 10, preserving the existing sort order.
Sequence
This is the routing sequence work center where this component is to be issued to the job. This assignment enables job materials to be monitored and issued from the Work Center Schedule screen on a real time basis. It is strongly recommended that you assign your components to their routing sequence work center. Unassigned lines will be assumed to be needed in the first routing sequence in the Work Center Schedule.
Work Center
This read-only field displays the work center associated with this routing sequence.
Type
This read-only field displays the component type. Possible values are ‘Item’, ‘BOM’, ‘Batch’, ‘Phantom’, and ‘Descriptor’.
Component ID, Description
These read-only fields identify the component.
Usage Qty
How the component usage quantity is calculated depends on the BOM type.
| • | If the BOM parent has a type of ‘BOM’ or ‘Phantom’, enter the net quantity of this component required to make one unit of the parent item. |
| • | If the BOM parent has a type of ‘Batch’, enter the net quantity of this component required for the batch size specified in the upper panel. |
UM
This read-only field displays the component’s stocking unit of measure (EA, LB, etc.).
Fixed Qty
Select this checkbox if the quantity required for this component is to be a fixed amount regardless of the BOM parent quantity being manufactured. Some batch processes, for example, require a fixed amount of an ingredient, regardless of batch size. Or there could be a situation where a service charge or fee is levied that does not vary with the quantity being manufactured. It is rare to have a Fixed Qty for a Manufactured Item. An example may be a mold that is manufactured in-house that is used in a Job one time regardless of the Job size.
Estimated Costs for Fixed Components
In the Cost Rollup screen, the Est Cost contribution of a component that is set to a Fixed Qty will be equal to the Total Estimated Cost divided by the Run Size of the BOM Parent.
Overage %
The component usage quantity represents the net quantity required to make the BOM parent. Some components require additional material that gets scrapped during the process. The scrap amount may vary with each job. Use this field to specify a percentage amount over and above the net usage quantity to account for anticipated scrap. When a job gets created for the BOM parent, the total usage quantity allocated for this component is increased by this percentage. The cost associated with the overage percentage is also incorporated in the BOM cost rollup. The overage percentage is applied to the usage quantity using this formula:
(Parent Qty / Batch Size * Usage Qty) / (1 – (Overage % / 100))
= Component Job Qty
Job Notes Sub-Tab
You can enter freeform text in this notes field. This text is passed into the Line Notes associated with job detail lines created from this BOM. These notes print on the job traveler immediately following the component.
References Sub-Tab
“References” enable you to define a sub-table of reference information against a component that prints on the job traveler following the component job notes. Circuit board manufacturers, for example, use references to designate component location coordinates.
Reference
This can be a location coordinate, a drawing bubble number, or it can be used for any table that has a one-to-many relationship with the component. You can enter as many reference records as you wish.
Qty
This is an optional field. It represents the quantity against this reference in relation to one unit of the BOM parent.
