
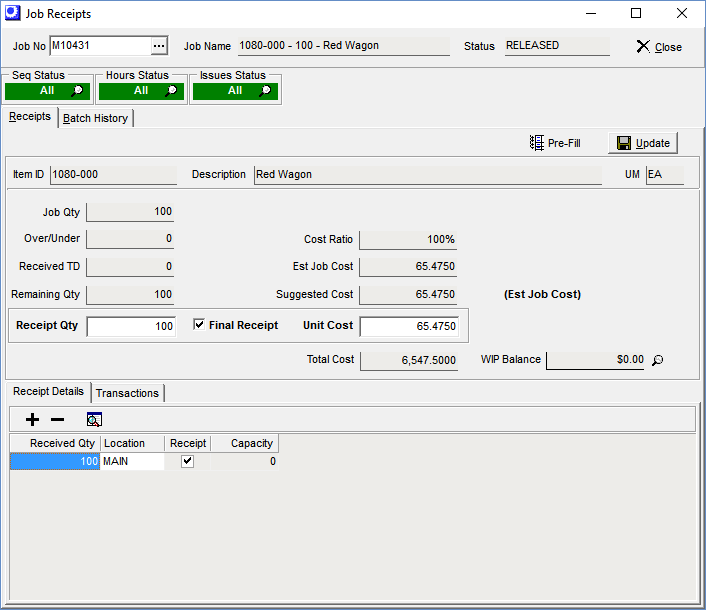
(Jobs – Job Receipts)
Use this screen to receive job “outputs” to stock. Once in stock, finished items are available for shipment to customers or issuing to other jobs.
Link:

Job Receipt Overview
Job Receipts unit cost values establish your inventory value for your items and will greatly impact your cost of goods sold.. You should always pay attention and ensure that you are always receipting at a reasonable unit cost value. A good policy is to only receipt your finished goods when all of your Status Indicators are Green.
Final Receipt Checklist
▪All Status indicators are Green
▪Unit Cost is a reasonable value
▪Review your Total Cost vs WIP Balance and ensure that they are within a reasonable percentage of each other
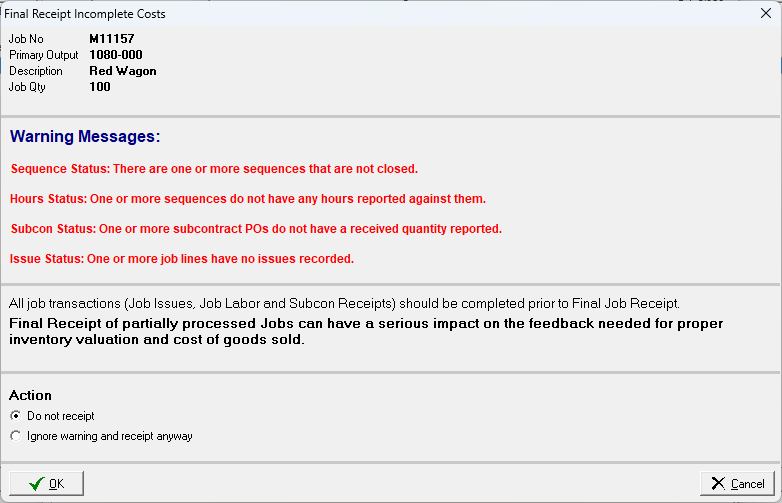
If any checklist items fail
•Do not perform the final receipt
•Immediately go to the Job and correct the transactions
•If you ignore the warning and receipt anyway, we will record a Job Event against the DBA User who performed the receipt for any of the 4 red status indicators. These events can be viewed in the Jobs > Job Inquiry > Events Log tab.
Screen Details
Job No
This identifies the job being processed. The lookup is confined to jobs with a status of ‘RELEASED’.
Name, Status
These fields help identify the job currently displayed on the screen.
Status Indicators
These four “status indicators” enable you to quickly determine if job input processing is completed. This is especially helpful when the Actual Job Cost basis is selected in Job Labor Defaults where accurate input costs are needed to calculate the unit cost on the final receipt transaction.
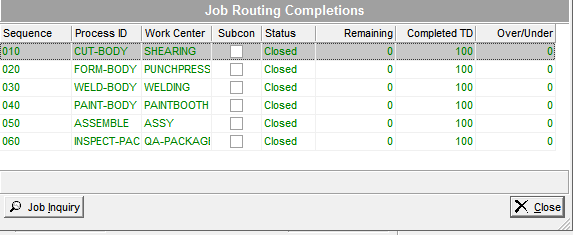
Seq Status
This field displays the status of this job’s routing sequences.
| • | A value of ‘None’, which is displayed in a red cell, means that none of the job’s routing sequences have a status of ‘Closed’. |
| • | A value of ‘Some’, which is displayed in a yellow cell, means that some of the job’s routing sequences have a status of ‘Closed’. |
| • | A value of ‘All’, which is displayed in a green cell, means that all of the job’s routing sequences have a status of ‘Closed’. |
You can click on the lookup icon to launch this screen, which shows you the sequence status details:
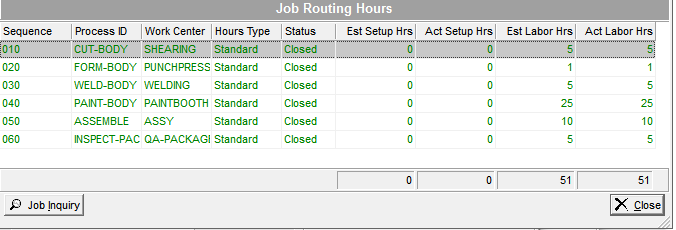
Hours Status
This field displays the status of this job’s non-subcontract routing sequence labor hours.
| • | A value of ‘None’, which is displayed in a red cell, means that no labor hours have been entered or backflushed against any of this job’s non-subcontract routing sequences. |
| • | A value of ‘Some’, which is displayed in a yellow cell, means that some labor hours have been entered or backflushed against some, but not all, of this job’s non-subcontract routing sequences. |
| • | A value of ‘All’, which is displayed in a green cell, means that some labor hours have been entered or backflushed against all this job’s non-subcontract routing sequences. |
NOTE: Be aware that even though some labor hours have been reported against each sequence, it does not guarantee that all labor hours have been reported.
You can click on the lookup icon to launch this screen, which shows you the non-subcontract sequence status details, including estimated versus actual hours:
Subcon Status
This field displays the status of this job’s subcontract purchase orders.
| • | A value of ‘None’, which is displayed in a red cell, means that none of this job’s linked subcontract POs have a receipt quantity. |
| • | A value of ‘Some’, which is displayed in a yellow cell, means that some of this job’s linked subcontract POs have a receipt quantity. |
| • | A value of ‘Review’, which is displayed in a green cell, means that all of this job’s linked subcontract POs have receipt quantities, but one or more still has a partial quantity remaining to be received. |
NOTE: The term “Review” is used because when partial receipts exist, it may be worthwhile to investigate why full receipt has not occurred. For example, the supplier may be having a problem finishing the subcontract service that may delay the ability to complete the job in full or on time.
| • | A value of ‘All’, which is displayed in a green cell, means that all this job’s linked subcontract POs have been fully received. |
You can click on the lookup icon to launch this screen, which shows you the details of this job’s linked subcontract POs:

Issues Status
This field displays the status of this job’s issues to job detail lines.
| • | A value of ‘None’, which is displayed in a red cell, means that no job issue quantities have been made against any non-subcontract job detail lines. |
| • | A value of ‘Some’, which is displayed in a yellow cell, means that some issue quantities have been made against some non-subcontract job detail lines. |
| • | A value of ‘Review’, which is displayed in a green cell, means that issue quantities have been made against all of the non-subcontract job detail lines, but one or more lines still has a partial quantity remaining to be issued. |
NOTE: The term “Review” is used because when a partial issues exist, it may be worthwhile to investigate why full issue has not made . For example, the item might be on backorder from the supplier and a shortage may delay the ability to complete the job in full or on time.
| • | A value of ‘All’, which is displayed in a green cell, means that issue quantities have been made against all of the non-subcontract job detail lines and there are no partial quantities remaining to be issued. |
You can click on the lookup icon to launch this screen, which shows you the job issue details:

Receipts Tab
Upper Panel
This panel is only visible when the job has a single output item.
Item ID, Description, UM
These fields identify the job’s primary output item.
Multiple Outputs Grid
This upper grid is only visible when the job includes two or more output items.
Item ID, Description, UM
These fields identify the output item.
Remaining
This is the original job quantity, less any receipt quantities to date, less any accumulated over-under amounts reported to job routing sequences in the Job Labor screen.
Orig Qty
This is the original job quantity.
Cost Ratio
Each output’s cost ratio is its percentage share of the total estimated and actual job cost.
Middle Panel
Pre-Fill Button
Click this button to make the selected output’s Receipt Qty in the middle panel equal to its Remaining Qty.
NOTE: This button is grayed out if the item has one or more characteristics, in which case pre-filling is not permitted.
Update Button
Click this button to update the transaction. The following processing is performed:
| • | Stock on hand for this item is increased by the receipt quantity. |
| • | The item’s inventory cost is updated by adding the total receipt cost to the current inventory value and then dividing that amount by the total units on hand. |
| • | The total receipt cost is debited to your Inventory account and an offsetting amount is credited to your Work in Process account. |
| • | If the Final Receipt checkbox is selected and all four status indicators are green in color, the job’s status changes from ‘RELEASED’ to ‘FINISHED’. |
Item ID, Description, UM
These fields identify the output item being received.
Job Qty
This is the job quantity associated with this output’s job detail line.
Over/Under
This field is only visible when the Completions – Enter Completed Qty option is selected in the Job Labor Defaults screen. This quantity indicates a job overrun or shortage, based on job routing sequence completion quantities recorded in the Job Labor screen. A positive number indicates an overrun, meaning that sequence completions exceeded the primary output’s job quantity. A negative number indicates a shortage, meaning that net sequence completions are less than the primary output’s job quantity.
Received TD
This is the quantity received to date for this output item.
Remaining Qty
This is the expected quantity remaining to be received, which is calculated as follows:
Job Qty – Over/Under – Received TD = Remaining Qty
Receipt Qty
This is the quantity that will be received to stock. You can enter the quantity directly or you can click the Pre-Fill button to populate this field with the Remaining Qty.
If the output item has tracking characteristics:
If the output item is assigned to one or more tracking characteristics, this field is grayed out and you must specify quantities and characteristic values in the Receipt Details sub-tab below.
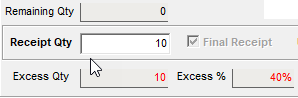
When Receipt Qty > Remaining Qty
To help prevent accidental over receipts, we present an Excess Qty and Excess % for receipt quantities that exceed the Remaining Qty on the Job.
Final Receipt
This checkbox identifies the final receipt for this output item and functions as follows:
| • | If the Receipt Qty is equal to or greater than the Remaining Qty, the program automatically selects the Final Receipt checkbox for you. |
| • | If the Receipt Qty is less than the Remaining Qty and you wish to receive the job short, meaning that the expected quantity will not be received (due to defects or other reasons), you can manually select the Final Receipt checkbox to indicate that no further receipts are expected. |
Cost Ratio
This is this outputs item’s percentage share of the total estimated and actual job cost.
Est Job Cost
This is the unit estimated job cost for this output item, which is calculated using this formula:
Total Est Job Cost * Cost Ratio / Remaining Qty = Est Job Cost
$ Button (Job Inquiry > Estimated Job Cost)
You can review the details of your Estimated Job Cost by selecting the $ button. If you discover problems with any of your routing or material costs, you should correct them in the Job prior to performing any receipts. It is always good practice to review Estimated Job Costs when the Job is released to production and before performing any Receipts.
Suggested Cost
This is the suggested unit cost that gets is inserted by default into the Unit Cost field.
•If the Final Job Receipt – Estimated Job Cost option is selected in the Job Cost Defaults screen, the Est Job Cost is used.
| • | If the Final Job Receipt - WIP Balancing Unit Cost option is selected in the Job Cost Defaults screen and the Final Receipt checkbox is not selected, the Est Job Cost is used. All partial receipts are performed at Est Job Cost. |
| • | If the Final Job Receipt - WIP Balancing Unit Cost option is selected in the Job Defaults screen and the Final Receipt checkbox is selected and all four status indicators above are green in color, a suggested unit job cost is calculated using this formula, which balances this item’s total input costs with its total receipt costs: |
Total Job Cost * Cost Ratio – Receipt Costs TD / Receipt Qty = Suggested Unit Cost
| • | After a Final Receipt transaction has been made, the Est Job Cost is used for all further transactions, including receipt reversals. |

Unit Cost
This is the unit cost that will be applied to this receipt transaction. The Suggested Cost is inserted into this field by default, but can be overridden, if desired.
Super Task - Slow down and review your data
•Make sure all of your transactions are in green status (Sequences, Hours, Issues, Labor, and Subcon) prior to Final Receipt
•Make sure your Unit Cost is a reasonable value. The Unit Cost will be averaged with your current inventory on hand to calculate the Item Cost. The Item Cost establishes your inventory value and cost of goods sold and has a high impact on your system costing.
•Also review your Total Cost and WIP Balance and see if they are within a reasonable percentage of each other
Do not perform your final receipt if you see problems in your costs
•Leave the Job Receipt screen and immediately correct your job transactions to address any valuation problems you have discovered
Total Cost
This is the total cost that will be applied to this receipt transaction, which is calculated using this formula:
Receipt Qty * Unit Cost = Total Cost
WIP Balance
This is the difference between total input costs and total receipt costs for this output item. You can click the magnifying glass icon to view the calculations behind this amount.
What does this mean?
Until the final receipt occurs, a WIP balance is expected and normal. When it is the final receipt, the existence of a WIP balance depends on the Final Job Receipt setting in the Job Cost Defaults screen.
| • | If the Final Job Receipt - WIP Balancing Unit Cost option is selected, the WIP balance will be zero because the program suggests a unit cost that balances out total input costs with total receipt costs. |
| • | If the Final Job Receipt – Estimated Job Cost option is selected, a WIP balance is normal and expected because total input costs will rarely, if ever, exactly match the estimated costs that comprise total receipt costs. |
Receipt Details Sub-Tab
+ –
By default, one line is presented in the grid below. Click the plus sign button to add additional lines if you are receiving stock to multiple locations or to specify multiple characteristic values. Click the minus sign button to delete lines.
Magnifying Glass Icon
Click this icon to launch the Stock Status inquiry for this item.
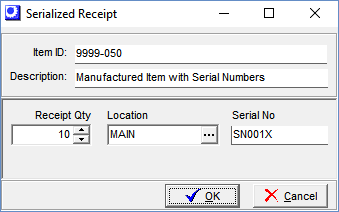
Receipt Qty (Serialized Items)
This field is only visible when the item requires serial number control. Enter the receipt quantity in this field or click the button in this field and you are presented with this screen:
Screen Details
Receipt Qty
Enter the receipt quantity for the location specified at right.
Location
All the serialized receipts that will be generated by this screen will be received into this location.
Serial No
Enter the starting serial number. If this item is designed for automatic serial number generation in the Item Characteristics screen, the next available serial number is automatically inserted into this field.
OK Button
When you click this button, the screen closes and serial numbers are automatically generated for the specified quantity. Each serial number gets its own line in the Receipt Details grid.
Grid
Enter a line in this grid for each quantity associated with each location and set of characteristic values.
Received Qty
Enter the receipt quantity associated with the location and characteristic values in the fields at right.
NOTE: If you enter a quantity that causes the total quantity in this location to exceed this item/location Capacity setting, you are given a warning.
Location
This field value defaults to the item’s default Receipt Location. You can make an alternative selection from this lookup screen.
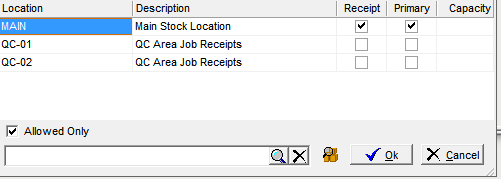
Only allowable locations for this item are listed. If you wish to use a non-allowed location, clear the Allowed Only checkbox in the lower panel and the list will be expanded to all locations.
The Receipt and Primary checkboxes identify the item’s default Receipt Location and Primary Location. The Capacity field shows you how many units of the item can be stored in the location.
You can view the stock on hand within a location by clicking the magnifying glass icon in the lower panel, which presents this screen
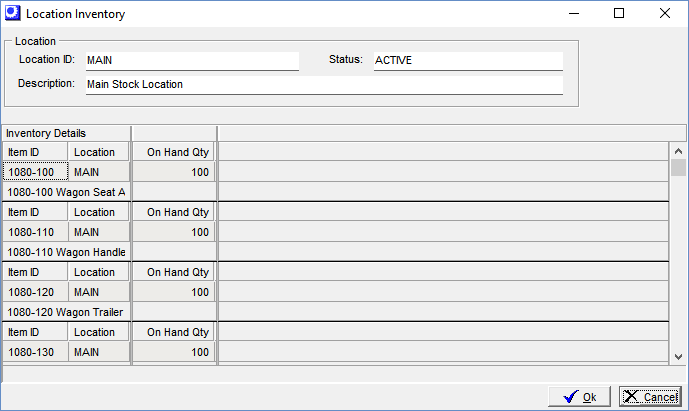
This inquiry screen enables you to find an open location that is not currently occupied.
Receipt
This checkbox is selected when the location at left is the item’s default Receipt Location. This is for reference purposes only.
Characteristic Fields
If the item is assigned to one or more tracking characteristics (such as lot or serial control), each characteristic is represented by its own field, which is identified by the characteristic’s Description. You are required to enter a value against each characteristic, which, depending on the characteristic, can be a date, a number, a lookup on a table of allowable values, or freeform text.
Transactions Sub-Tab
All previously updated receipt transactions for this item are displayed on this sub-tab. The Job must be changed from FINISHED back to RELEASED in order to be able to reverse the receipt transaction.
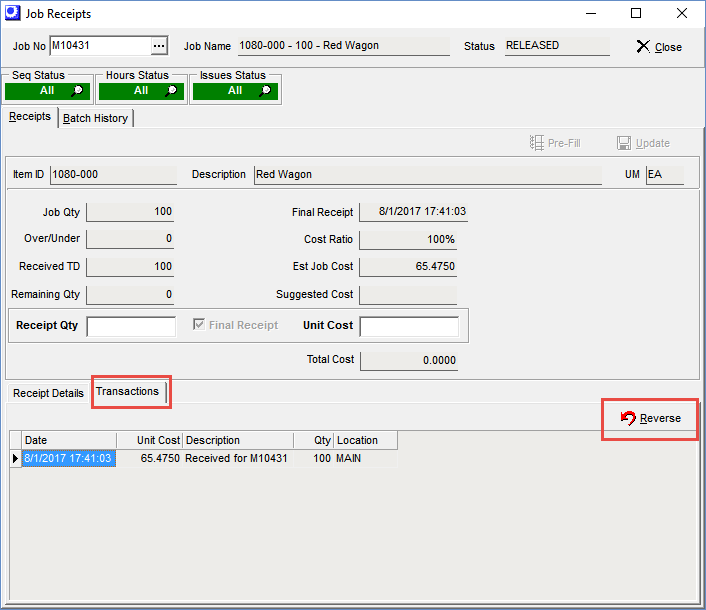
Reverse Button
Click this button to reverse a receipt transaction that was made in error. You are presented with this screen:
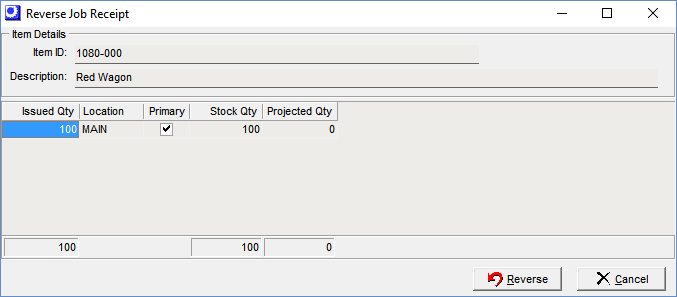
Screen Details
All stock on hand for this item across all locations and characteristic sets is displayed in the grid.
Issued Qty
This is the quantity of this item to be issued (returned) from stock back to the job. It defaults either to the original transaction quantity or the current on hand quantity in the transaction location, whichever is lowest. You can accept the default quantity or enter a lower quantity, if you wish.
NOTE: The Issued Qty cannot exceed the current on hand quantity for this location. Once stock in this location has been picked for shipment or issued to jobs, it is not available for reversal.
Location
This is the location from which the stock will be issued back to the job.
Primary
This read-only checkbox is selected for reference when this location is the item’s default Primary Location, as designated in the Stock Items screen.
Stock Qty
This is the current stock on hand quantity for this location.
Projected Qty
This is the projected stock on hand for this location after this reversal transaction is processed.
Reverse Button
Click this button to process this reversal transaction. The original transaction and the reversal transaction are both displayed in red text.
Batch History Tab
Each time the Update process occurs, all the transactions associated with the update are assigned to a “batch” number. This job’s receipt batches are listed on this tab.
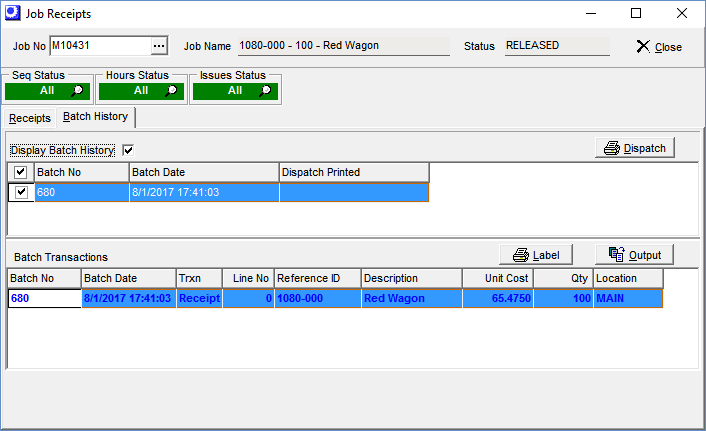
Upper Panel
Display Batch History
This checkbox is selected by default. When selected, the screen is occupied by two grids: a listing of batches in the upper grid and a listing of Batch Transactions in the lower grid, limited to the batches selected in the upper grid. If you clear this checkbox, the Batch Transactions grid occupies the entire screen and lists all transactions for all batches.
Dispatch Button
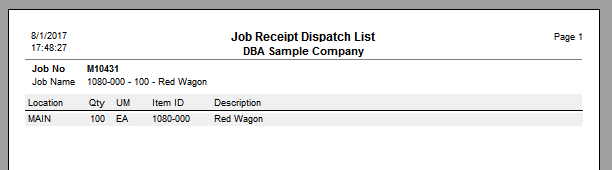
This button is only visible when the Display Batch History checkbox is selected at left. You have the option of receiving stock on the Receipts tab before you physically transfer it to its destination location. After Update processing is completed, you can immediately access this tab and click this button to print a “dispatch list” to use as a guide for physically moving the stock to its final destination.
NOTE: Click the selection checkbox to the left of each batch you want included in the dispatch list. You can combine multiple batches into one dispatch list, if you wish.
After clicking the Dispatch button, you are presented with this screen:
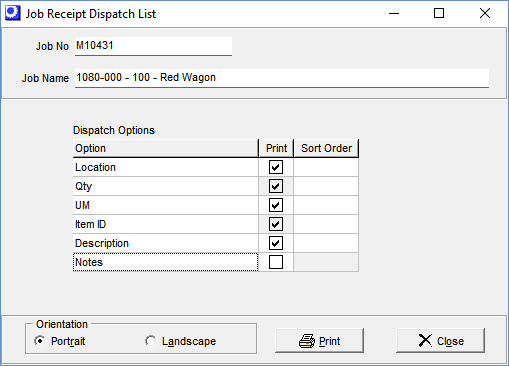
Dispatch Options
Use the Print checkbox to select or de-select the fields you want included on the dispatch list. You can change the order by clicking into the Sort Order field on those cells in the grid that are not grayed out.
Orientation
You can select the Portrait or Landscape option to achieve a vertical or horizontal style printing layout.
Print Button
After your selections are completed, click this button to print the dispatch list. Here is a sample:
Upper Grid
All update batches for this job are displayed in this grid.
NOTE: This grid is only visible when the Display Batch History checkbox is selected at left.
Selection (Checkbox)
This checkbox is selected by default against all batches that have a blank value in the Last Printed column. Selecting this checkbox serves two purposes:
| • | This batch will be included in the dispatch list when you print it via the Dispatch button. |
| • | This batch’s transactions are displayed in the Batch Transactions grid below. |
Batch No
This number identifies the batch and is automatically assigned by the program.
NOTE: Each Batch No is unique such that no two jobs ever have batches with the same batch numbers.
Batch Date
This field shows the date and time the batch was created.
Last Printed
When you print a hard copy of the dispatch list, the date and time is captured in this field.
NOTE1: This field does not get updated when you preview the dispatch list. It only gets updated when you print a hard copy on your printer.
NOTE2: This field only gets updated the first time you print the dispatch list. It does not get updated when you reprint the dispatch list.
Batch Transactions Grid
When the Display Batch History checkbox in the upper panel is cleared, this grid occupies the entire screen and provides a listing of all issuing transactions for this job.
When the Display Batch History checkbox in the upper panel is selected, this grid occupies the lower half of the screen and only lists transactions associated with batches that are selected (via the checkbox) in the Batch History grid above.
NOTE: Transactions displayed in bold blue text are associated with the batch that is currently highlighted in the upper grid.
Buttons
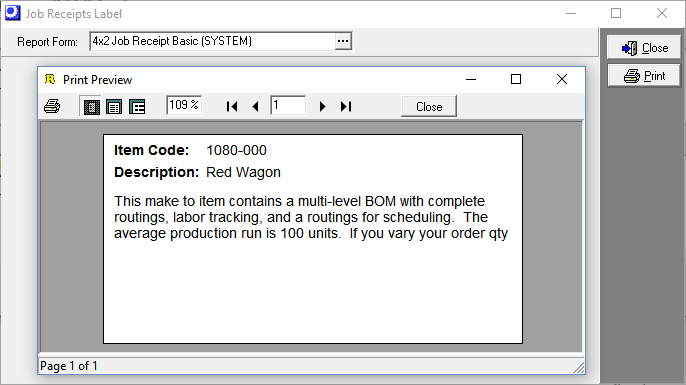
Label
Click this button to print item labels for the selected transaction. You are first presented with this selection screen.
Screen Details
Upper Panel
Report Form
Use the lookup in this field to select a label format. The default label format designated in the Forms Edit – Job Receipt Label screen is selected by default.
Select Characteristics to Print
The tracking characteristics associated with this receipt transaction are listed in this panel and are selected by default for printing. If you don’t want a characteristic to be printed, clear its checkbox.
Additional Information
If this label format requires any ‘Additional Info’ text fields, they are listed in this panel.
Req
If this checkbox is selected, the user is required to enter a Value.
Header
This is the user-defined field label that identifies the Value at right.
Value
Enter freeform text in this field.
Print Button
Click this button to begin printing. You are first presented with this print preview screen:
Click the printer icon in the upper left corner to begin printing. You are presented with the standard Windows Print screen.
The printer Name defaults to the printer designated in the page setup against this label format. Select an alternate printer, if applicable. For multiple copies, enter a value in the Number of copies field.
Output
Click this button to output the contents of the grid to an Excel spreadsheet, CSV file, HTML file, or to the printer.
Transactions Grid
| • | If the Display Batch History checkbox at the top of the screen is selected, issuing transactions associated with the batches selected in the upper grid are listed in this grid. |
NOTE: Transactions displayed in bold blue text are associated with the batch selected in the upper grid.
| • | If the Display Batch History checkbox at the top of the screen is cleared, all issuing transactions associated with all batches are listed in this grid. |
