
(Purch – Suppliers … or Supp Icon)
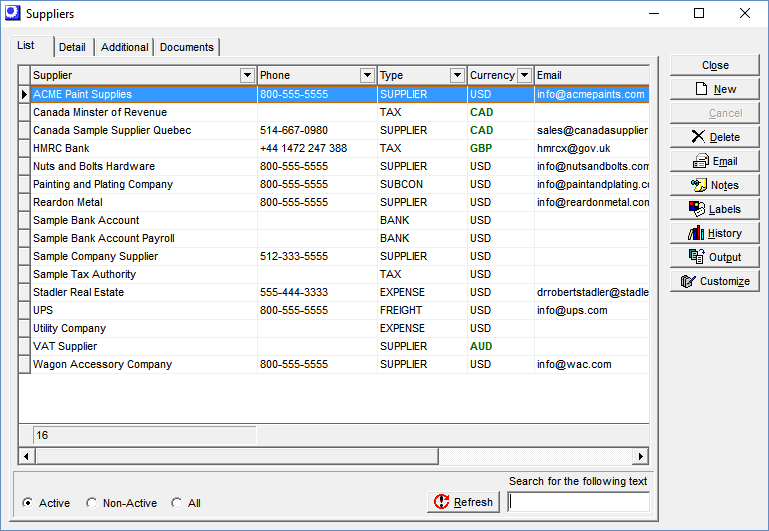
Use this screen to set up and maintain your suppliers.
Links:

Screen Details
Customizing the list
Use the Purch – Purchasing Setup – Suppliers List Tab screen to customize the list. You can designate which fields you want displayed and you can change column heading names.
New Button
Click this button to create a new supplier record.
Email Button
If you wish to send an Email to this supplier, click this button to launch the system’s Email client form. The supplier’s Email address is inserted into the To: field.
Notes Button
Clicking this button launches the Activity Notes screen where you can view past activity notes against this supplier and create new activity notes.
History Button
Clicking this button displays supplier history in the following tabs:
Invoices
This tab provides a listing of this supplier’s past invoices.
Emails
This tab lists all the past Emails sent to this supplier.
Notes
This tab lists all past activity notes for this supplier.
Detail Tab – Main Side-Tab

Supplier Name (Required)
This unique ID is a 50-character field that identifies the supplier record and is what displays on screens, lookups, and reports. We suggest you enter the supplier’s full name.
NOTE: Each supplier name must be unique. So if you have two or more suppliers with the same name, make each name unique, such as by appending the city or some other identifier in parenthesis following the name.
Trading Name (Required)
When you click into this field, it is automatically given the same value as the Supplier Name, when can then be changed, if needed. The Trading Name is the name that prints on purchase orders. Unlike the Supplier Name, duplicate values are allowed. Normally, the Supplier Name and the Trading Name are the same except in cases where the Supplier Name has been appended to avoid duplicate values.
Address Details
This is the Supplier’s primary mailing address. Physical addresses are entered on the Physical Addresses side-tab.
Phone, Mobile, Fax, Email, Web
These are the contact settings for this supplier’s main office and do not pertain to a specific contact. Contacts are entered on the Additional tab. Each contact record has its own Phone, Mobile, Fax, and Email settings.
Currency
This field is only visible when one or more foreign currencies is activated in the GL – General Ledger Setup – Currency Table screen. Each new supplier is assigned by default to your home currency. If you wish to purchase from this supplier in a foreign currency, click the button in this field to select a foreign currency from the lookup.
Link:
 Financial Transfer Guide - Multi-Currency
If the supplier has invoice history:
If the supplier has invoice history, the currency assignment cannot be directly changed in the Suppliers screen and must be changed through data import.
Data Import Currency Assignment
Go to the Suppliers screen and use the Output tool to generate a CSV file consisting of the Supplier Name and Currency.
In the CSV file, modify the Currency column with the appropriate 3-character currency code against each supplier you wish to purchase from in foreign currency.
Go to the File – Data Import – Suppliers – Suppliers screen, select the CSV file, and map two fields – the Supplier Name and Currency code. Perform the import and the currency assignments will be changed.
Update supplier prices
After a supplier is assigned to a foreign currency, update the associated supplier prices, which are now expressed in the foreign currency. You can get a listing of suppler prices by currency using the Inventory – Data Views – Item Sources data view. Supplier prices are updated on the Sources tab of the Inventory – Stock Items screen.
If you are using the Legacy Financials accounting configuration:
If you are using the Legacy Financials accounting configuration, be aware that the legacy financial modules --Accounts Receivable, Accounts Payable, and Banking – have no multi-currency capabilities. For multi-currency processing you must convert to the Financial Transfer accounting configuration and a mainstream accounting package for financial processes (receivables, payables, banking, payroll, overall general ledger).
Link:
Legacy Financials Conversion Guide
X-Ref Code
If you are using DBA with an outside accounting system, it may be that the supplier is identified in the outside system with a short code instead of the full supplier name as in DBA. For financial transfer purposes, you can store the short code in this field, which is one of the fields available for transfer in the PO Invoice Transfer screen. When you import the PO invoice transfer file into your outside system, this field is mapped to the supplier code in your outside system.
Creation Date
This is the date this supplier record was created. You can change this date, if you wish.
Status
When you create a new record, its status is set to ‘Active’. You can change the status to ‘Non-Active’. At the present time this setting is for reference only.
Payment Terms
This is a standard payment terms record from the Supplier Terms table. These are the default Payment Terms that get applied during supplier invoice entry.
From End of Month
This read-only checkbox is selected if the number of days due is calculated from the end of the month, a common practice in some countries.
Days
This read-only field displays the number of days from the invoice date or end of month that establishes the invoice due date.
Printing Options
Email Documents
If this checkbox is selected, when printing POs you are given the option of Emailing the document.
Tax Code Source
These settings determine the source of the purchase order header Tax Code for this supplier’s POs.
Default
When you select this option, the default Purchase Tax Code specified in the Tax Defaults screen is used as the purchase order header Tax Code.
Exception
Select this option if this supplier’s purchase order header Tax Code is to be different than the system default tax code. A Tax Code field becomes visible to the right so that you can select a tax code from its lookup.
Non-Taxable Supplier
If the supplier is non-taxable, which is common with USA taxation when you purchase for resale, make sure that the tax code source is a non-taxable Tax Code.
| • | If your system default tax code is non-taxable, select Default as the tax code source. |
| • | If your system default tax code is taxable, then assign the supplier to a non-taxable tax code Exception. |
Tax Group
This checkbox is only visible when the Tax Group Matrix option is selected in the Tax Defaults screen. Tax groups enable you to designate exception tax codes at the line item level hat only apply to particular sources and items. When you select this checkbox, a Tax Group field becomes visible to the right. Select a Tax Group from the lookup. When an item or descriptor assigned to a Tax Group encounters a supplier that is also assigned to a Tax Group, the two Tax Groups are matched in the Tax Group Matrix to determine the Tax Code that gets used in the PO line.
Classification
Supplier Type (Required)
You must assign the supplier to a Supplier Type. When you create a new supplier record, the default supplier type is automatically selected and can then be changed, if applicable.
Supplier Region
You can optionally assign this supplier to a supplier region.
Supplier Code
You can optionally assign this supplier to a user-defined supplier code.
Notes Sub-Tab
You can enter unlimited notes against this supplier. These notes are for reference on this screen only.
Shipping Sub-Tab
Ship Method
You can select a Ship Method from the lookup, which is used as the default Ship Method for this supplier’s purchase orders.
Tax / Financial Sub-Tab
Tax ID Number, Bank Name, Bank Account Number
These three fields are for reference only and are not used outside of this screen.
Print 1099
This option is for USA tax reporting. Year end 1099 forms will be printed for all suppliers with this option selected.
Forms Sub-Tab
Use the fields on this sub-tab to specify customized forms layouts (RTM files) for this supplier. When you leave any of these fields blank, the standard form layout is used. See chapter 3 for details on how to customize forms. You can specify custom layouts on this sub-tab for the following forms:
| • | PO Quote |
| • | PO |
GL Account Sub-Tab
Default GL Account
Select the GL account that will be applied to invoices created in the Supplier Invoices screen.
NOTE: This setting has no purpose when you are using the Financial Transfer utility in conjunction with an outside accounting system and can therefore be left blank.
Detail Tab – Physical Addresses Side-Tab
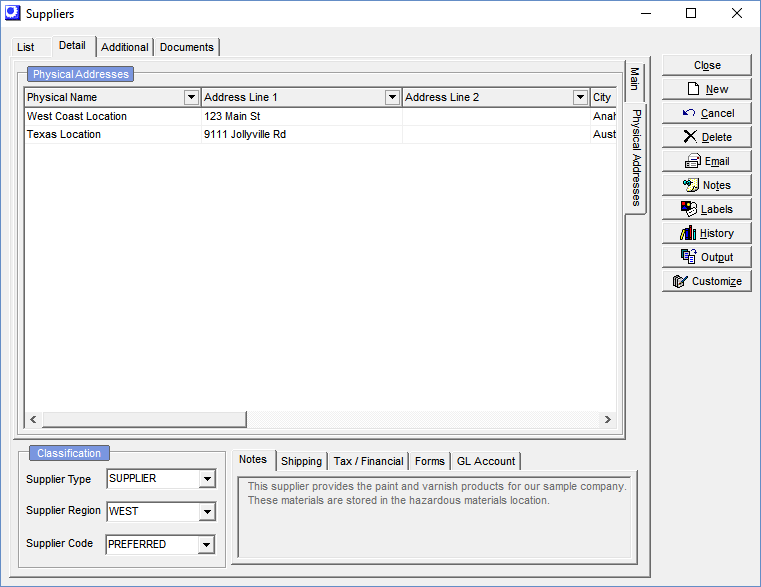
Physical Addresses
In this grid you can enter multiple physical addresses for this supplier.
Physical Name
This is the name that identifies the address on this screen and in lookups. This name does not transfer to the PO.
Address Fields
Enter the physical delivery address in the Address Line 1, Address Line 2, City, State, Postal Code, and Country fields.
Contact, Phone, Fax, Email
You can specify a contact person and contact details at this address for reference on this screen only.
Additional Tab
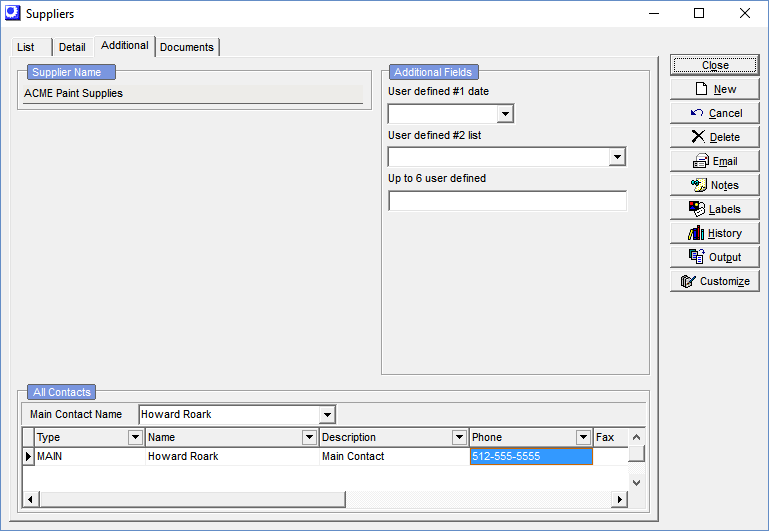
Contacts
Main Contact Name
You can select one of the contacts from the grid below to be designated as the main contact at this company.
Type
Select a contact type, which are user-defined contact categories.
Contact
This is the contact’s full name.
Description
Use this field to describe the contact’s position or function.
Phone, Fax, Email, Mobile
These fields are for reference in this screen and do not transfer to the PO.
User-Defined Fields
If you created any user-defined fields in the Admin – User-Defined Fields screen, those fields are entered on this panel.
Documents Tab
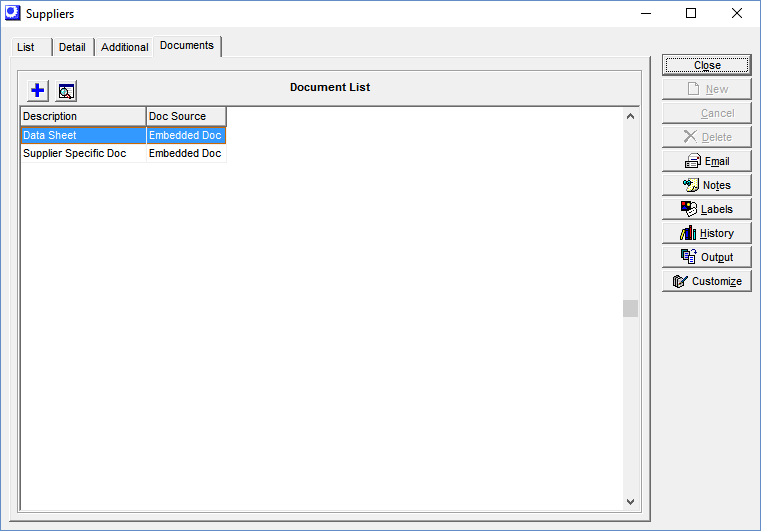
On this screen you can attach documents (such as drawings, specifications, etc.) or files of any kind that relate to this item.
Link:
Edit Documents
To link to a document, click the Edit Document panel at the bottom of the screen.
Description
Enter the description that will display on the Document List panel.
File Location
If a document is only to be used by you, you can specify a File Location to your local computer. If the document is to be shared with others, it should be stored on the central file server.
