The Backup Manager is accessed from the server
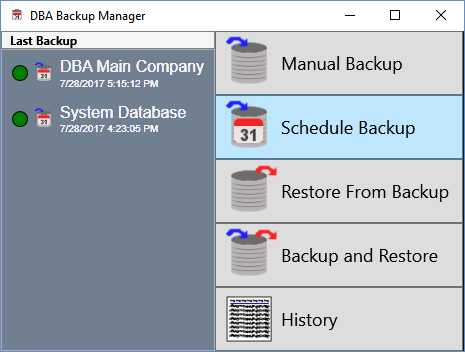
The Backup Manager is accessed from the server by clicking Windows Start – DBA Manufacturing – Utilities – Backup Manager.

You must set up at least one daily backup schedule for your main registered company, your System Database, and any other registered company databases.
Recommendations
Schedule backup to occur when users are off the system
Backups should be scheduled late at night when users will be off the system. If you ever manually make a backup during working hours, always make sure all users are logged off the system.
Back up each of your registered company databases
Use the Schedule Backup process to create a daily backup schedule for each of the following registered databases.
•Create a daily backup schedule for your Main Company database, which is identified by the registered company name.
•Create a daily backup schedule for your System Database, which stores various system settings.
•Create a daily backup schedule for any secondary companies, which are identified by the registered company name.
NOTE: You are not permitted to schedule backups for the Sample Company or the Training Company.
Database backup is only the first phase of daily backup
The process described here, which is to schedule backup file creation for each of your registered database, is only the first phase of your daily backup process. It is vitally important that you also perform the second phase, which is to schedule a daily server backup. The daily server backup will include the DBABackup folder so that your database backup files get safely backed up to an off-site location.
Link:
Screen Details
Scheduled Backups Screen
You are first presented with the Scheduled Backups screen, which lists your currently scheduled backups.

New Schedule
Click this button to create a new scheduled backup. The Create Scheduled Backup screen is presented.
Scheduled Backups Listing
The following fields and buttons are displayed in the grid:
Schedule ID
The program automatically assigns a sequential number to identify each scheduled backup.
Company Name
This is the registered company name associated with this database.
Description
This is a user-defined description of this scheduled backup.
Backup Directory
This is the location of this database *.fdb file.
Edit
Click this button to edit the specifications of this scheduled backup.
Remove
Click this button to delete this scheduled backup.
Create Scheduled Backup Screen
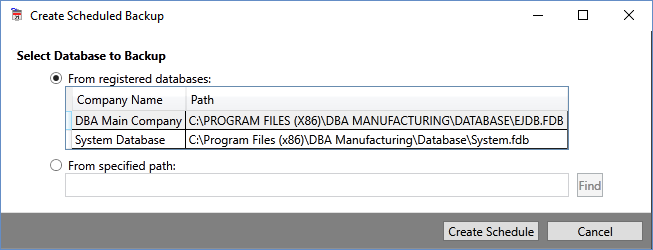
Use this screen to select the databases associated with the scheduled backup.

Select Database to Backup
Two options are available:
From registered databases:
This option is selected by default and lists the registered databases that are installed on this server. Select the database you wish to back up. The following fields are displayed in the grid:
Company Name
In most cases you will see two databases listed -- the registered name associated with your Main Company and ‘System Database’, which is a database that coordinates common settings among your company databases. If you purchased any additional companies, their registered names are displayed as well.
Path
This field displays the database location.
From specified path:
Select this option to back up any non-registered databases, which are identified with an *.fdb extension. Use the Find button to navigate to the database file.
Create Schedule
Use this button to advance to the Edit Scheduled Backup screen.
Cancel
Use this button to cancel selection and return to the Scheduled Backups screen.
Edit Scheduled Backup Screen
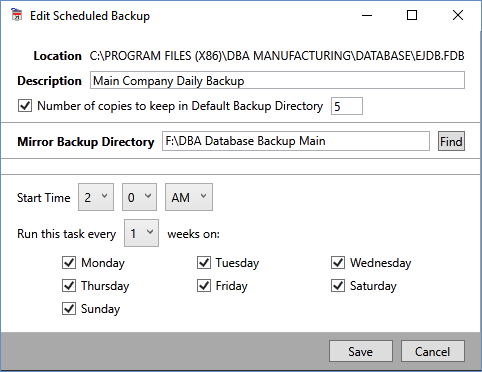
Use this screen to specify scheduled backup details.

Location
This read-only field displays the location of your database file(s).
Description
Enter a description in this field that identifies this scheduled backup.
Number of backup copies to keep
This setting determines the number of sequential backups that are to be maintained in the backup history folder. 5 backups are selected by default and is the recommended setting.
WARNING: Do not clear this checkbox because backup files will accumulate in the history folder without any limitation, which can ultimately fill up your hard drive and lead to backup or disk failures.
Mirror Backup Directory
It is strongly recommended that you designate a mirror copy location that is on a different device or different drive than your default database backup. A backup will be made to the default location and a mirror copy will be made to the drive/device that you specify. This ensures that if you have a hard drive failure that your backups are not all on the same drive as your program.
Start Time
Select the time of day to start this scheduled backup. Establish a time during off hours when users are logged off the system.
Run this task every __ weeks on:
To make daily backups, set this to ‘1’ week and select each day of the week below. We strongly recommend daily backups.
Save
Click this button to save your settings and advance to the Windows Login Credentials screen.
Cancel
Click this button to close the screen without saving.
Windows Login Credentials Screen

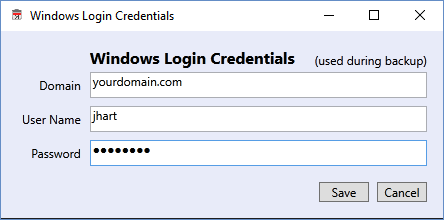
In this final screen you must designate your Windows login credentials to establish scheduler permissions.
NOTE: If you need help in making these settings, contact your IT service provider for assistance.
Domain
Specify your network’s domain name.
NOTE: If you are making backups on a local PC that has no domain name, you can leave this blank.
User Name
Enter your user login name.
NOTE: If you are unsure of your user name, check the Users folder on your root directory for reference.
Password
Enter user login password.
Save
Click this button to save your entries and complete scheduled backup creation.
Cancel
Click this button to close the screen without saving.

