
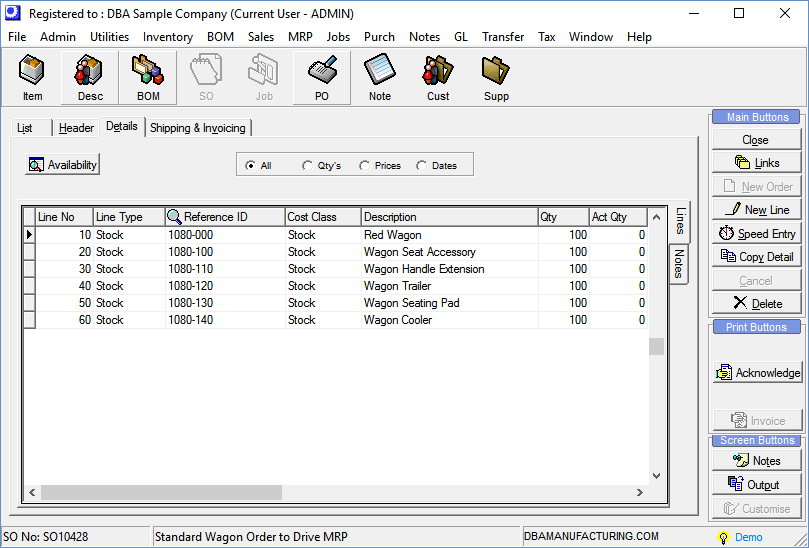
(Sales – Sales Orders - Details Tab)
Sales order line items are entered on this tab.
Related Video:
 Training Guide - Managing SO Dates
Screen Details
Availability Button
This button is only visible when the highlighted line has a Line Type of ‘Stock’. Click this button to view the Stock Status inquiry, which shows available and projected stock, as well as demand supply details.
Currency Panel
This panel is only visible when the Sold To Customer is assigned to a foreign currency. It displays the currency code and description, the exchange rate (foreign units per unit of home currency), and the inverse exchange rate (units of home currency per unit of foreign currency). The exchange rate is assigned to the sales order based on the Currency Table exchange rate in effect at time of sales order creation and remains fixed for the duration of the sales order.
Link:
 Financial Transfer Guide - Multi-Currency
If you are using the Legacy Financials accounting configuration:
If you are using the Legacy Financials accounting configuration, be aware that the legacy financial modules --Accounts Receivable, Accounts Payable, and Banking – have no multi-currency capabilities. For multi-currency processing you must convert to the Financial Transfer accounting configuration and a mainstream accounting package for financial processes (receivables, payables, banking, payroll, overall general ledger).
Link:
Legacy Financials Conversion Guide
Lines Sub-Tab
Line No
This field is used by the program for sorting purposes. The line items normally sort in Line No. order unless you click on any of the column headings to change the sort order.
Line Type
You must select one of the following line types:
Stock
Select this line type if you wish to enter a stock item.
Descriptor
Select this line type if you wish to enter a descriptor.
One-Off
Select this line type if you wish to generate a “one-off” item to customize an existing BOM or to create a custom BOM or job from scratch. Upon selection, the One-Off Item Generator screen is displayed.
Link:

Quote recommended for BOM customization
The recommended process for BOM customization is to generate the one-off item and BOM within a quote, which is not subject to CTO job generation in MRP. You can then customize the one-off BOM as needed. When customization is completed, convert the quote to a sales order to update the Required date and make the sales order line eligible for CTO job generation.
Custom Manufacturing Guide
Review the Custom Manufacturing Guide for a complete explanation of one-off items and the custom manufacturing process workflow.
Link:
Reference ID
The value in this field varies according to Line Type.
Stock
You must select the stock item from the lookup.
Link:
Descriptor
You must select the descriptor from the lookup.
One-Off
After you select the ‘One-Off’ line type, you are presented with the One-Off Item Generator screen, which is normally only used during quote entry. See Quotes for details.
Description
The source for this field value varies according to Line Type. Regardless of its source, this value can be modified.
Stock
This is the Description from the stock item’s master record.
Descriptor
This is the Description from the descriptor’s master record.
Custom
This is the Description that was entered in the Custom Item Generator screen when this line was created.
Qty
This amount is manually entered and is the line item’s order quantity.
Act Qty
This amount is for reference only and is the quantity picked to date.
UM
This value denotes the line item’s unit of measure, such as ‘EA’, ‘LB’, etc. The source for this field value varies according to Line Type. Regardless of its source, this value can be modified.
Stock
This is the UM from the stock item’s master record.
Descriptor
This is the UM from the descriptor’s master record.
Custom
This is the UM that was entered in the Custom Item Generator screen when this line was created.
Reference Price
The source of the Reference Price varies according the Line Type. Regardless of its source, this price can be modified.
Stock & Descriptor
| • | If a Contract Price exists for this line item and customer combination, it takes precedence over other prices. |
| • | If there is no Contract Price and this line item is a stock item or descriptor, its Base Price is used. If this customer is assigned to a Price Level, a multiplier is applied to the Base Price according to the % of Base setting against the Price Level. |
Custom
The Reference Price is manually entered.
Discount
If this customer is assigned to a Discount Code, the discount percentage is inserted into this field. This field may be left blank if you don’t offer discounts. The percentage can vary within Discount Code depending on the settings made in the Discounts screen. Regardless of its source, you can modify the percentage, If you wish, or enter it from scratch for a ‘Custom’ Line Type.
Price
This is the unit selling price, which is calculated by applying the Discount to the Reference Price.
NOTE: When the Discount field is blank, the Reference Price and the Price are the same value.
Total Price
This amount is calculated by multiplying the Qty by the Price.
Est Cost
This field is only visible when the Est Cost option is selected via the Screen Config button on the SO Types screen. This is the stock item or descriptor’s unit Estimated Cost at the time the line was created.
Act Cost
This read-only field is only visible when the Act Cost option is selected via the Screen Config button on the SO Types screen. This is the actual unit cost of the quantity picked to date.
Total Cost
This field is only visible when the Total Cost option is selected via the Screen Config button on the SO Types screen. This field displays the total estimated cost, which is the line’s Qty multiplied by the Est Cost.
Margin or Markup
This field is only visible when the Margin or Markup option is selected via the Screen Config button on the SO Types screen. This is the Margin or Markup (depending on your Profitability setting in the Sales Defaults screen) of the net Price over Est Cost.
Changing the Margin or Markup
You can change the Margin or Markup percentage by clicking the 3-dot button in this field. You are presented with a screen within which you can enter the new percentage. When you click OK, the Price will be adjusted to reflect the new Margin or Markup.
Total Tax
This field displays the sales tax total for this line item. It is calculated by applying the Tax Rate percentage associated with the Tax Code at right to the total price. You can manually override this amount, if you wish.
Non-Taxable Lines
If an item or descriptor is always non-taxable, regardless of customer, a non-taxable tax code Exception should be assigned against the stock item or descriptor. A non-taxable Tax Code has a zero percentage tax rate.
Tax Source
This field value indicates the source of the Tax Code at right. There are five possible values:
Header
The Tax Code at right is the Tax Code from the sales order Header tab.
Item
The Tax Code at right is a tax code Exception designated in the stock item master record.
Descriptor
The Tax Code at right is a tax code Exception designated in the descriptor master record.
Tax Matrix
The Tax Code at right derives from the Tax Group Matrix and is determined by the Tax Group associated with the Sold To customer master record combined with the Tax Group associated with the item or descriptor master record.
Manual
The Tax Code at right was selected manually from the lookup.
Tax Code
Each line item is assigned to a Tax Code, which gets its default value from the Tax Source indicated at left. You can manually select a tax code exception from the lookup.
NOTE: A Tax Code can be taxable or non-taxable. A non-taxable Tax Code has a zero percentage tax rate.
Required Date
The line item Required Date as a standard target date that drives MRP generation and determines job and picking priority. For M items the date is established by the item's planned Time to Shipment target. The Required Date is the system internal planning date and the Expected Ship date is the customer communication date.

Related Video:
Training Guide - Managing SO Dates
The Required Date drives MRP and shop priorities
The line item Required Date is the target demand date that drives MRP generation and job and picking priority. The default Required Date is established by the item's planned Time to Shipment target and thus reflects your company's time to shipment strategy.
Click the down arrow to view Required Date origin details
Click the down arrow to view the Required Date origin details or to change the date for a blanket sales order. The inquiry displays the settings that comprise the item's planned Time to Shipment target -- the Item Type (Manufactured or Purchased), the Order Policy, the line item Creation Date, the item's standard Lead Days and Job Days, any SO Extra Days specified in the SO Required Dates screen, and the calculated Target Date.
NOTE: The Order Policy, Lead Days, Job Days, and SO Extra Days are the settings that were in effect at time of line item creation and may differ from their current values.
Leave the default Required Date as is
Always leave the default line item Required Date as is so that it aligns with MRP planned job dates and provides consistent time to shipment from one order to the next over time. The only exception to this guideline is for blanket sales order entry where the date is manually entered as a future ship date requested by the customer.
The Required Date is a target ship date
The Required Date is a target ship date that does not adjust to particular situations. Instead, adjustments are made by MRP and shop activities to meet the target date. Here are a couple of examples:
•When an unusually large order is entered for a Stocking order policy item that is not covered by stock on hand, the Required Date stays fixed as is and does not get moved out. Instead, MRP immediately generates a job to replenish stock and the early Required Date gives the job high priority in work center queues to automatically expedite the job.
•When an unusually large order is entered for a To Order policy item, the Required Date stays fixed as is and does not get moved out. Instead, MRP immediately generates a job to order and the Required Date gives the job higher priority in work center queues to meet the target required date.
The Expected Ship date is the customer communication date
If you know that you will not be able to ship by the Required Date target date or if you wish to have a bit of cushion in your initial shipment target date, you should use the Expected Ship date as your customer communication date.
Never move the Required Date out when past due
Never move the line item Required Date out when it is past due. A late Required Date gives the order high priority in job release, work center scheduling, and order picking. If the Required Date gets moved out, the order gets lower priority, which is counter-productive. Instead of changing the Required Date, you can freely change the Expected Ship date (see next field), without affecting shop priorities.
Only change the Required Date to enter a blanket sales order
Only change the default line item Required Date when entering a blanket order where the customer requests a set of future shipments. In that case, enter a separate line for each shipment quantity and change the Required Date to correspond to the requested ship date. MRP is ideally suited for blanket orders because no action is taken against future shipments until the line item Required Date falls into the item's planning period action window.
The Required Date is updated with quote conversion
Whenever a quote is converted to a live sales order, each line item Required Date is updated relative to the current date by the item's Time to Shipment target.
Extend Required Dates with extra shop days if needed
(Sales - Sales Setup - SO Required Dates)
You can extend default Required Dates on an across the board basis by item order policy using the extra Shop Days settings in the SO Required Dates screen. Here are examples of how the extra Shop Days setting might be used:
•Against Stocking order policy items you may wish to extend Required Dates by an extra shop day because orders cannot always be shipped on the same day they are received.
•Against To Order policy items you may wish to extend Required Dates by one or more extra shop days to provide additional time for one-off BOM customization or other pre-MRP activities.
Avoid frequent adjustments
Avoid frequent adjustments to extra Shop Days settings because it can cause newer orders for an item to have earlier Required Dates than older orders.
Expected Ship
The Expected Ship date accompanies the line item Required Date and indicates when you think the item is likely to be shipped. The program automatically makes the Expected Ship date equal to the Required Date when a new line is created, when a quote is converted, and when the Required Date is modified for blanket order entry. Unlike the Required Date, which is an MRP demand date, the Expected Ship date can be freely changed without affecting MRP. This is the preferred customer communication date and the Required Date remains an internal planning date.
Related Video:
Training Guide - Managing SO Dates
The Expected Ship date does not affect MRP
The Expected Ship date is a customer communication date that does not affect MRP generation or job and picking priority.
Do not add padding or safety to the SO Required date - use the Expected Ship date instead
The SO line Required Date is the principle driver of MRP and system priorities. If you wish to give yourself some cushion on a delivery use the Expected Ship date as your customer communication date.
Use the Late Supply screen to update Expected Ship dates
Use the Late Supply screen to update line item Estimated Ship dates for sales order line items that will not meet their Required Date due to late supply from jobs or purchase orders of insufficient stock on hand. The Expected Ship date is for customer communications and can be freely updated as needed without affecting job or picking priority.
Foreign Price
This entry field is only visible when the Sold To Customer is assigned to a foreign currency. It displays the price in foreign currency and is populated by default as follows:
Price * Exchange Rate = Foreign Price
You also can manually enter a value, which recalculates the home currency Price as follows:
Foreign Price / Exchange Rate = Price
Link:
Financial Transfer Guide - Multi-Currency
Foreign Total
This read-only field is only visible when the Sold To Customer is assigned to a foreign currency. It displays the total price in foreign currency and is calculated as follows:
Foreign Price * Qty = Foreign Total
Foreign Tax
This read-only field is only visible when the Sold To Customer is assigned to a foreign currency. It displays the tax amount in foreign currency and is calculated as follows:
Foreign Price * Qty = Foreign Tax
CTO Job
This read-only field pertains to ‘CTO’ (custom to order) items only. When MRP generates a job directly from this sales order line, the linked job number is displayed in this field.
Warranty Code
This field is only visible when the Warranty Code option is selected via the Screen Config button on the SO Types screen. When this stock item or descriptor is assigned to a Warranty Code, it displays in this field. When this field is visible, you have the option of making an alternate selection.
Notes Side-Tab
Line Notes
The Line Notes from the stock item or descriptor master record get passed into this notes field. This text is printed underneath this line item on these documents:
| • | Quote |
| • | Acknowledgment |
Invoice Notes
The text entered in this notes field is printed underneath this line item on the invoice.
Buttons
New Line
Click this button to create a new line item. The program creates a new row in the grid and increments the previous Line No by ‘10’. The Line Type defaults to ‘Stock’ and the cursor is positioned in the Reference ID field.
Speed Entry
Select this option to launch the Speed Entry screen, which enables you to rapidly generate a set of sales order lines.
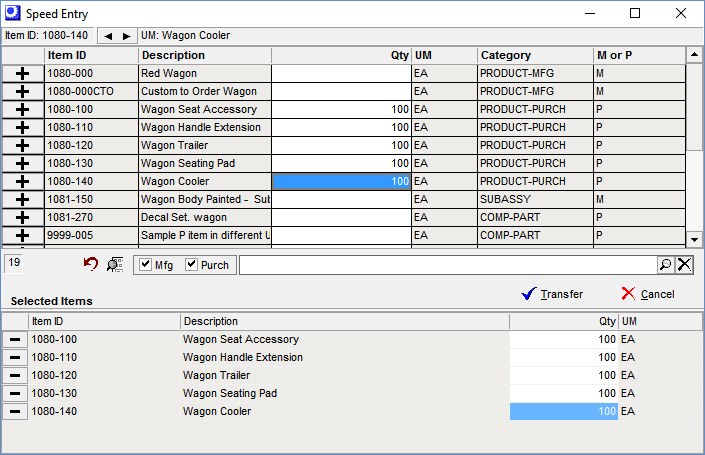
Upper Grid
Stock items are selected in the upper grid. Options in the lower panel enable you to you filter the grid by manufactured or purchased items, or you can click the search icon for a list of advanced search options.
The screen is optimized for keyboard entry. As you type each character of the item number or description, the cursor progressively moves to the closest match. You can use arrow keys to navigate in any direction. When you find the desired item, click the Add button at left or press the Enter key to launch the Order Qty prompt.
Order Qty Prompt
When a selection is made, you are prompted to enter the Order Qty. You can click OK to press the Enter key to close the prompt. The selected item is listed in the Selected Items grid. In the upper grid, the Order Qty is displayed against the item for reference.
Selected Items Grid
The selected items are listed in the lower grid. You can use the Tab key to toggle back and forth from the upper grid to the lower grid. To remove a selection, navigate to the Delete button at left and click it or press the Enter key. You can also delete a record while in the upper grid by pressing the number pad minus key.
Transfer Button
When your selections are completed, click the Transfer button to add them to the sales order. The selected items are added in the order of selection and are numbered in increments of ‘10’.
Copy Detail
When you click this button, two options are presented in the Copy Details screen.
Template
You have the option of copying in a set of line items from a sales order template. After you select the Template option and click OK, you are presented with a list of available templates. Highlight the desired template, then enter a Qty Factor, if applicable, which is a multiplier that gets applied to each template line item’s quantity to determine each sales order line item Qty. Click the Transfer button to transfer the template line items into the sales order.
Sales Kit
You have the option of copying in a sales kit, which consists of a parent descriptor and a set of kit components. After you select the Sales Kit option and click OK, you are presented with a selection screen. Select a sales kit descriptor from the lookup, then enter a Qty Factor, if applicable, which is a multiplier that gets applied to the parent descriptor and each component’s kit quantity to determine each sales order line item Qty. Click OK to transfer the sales kit into the sales order.
